Saturday, May 26, 2018

Everything's coming up roses

(The monthly scrap giveaway is at the end of this post!)

Good golly, it's the end of the month already! Okay, it's really close. I'm stunned that it went so quickly.  But look what we got in May-- roses!


Those will lift anyone's spirits, won't they? Yellow ones are my favorite, but pink is also quite festive.  And now that the rain hasn't been beating them down, these actually have some petals left on them!

Today I'm rounding up the pink RSC projects for May.  I love pink and use it all the time, so I had a lot of fun with this month's projects.  First up are the patchwork scrap stars:


These are super-happy looking, aren't they?  Yes, the star on the left is orange, but doesn't it look good with those pinks? I didn't realize I had so many different pink prints, and some of those have been hanging around here for years.  It's good to see them being used.

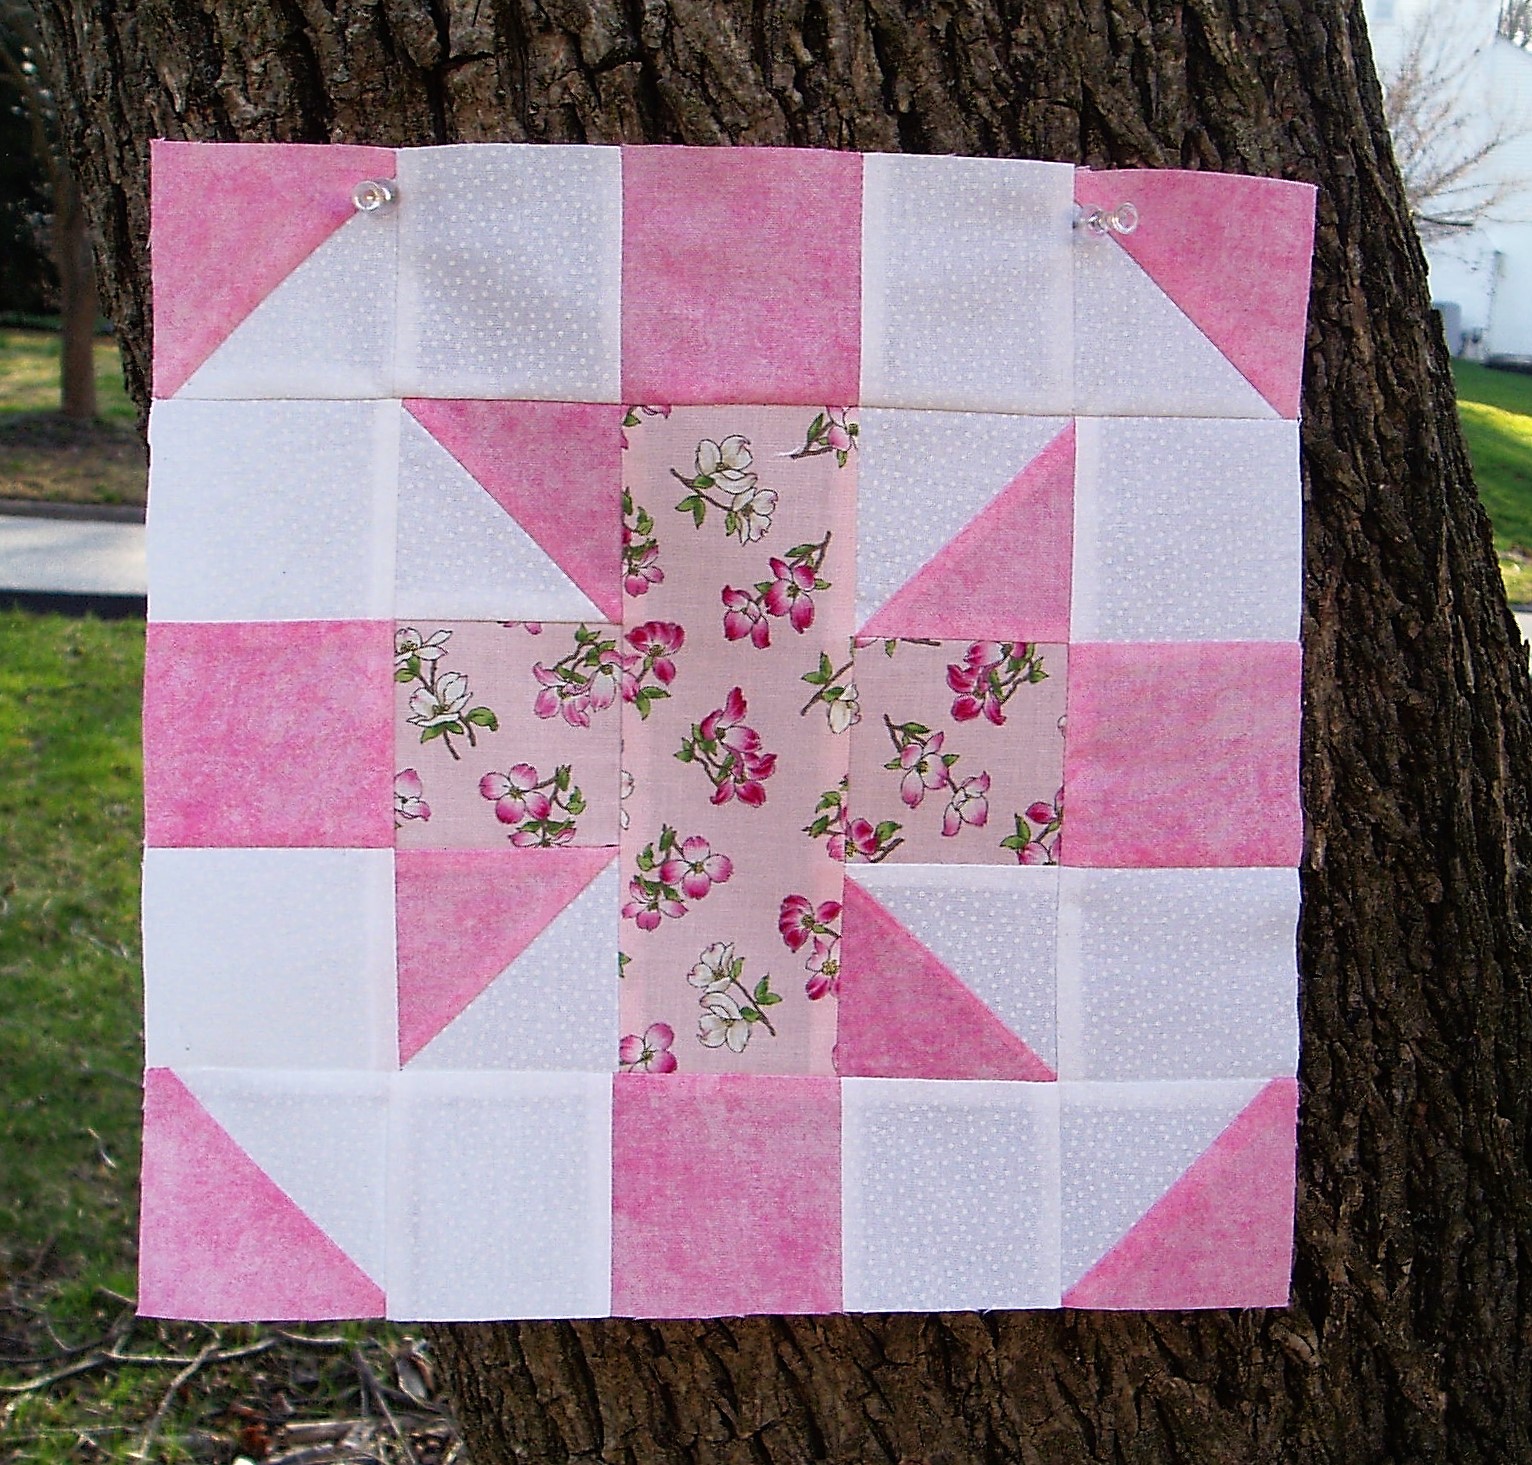
Then there are the 9-patches for this month:


How do you like that "clothesline?"  I just wanted some pretty pictures with the pink geranium.  I'm going to call these "hollow 9-patches" from now on.  I think that's a better name than "9-patches with white centers" and it's a good description of the blocks.  I got eleven 9-patches this month, which brings my total to 68. 

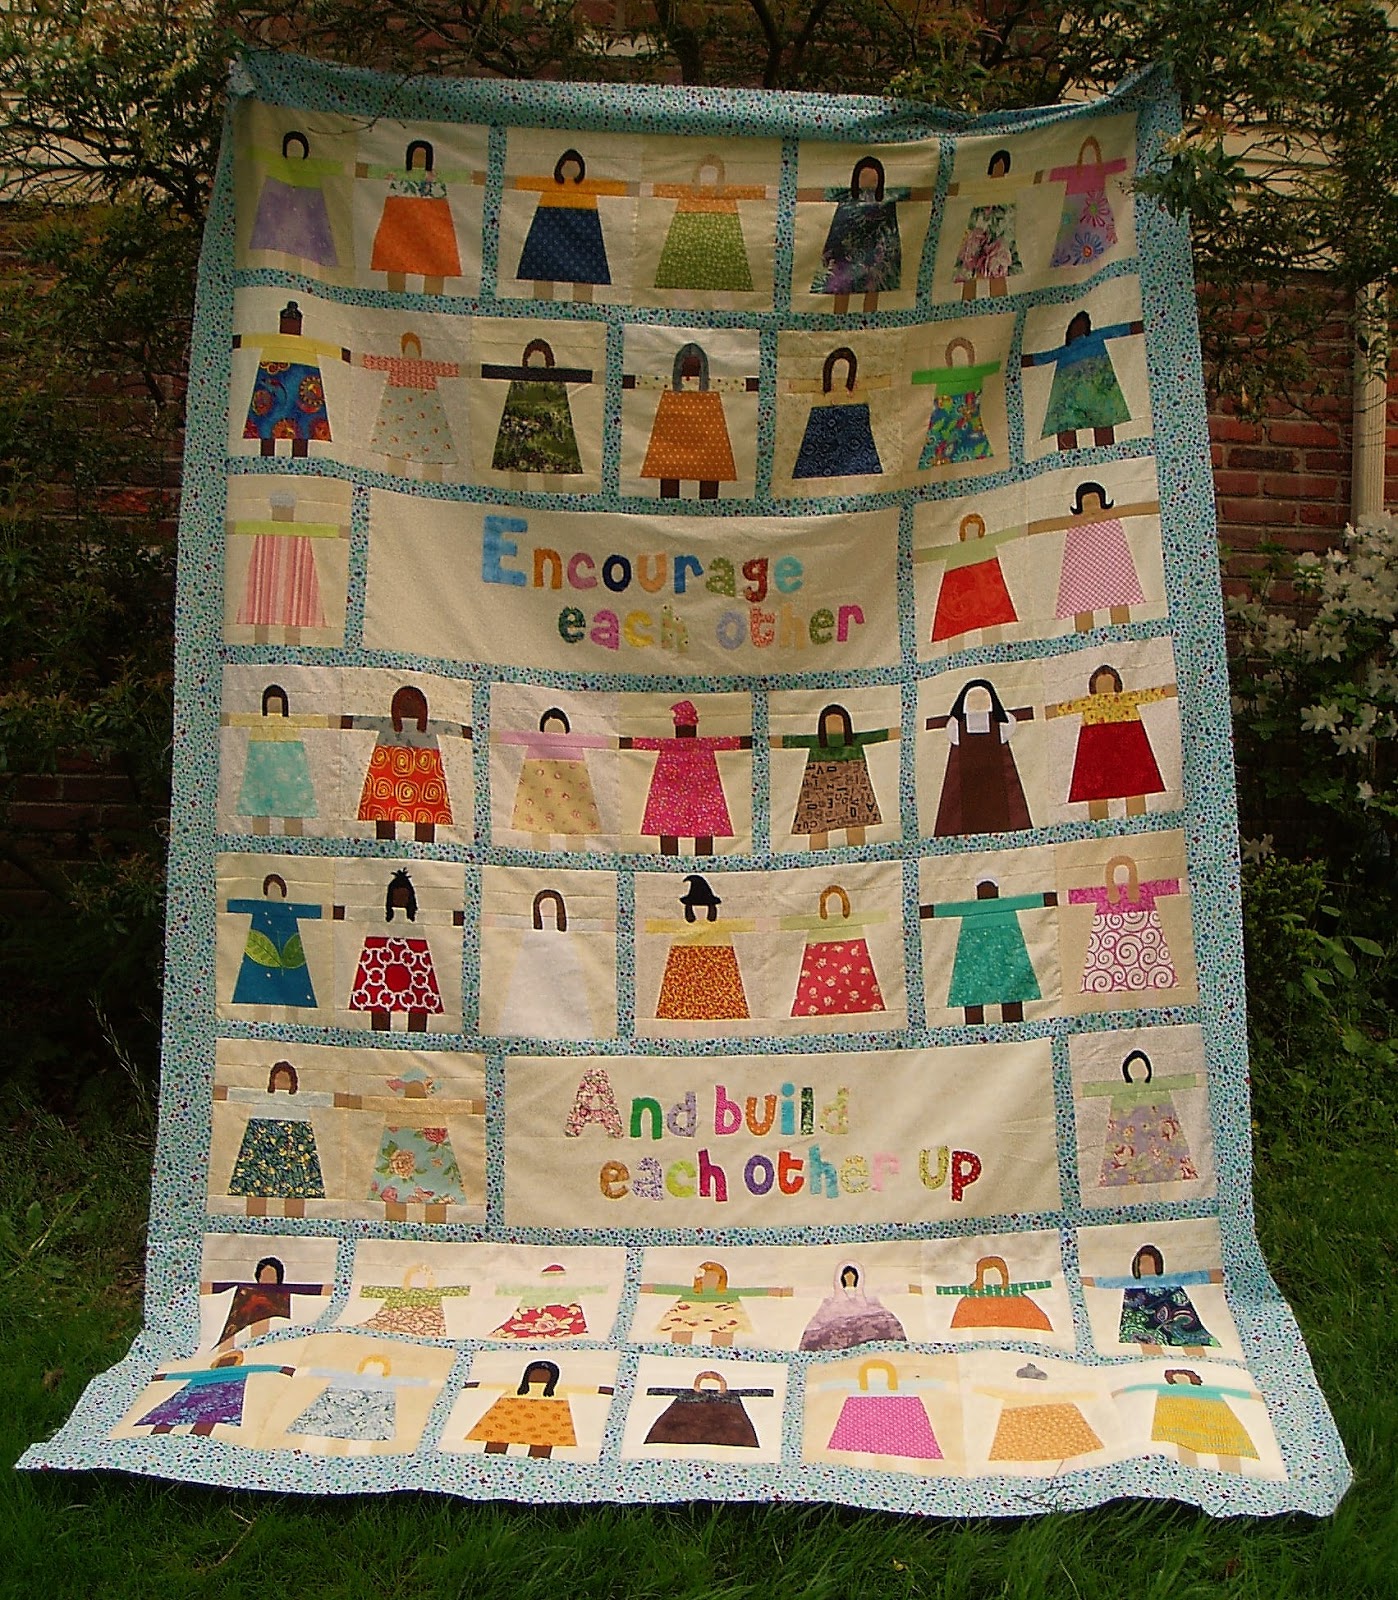
And now to the giveaway!  As I am every month this year, I am giving away the pink scraps remaining in my bin after I finish the RSC projects.  Nothing wrong with any of them; I'm just tired of looking at them.  Since I love pink, I had a lot of pink scraps to start with, so there is a nice selection this month:


This month there are the pink scraps, a handful of both 2-inch and 1-1/2 inch squares, and about 50 1-1/2 by 9-1/2 inch pink strips.  The strips are what's left from some sashing that I cut wrong when I was making a quilt several years ago.  I cut every piece of sashing for an extra-long twin the wrong size, so I've been using these pieces up for years and now I'm just done with them.  But I'll bet someone out there can think of something creative to do with all those pieces.  The package is finished off with the pink/ red fat quarter in the center of the picture, only because I can't decide if it's pink or red. 

The giveaway is now closed! Thanks everyone!

All you have to do to receive this package is leave a comment on this post! Sadly, I can only send the package to the US or Canada because of postage.  I'm sorry, European friends!  We'll think of something for you later this year.  If you are no-reply, please, please leave an email address!  If I can't contact you, you can't win.  I will use the random number generator to choose a winner on Tuesday morning, May 29th. 


Have a wonderful Memorial Day weekend, and don't forget to give thanks for those who gave their lives for our country and our freedom.  It's not all about the burgers!

Sharing at soscrappy for RSC18.

Friday, May 25, 2018

An old-fashioned finish

The rain has finally stopped!  Okay, it has stopped for now, because it's going to rain again this weekend,  but we have had enough of a respite to cut the grass, plant some new plants, clear away the broken branches, and generally breathe again.  The sunshine has been wonderful, and that grass was getting really, really tall.  Better weather makes you feel human again.  And, you know, it's nice that some of the mud is gone, too.

The beautiful weather for the last couple of days also let me take some pictures of a great finished quilt (if I do say so myself!)  Here is the finish that has me seriously smiling:


Whoo-hoo! This is a quilt I just can't stop calling Grandma's Quilt.  I started this long ago as a project for RSC16, finished the top in January, and now it is a cozy, finished quilt.


I love this quilt so much.  The block is the modern version of a block made by my great grandmother, which is one of my most treasured possessions.  (If you're interested, a tutorial for the block is HERE.)  The blocks are each 12 inches and are made with hand-dyed fabrics from Vicki Welsh, except for the white, which is all a basic Kona white.  After I took these pictures, which involve dirt and nature, I washed the quilt and not a single one of the hand dyes ran.  Not one! Not even the burgundy block.  I wouldn't buy hand dyes from anyone else.


The backing for this quilt is a vintage sheet, which turned out to be a great backing!  The colors are perfect with the top and it is so soft and cozy.  The binding is very narrow in a pale blue, mostly because that's all the fabric I had left.  The quilt finished up at just about 75 by 86.


Grandma's Quilt was quilted by Diane Minkley, and she did a fabulous job!  The simple feather is kind of old-fashioned and modern at the same time.  It really shows up well because I used wool batting, which is very light and very warm.  I hand-stitched the binding to the back of the quilt and I had to lay the quilt on the coffee table instead of on my lap because it was so warm.  Wool quilt in summer equals heat stroke, I think.


I could literally weep when I look at this quilt.  There's a real difference between having the top finished and having the quilt finished, and finally having it finished makes me feel like I have honored my great-grandmother and made something she would be happy with.  Gosh, that's sappy, isn't it?  I think she would get it, though.


Now that I have finished this one, I'm going to relax all weekend, when it will be raining yet again.  It's Memorial Day weekend in the US, so we'll be going to the parade and then breaking in our new grill.  Burgers on the deck!  We may also go check out some tall ships if the weather allows.  I hope all of you have a wonderful weekend as well!


Sharing at Confessions of a Fabric Addict, Finished or Not Friday, crazymomquilts, and soscrappy for RSC18.

Friday, May 18, 2018

Walking along in the rain

Well, folks, today's finishes are brought to you by the buckets and buckets of rain we've had this week!  I was planning to work outside, but not very much else got planted or dealt with because it has not stopped raining all week.  And I don't mean gentle showers!  It's been really good for the plants, though.  I can tell because the grass is nearly knee high in some spots.  And I can't even cut it because it's too wet!

Instead of building an ark, I finished off the two small donation quilts that I used to try out some new walking foot quilting techniques.  Here's the cheerful pair, photographed this morning because there was not a single opportunity to take them outside yesterday:


I love these so much!  They are cheerful, extra cuddly, and completely quilted by me!  The measurements for making these little quilts can be found HERE at the end of the post.  They are simple to make and look really cute.


I started with the somewhat darker version and use some of the simpler patterns, just to get a feel for how this would go.  Turns out it went just fine!


These patterns were super easy, including the scallops in the blue triangles.  I'm not thrilled with how they flattened out when they were echoed, but all curves do that to some extent.  I wonder if a different type of guide bar for my walking foot (to keep the lines evenly spaced) would help.


The brighter quilt was so much fun because I used some more complex patterns on this one, including triangle spirals and the diamonds in the red triangles:


None of these were difficult, but they did take a little time and a bunch of twisting and turning.  If I had to pick a favorite motif it would be the curved cross-hatching in the outer green triangles:


This was one of the easiest motifs, but didn't it turn out great?  Now that they're done, these two little quilts will be donated for Sarah's Hands to Help Challenge.  I think some little people will like them, don't you?  By the way, the new batting I used turned out great, too.  I would definitely use it again.  It's a very good weight.


I have been using these two books to help build my walking foot skills:


Both of these are very good and helpful.  Walk by Jacquie Gering has a lot of information for beginners, but she also gives a lot of stitching designs, including how to mark them and the most efficient way to work through the designs in a quilt.  Explore Walking Foot Quilting by Leah Day is also a really good, helpful book.  Her stitching designs are different from those in Walk, and she also has some patterns for practice pieces along with ways to quilt them.  And just look at this project for mastering the walking foot:


Doesn't that look like fun to make?  She also gives a lot of direction and tips on how to quilt this piece.  The books are different from each other and have different stitching designs, and I really do recommend both of them.  (I am not an affiliate of any kind, so my opinion has only been influenced by my own experience!)  The only thing I wish was different on them is the binding.  I'm taking them to Staples to have a spiral binding put on them so that they will lay flat and be easier to use.


Well, it's still raining, but if you're reading this, that means that I managed to get some pictures between the raindrops.  I hope you all have a nice dry weekend!  One of my sisters will be coming for the next couple of days, so I hope we get a chance to do some sight-seeing.  Or really anything that's dry, at this point!

Sharing at Confessions of a Fabric Addict, Finished or Not Friday, and crazymomquilts.

Wednesday, May 16, 2018

Midweek update

Well, folks, I have hit "submit" on my last grades, returned my library books, thrown out the old pens, and now I am free for the summer!  Okay, free-ish, because I still have a *lot* of work to do this summer.  I was making a schedule for myself a few days ago and there is just not enough time to get it all done.  I may have over committed.  What a surprise, huh?

So far I've been letting my brain rest a bit by working on the yard and the plantings around this place.  It's been neglected for years and years and we're finally taking care of it, so there is a lot going on.  Yesterday, I planted three trees and two bushes:


After that I stopped because I thought it would be bad for my neighbors if I passed out on the lawn and they had to see it.  I was just thinking of them, you know.  We have a huge landscaping project ready for the backyard, but we have had storm after storm that has delayed it.  I'm okay with that, as long as I don't have to be the one driving the bulldozer when it's 95 degrees outside.

All of the work that I have to accomplish means that this summer is going to be a little different for my sewing, but in a good way!  I have several projects to finish off before I start what I'm thinking of as "the summer projects,"  so I'm really planning for a flurry of finished things in the next few weeks.  I basted the two small practice quilts and got started quilting those with the walking foot:


For these, I was planning to leave out the batting because I put flannel on the back and I'm donating these for Sarah's Hands to Help Challenge.  One of the organizations this year wants quilts that fit into a backpack, so I thought they would fold up a little smaller without batting.  I didn't like them when I layered them, though, so I got this batting at the J-store:


This is new to me and made by the same people as make Warm and Natural, which I think is very heavy.  This is much lighter and is working out okay so far.  For those who know Hobbs 80/20 batting (which is my favorite), this is lighter than that, too. 

The only other sewing thing I've done is buy new fabric!


I had an epiphany about reds, so of course I've been buying some to test my theory, which is okay because I have so very little red.  New fabric in any color always lifts your spirits, though, doesn't it?

That's the big update from here! One last thing-- is anyone else having a rash of new followers with names like "sexylana" and a Russian address?  It seems like they're following random blogs, including this one, then they get deleted, then they follow again.  I talked to the hubs about it (he knows about these things) and he's pretty sure it's nothing to worry about, but I'm just wondering if anyone else has had this experience.  Of course, we all know why they'd want to follow quilting blogs-- that lingerie can't be very warm.  They'll need several quilts!

Okay, I'm rambling now! My brain still needs rest! Have a good week!

The third tree is there, just hiding! It has a white tag as well.

Sharing at Let's Bee Social.

Friday, May 11, 2018

All dolled up

Hi everyone!  It's been a hard week for me, as it always is early in May, but I'm happy to say I've lived through it!  I'm even doing okay with the "pollen bomb" that we are experiencing right now, although it does look to others like I've been crying.  I'm not sad, I'm just allergic, and my eyes show it.  And so does my car-- it rained, and now my white car is coated in a gross greenish layer of allergens.  Anybody else having a problem like that? We keep the car wash in business, I think.

Has anyone got a quilt in progress that you love and can't wait until it's finished, but it keeps getting held back for some reason?  I have one of those, and I'm super happy that I finished the top and can show it off today.  Here are some fancy ladies who really want to meet you:


Happy dance!  This is the finished top for a project that I started in 2015.  Yes, three years ago! Making these blocks was my RSC project for the year, so all of the dresses are made from scraps.  Some of those were ugly bits, too, but they work great as dresses.


The pattern for these is Paper Dolls by Cozy Quarters, and it is available HERE.  (I adapted the dolls some, so mine are a little different from the pattern.) I love all of these dolls, and I feel like each of them has her own personality.  Some of them are based on real people, but some of them just came about because of the scraps I had.  I had a lot of fun giving them each a hairstyle and thinking up their backstories.  Kind of like we used to with real paper dolls, remember?


I don't know why it took me so long to finish this top when I have such positive feelings for these blocks.  When I did finally start to put it together, I had a brainstorm and added the quotation that's in the top, which delayed things a bit more.  The quotation is done in freezer paper applique, stitched down by hand.  Yep, that took a while!  It was fun to do, though.  The letters are also all scraps.


Some of you will recognize the quotation as an excerpt from the Christian New Testament, but it's not meant as a religious statement-- or a political one, either.  I just felt like it added a positive note to the quilt and made it more interesting.  Plus, I really do feel that women have to support, encourage, and help other women.  If we won't help each other, who will?


You may have noticed that it was hard to get a picture of the whole quilt top.  This baby turned out much larger than anticipated!  Each of the doll blocks finishes at 8 by 10 inches, and the whole top is about 66 by 95.  This is way bigger than I had planned back in 2015! I'm going to have to rig up something to get a full picture once it's quilted.

Speaking of quilting. . .


Can it be?  Yes, that is the backing and batting for this quilt!  I plan to quilt this myself and hopefully have it finished sometime before the end of September.  No real reason for that deadline, but it seems doable to me.  I'll have to get some more practice with the walking foot before that happens, but I've been working on it.  It will be nice to have a project to quilt that I'm excited about.

So there we are! The project from 2015 is now ready for quilting (after a really good pressing, because it was starting to rain when I took these pictures.)  I am breathing a happy sigh of relief and looking forward to a finished quilt for this fall.

Hope you all have a lovely weekend!  Sunday is Mother's Day in the US, so a very happy day to all mothers of every kind.  I even have some flowers for you:


Happy Mother's Day all, and happy weekend!

Sharing at Confessions of a Fabric Addict, Finished or Not Friday, crazymomquilts, and soscrappy for RSC18.

Saturday, May 5, 2018

Squared Away Block 5

Hello again, and welcome back to the Squared Away  quilt project! This free project was designed by me and Angela of soscrappy as a fun project to use up some of our scraps, especially the scrap squares.  You can find links to the earlier blocks both HERE and HERE.  Come on along with us and make some blocks!

Our colors for this month are pink and rose, the colors of spring roses.  Here is our block for the month:

Baton Rouge Square, Nancy Cabot, 1936

You would think that this is yet another Red Cross block, but it's not!  This block is Baton Rouge Square, a Nancy Cabot block from 1936.  It is easy to construct, but pay attention to the directions of the hsts as they are easy to mix up. (Ask me how I know.)

Let's get to it!

Cutting for a 10-inch block:

I made my blocks using strip piecing and methods that use larger cuts, but if you have squares already cut, go ahead and use those. Waste not, want not!


From the main pink, cut:

1 5-3/4 inch square* (for hsts, so you can oversize if that's something you do)
1 2-1/2 by 10-1/2 inch strip

From the second pink, cut:

5 2-1/2 inch squares OR 2 2-1/2 inch squares and 1 2-1/2 by 6-1/2 inch strip

From the background, cut:

1 5-3/4 inch square*
2 2-1/2 by 10-1/2 inch strips

Construction:

First, make the hsts.  Use the 5-3/4 inch squares of the first pink and the background to make 8 2-1/2 inch hsts using the Magic 8 method.


Next, use the 2-1/2 by 10-1/2 inch strips of the pink and the background to make a 3-strip set, with the pink in between the two background strips.  Press to the background pieces. Cut this into 4 2-1/2 inch sections.  (A little bit is included for straightening if needed.)


That all of our units--on to the assembly!

Assembly:

First, make the center section.  Take four of the hsts and all of the pieces of the second pink and arrange them as shown, paying attention to the directions of the hsts:


Stitch together.  If you want your seams to nest properly, press to the second pink, including the second pinks at the center.  (You can see that I used a 2-1/2 by 6-1/2 inch strip instead of squares.  This saves two seams.) This unit should measure 6-1/2 inches square.

All that's left is to lay out all of the remaining pieces and units as shown:


Join the units into rows and the rows into a finished block.  Press well, stand back, and admire your beautiful block!


Here are all of my blocks for this month:


You can see that I used a yellow background for one of the blocks.  It doesn't show very well in the pictures but looks good in person. And I'm thrilled to use those novelty prints in the bigger blocks.  Don't they look like packages tied up with bows?

Finishing these blocks means that we are halfway to a finished quilt! I hope your blocks are looking great and your quilt is coming together.  Remember that Angela has a linkup every Saturday at her blog to show off your blocks! If you post your blocks on Instagram, you can also link up at Angela's, and be sure to tag me (@academicquilter) and/or use #squaredawaybom so we don't miss your beautiful blocks!

The next exciting block for our quilt will be Saturday, June 2, so meet back here!  Be sure to bring plenty of scraps!

Sharing at soscrappy for RSC18.

Friday, May 4, 2018

A church in winter

Hi there, everyone!  How are things with you?  It's been pretty stressful around here, as well as hot and humid.  "Hot" as in it was over 90 degrees the past couple of days.  Not to worry, though, because apparently we're in for a couple of big storms and then cooler temperatures.  Which is good, because I have a lot of work to do outside before our massive landscaping project.  Which I will get to just as soon as I finish these papers. . .

It may be hot, but I'm thinking of winter right now, because I have finished my winter church project!  It took a bit of doing, but here is the "winter" panel:


This is St. James Church in Stanton, Delaware, near Wilmington.  It has a fascinating history and you can read more about it HERE.  This church was established in the early 1700s and the building here dates to about 1821.  It is on the National Register of Historic Places and is a cool place to visit if you ever find yourself in Delaware.


I decided on this church because it is so unique, both in the shape of the building and the setting, plus all of the details that make it so different from others.  There is a cross at the top that will have to be made from thread when it's quilted because it's quite thin. The door there is actually quite tall and heavy, just like you would think a colonial church door would be.  The little bump out on the right is actually where the sanctuary is located, and the windows are not stained glass, but are the colonial 12 over 12 windows.


Plus, look at that cupola!  How great is that?  It looks huge here, and it is, because I was careful about the proportions.  It's really that large.  The bell is just kind of floating there, but there will be some other details quilted in, including the connection of the bell to the rest of the building.

This is actually the second version of the church that I made.  Here is the first attempt:


Look at all those great details! Even those handrails are pieced in. And it wasn't even finished yet-- and there was the problem.  At this point, the church was 37 inches wide, with the portion on the right not even pieced in yet, not to mention any grounds or the roof or anything.  This was obviously too big, because I want a quilt with four churches and I don't want it to be king sized.  I made a mistake in that I started with the door, when I should have started with a larger area to establish the overall size.  I didn't cry when I realized the problem, but I did get a little frustrated and put it in time out for a while. (This version is still there. It will break my heart to throw it out, so I'll cut it up for some scraps.)

Making windows

So, yep, I started over.  I'm still not completely happy with myself, because I didn't leave enough space for landscaping, which is a part of the charm of the church.  This panel is about 30 inches wide by 36 inches tall, which is good for a church with a spire. I'm not going to promise that I won't make another one that will show more of the grounds and such.  That would mean losing some of the details, though, so everything is a trade off.  And I definitely think I will feel a lot better about it after I quilt in some more details and have it in a quilt with some other churches.


The fabrics here are mainly Grunge by Moda, in two different colors, even though that isn't really evident in the photos.  The roof fabric is something called Evening Mist by Sentimental Studios and looks pretty grungy, and definitely like a weathered roof.  I went back and forth on the fabric for the sky, but ultimately went with a lighter, grayer blue from Timeless Treasures because I felt like it looked more like a washed-out winter sky.  The other fabrics are various bits from my stash.  If you notice, the windows are gray, not black, to make them look washed out as well.

So now I've finished the first of four church panels!  And I've picked the next church, and even pulled the main fabrics for it:


Notice there is not even a speck of green in the St. James panel, so this will definitely be different!

If you'd like to make any building of your own in fabric, I have learned a lot from Julie Sefton's book Build a Barn, No Pattern Construction.  It is a very useful book, and you don't have to make barns, you can make any building.  Really!  You can find it HERE in soft cover or you can get a digital copy HERE.  It's well worth it!

Everyone have a wonderful weekend!  I'll have a pen and not a needle in hand, so think of me when you sew something fun!


Sharing at Confessions of a Fabric Addict, Finished or Not Friday, and crazymomquilts.