Saturday, September 29, 2018

Quilty blue persuasion

(For anyone interested, there are TWO scrap giveaways at the end of this post!)

Holy cow, it's the end of September! Pretty soon it will be Halloween, and then 2018 will be gone before we know it.  I am not ready for this!  As it is, we're up to that part of the year when I'm ready to wind up my RSC projects and get some quilt tops made.  And we're also to the part of the year where we hit the colors that I seldom use and therefore have few scraps to work with.  Kind of a good problem to have, though.

Since I put the galaxy stars into a top already, all I have left are the patchwork scrap stars and the hollow 9-patches.  Let's look at those first:


Only three! These were the squares that I had cut already.  I could have cut some more, but that would defeat the purpose of using scraps.

I also made some black hollow 9-patches:


Confession:  these were the only things in the black scrap bin.  Really.  I have something like four black squares left.  Pathetic, I know.  I like the color variations in these, and now I think I have almost enough hollow 9-patch blocks for the two quilts I want to make.  I'll have to count and make sure that I have enough of them next month.

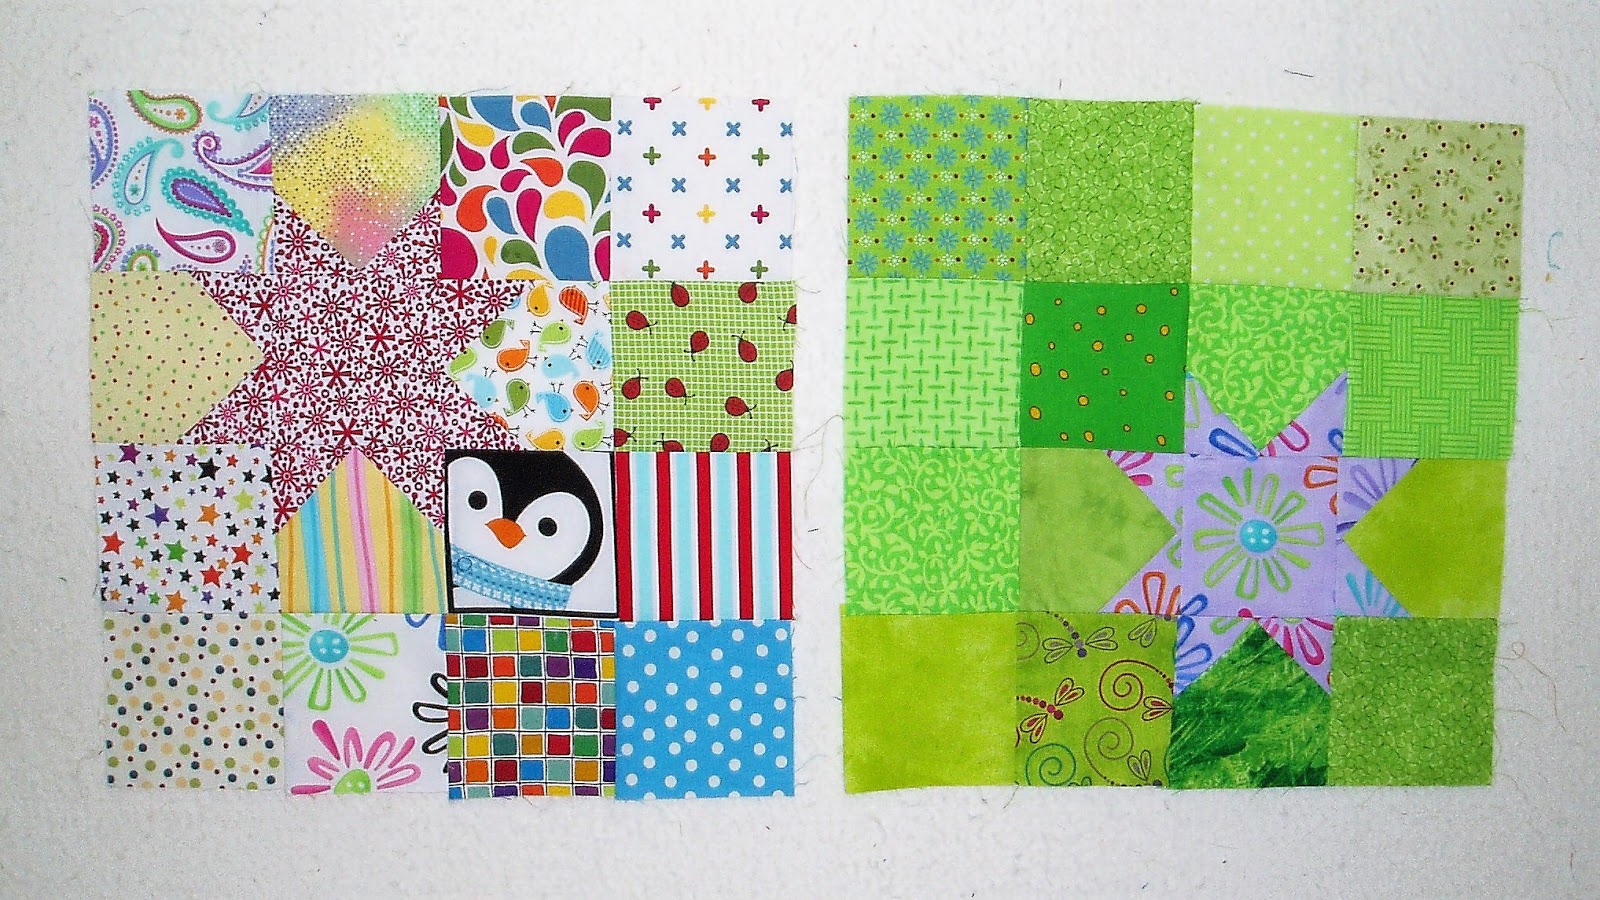
For the patchwork scrap stars, I did not make dark blue ones, both because I didn't want a dark blue block in the quilt and because I was just too lazy to cut up any of the blues.  Instead I have these:

Yes, it was raining, so we get indoor pictures today.

Okay, that one on the right is a little wild, but I think it works okay with the rest of the blocks.  I really love the little penguin peeking out.  This block was just leftover bits and pieces with a red print star, and the other is obviously a lime green block.  Still have plenty of those pieces left over, too.  I do like the fussy-cut purple star, too.


So those are my remaining RSC projects!  Next month I should be able to start putting these together into some tops.  That's the hope, anyway!

As I have each month this year, I'm giving away what's left in my dark blue scrap bin this month.  These giveaways have helped me so much and I'm so grateful to all of you who have taken these old, unloved scraps off my hands.  The empty bins have opened up a whole new world of ideas for me, so thanks!

Here are the dark blue scraps:


There was more there than I thought there would be! Since I seldom use dark blue, these are pretty old, but they also include the (very few) leftovers from my blue-background projects this year, including a few small pieces of the Kona solid I've used for the larger Squared Away blocks.  There are also a handful each of the 2-inch and 1-1/2 inch squares.

But wait, there's more!  Take a look at these florals:


This is the entire contents of the floral scrap bin, which was so full that I had to use rubber bands to keep the lid on it.  I doubt that I will ever use most of these.  There is a piece in there that I know is from 2012 and others that might be older. (Eep!)  There are newer ones, too, of course.  I would also like to give these away to someone who will swear on a stack of quilt books to love them and use them.  They are very pretty, and there is quite a bit of fabric here.  I didn't weigh it, but really, I could not get that bin closed any more!

This giveaway is now closed.  Thanks all, and congratulations to Lori and Liz.

If you would like to have one of these sets of fabric, delivered to you in the US or Canada free of charge, all you have to do is leave a comment on this post!  Really! Tell me which you would like, the blues or the florals, and I will separate the comments and use the random number generator on Monday evening, October first, to choose two winners.  Please, please, if you are no-reply, leave an email so that I can contact you.  If I can't reach you, you can't win!


Hope you are having a great weekend with lots of cool temperatures and low humidity.  If that ever happens here, I'll be sure to let you know!

Sharing at soscrappy for RSC18.

Tuesday, September 25, 2018

Block by block

Hi everyone!  Well, the leaves have officially started to turn, so it must be fall.  I can see yellow leaves on my neighbor's trees, though ours are still all green.  Plus I noticed that it's definitely getting dark earlier in the evening.  Thankfully, I have those great lights in my sewing room now so I can still see everything no matter how bleak it is outside.

Right now I'm working on blocks for two quilts.  First up is this new one:


One of the colors for the rainbow scrap challenge this month is dark neutrals, so I pulled out the bin of black fabrics.  It was almost comically empty, just a few small squares.  It happens, though, that I have a bunch of fabrics with black backgrounds that I have never used. 


Aren't those pretty ? They really deserve to be used, but I've never found a way to incorporate them into my quilts.  I should totally work on that, but until then, I decided to use them in a quilt all their own.  Sounds fair, right?  Plus it will get them off the shelves and into something cozy.

The block is from my Intricate Stitches quilt and the pattern can be found HERE.  In a bit of serendipity, one of the names for this block is Black Beauty.  It was meant to be! I've got ten more of these cut out and ready to stitch, and I think I'll probably get 20 blocks out of the pieces I have.  And then I'll also have some black scraps!

The second project is the fall flowers quilt:


If you recall, these are flower blocks that I'm making from the bundle of fabrics that I chose for Bernie's shop.  (There are still a few bundles available HERE, or you can find some other fun stuff you like there.) I've been having fun making a variety of flower blocks using the fat quarters from the bundle.  Some of these I've also done before, but some of them I just drafted for this project.  I'm not sure about the two orange squash blossom blocks so I may yet take one of them apart.  I think I can manage to get 4 or 5 more blocks from the bundle, then I'll figure out some alternate blocks to make the quilt a decent size.  What if I used the adobe-colored scraps to make some fall leaves?  Hmmm. . .

Lots of little pieces in a complicated layout--just what I love!

That's my current progress!  I'll keep working on these, but I've also pulled out the walking foot because I've got several quilts basted and ready to go and I really need to get to them.  I need the room!  Plus, it's getting cooler and it will be cold before you know it, so I'd better finish up at least the quilts for my daughters.  And we all know I have to finish them at the same time, right?

Everyone have a good week!  Hoping to have a binding on something before this week is over!

Sharing at Let's Bee Social and soscrappy for RSC18.

Friday, September 21, 2018

Mission San Miguel

Hi everyone, and happy last day of summer! I know it doesn't feel like it everywhere (certainly not here!) but fall officially starts on Saturday.  I am ready for some cooler temperatures, but very unready for the season that follows the fall, which shall go unnamed for now.  So far, we have some dead leaves that have fallen, but nothing colorful yet.  Oh, and the tomato plants have given up, though they did produce really well this year.

This week I'm showing off my second free-pieced church!  Let's take a trip back in time, to last spring, so that we can pretend that I actually made the free-pieced church for the spring panel *in* the spring.  Just use your imagination! 


This is San Miguel Chapel, also known as Mission San Miguel, in Santa Fe, New Mexico.  It's reportedly the oldest church building in the continental United States, built between 1610 and 1626, long before any church building in New England or Virginia.  You can read much more about the church HERE.  It's an exciting story, really, because the church was originally constructed by the Tlaxcala Indians and it's been destroyed and rebuilt several times.  There are many historical pictures and pictures of the inside online as well.


I made this church using techniques detailed in Julie Sefton's book Build a Barn, No Pattern Construction. There was no pattern or anything, I just used a couple of photos that I had (which are not suitable for publication here since I knew even less about photography years ago) and pieced it in sections.  One thing I found helpful was to print out a photo on plain paper and then fold it to get a sense of the proportions.  Oddly, the church is almost symmetrical, in three parts.  The hardest part of the piecing was figuring out how to show the buttresses.  They're more like wedges than they appear in the quilt panel, but I think I did okay with it.


The main reason that this wasn't finished in the spring was that  I spent a lot of time looking for the perfect fabric to mimic the adobe.  That red-brown is a pretty difficult color to find.  Everything was either too light or too brown.  I had a lot of fun looking, though.  You may notice, too, that there are not a ton of plants around the church.  It is New Mexico, and most of the area around the church is paved, with other buildings very close to the church.  I always expect iconic buildings to be set off somehow by themselves, and then it ends up that they're across the street from a hotel or something, like the Alamo.  This church is in an historic district, but it's right there in a neighborhood, with apartments really close.


This church panel finished at 25 by 33, which is only a tiny bit different from the first panel.  This was a total coincidence, because I purposely didn't measure so that I could give San Miguel the space it deserved.  I was really surprised when I took the first church out of the box to take this picture.  Funny how things work out, isn't it?  I should also add that there are many details that will be quilted in, too, like the branches and leaves for that tree on the left, and the window panes.

So there's church number 2!  I've picked out the church for a summer panel, but I have a few things I have to work out for it first, like how to make the siding.  Maybe I'll make the fall church before the summer one because it's brick, which might be easier. 


Everyone have a great weekend!  There are no bridesmaid's dresses to alter this time around, but this weekend is my birthday and I have some gluten-free cake to enjoy. I have it on good authority that there will also be takeout, which we all know is my favorite thing.

Sharing at Confessions of a Fabric Addict, Finished or Not Friday, and TGIFF.

Saturday, September 15, 2018

Cloudy with scattered stars

Hi all, and welcome to another wet weekend!  What a surprise, huh?  The weather people said this week that we've had the wettest summer in 50 years, thus confirming what I have suspected all along.  Of course, I can't complain, because we are not currently in the path of a hurricane.  If you are, my sympathies and please stay safe.  I hope it dries out for you very soon!

Since this is the dark blue month for the rainbow scrap challenge, I decided that it was time to put together the galaxy stars quilt top, which I've been making to use up some dark blue half yards that I bought to test out another pattern.  I never use dark blues, so they were just going to sit around here, doing nothing.  Instead, they've become this little quilt:


Oh, gosh, that turned out better than I thought it would!  It's been quite cloudy, so the pictures are a little dark, but that's letting all the colors of the stars shine through.


The pattern for this star is HERE, but I made mine larger, 8 inches finished instead of 6 inches.  They were super-easy to make, and I used all scraps in the color of the month to make the stars.  I tried to mix up all the backgrounds as much as possible each month, and I didn't have a set number of stars that I was aiming for.  This made the quilt a pretty relaxed project for me.


I put the stars up on the wall and played with the layout and the distribution of colors for a couple of days, which was fun.  I didn't want to put them in a plain straight set, so I moved them around a bunch until I liked it, then filled in with leftover blue squares.  I laid this out in rows, but pieced it in columns, adding a piece to the tops and bottoms of the columns to make the stars off set.  This made them look much more scattered, which was exactly what I was going for.


So there's one more scrap project down!  I'm really pleased with it. I didn't put any borders on this top, but I still might.  I have just enough for a small border to go all the way around, and enough scraps for a binding.

Hope everyone is having a nice, dry weekend and you all have something fun planned.   I have to go to my daughter's house and alter a bridesmaid's dress.  Wish me luck!

PS-- There's still time to enter to win a blogger bundle from Bernie!  Check out THIS POST for details.

Sharing at soscrappy for RSC18.

Wednesday, September 12, 2018

A bundle of fall flowers

Hello everyone!  How is your week going?  Many of you know my friend Bernie over at Needle and Foot, and her fabric shop.  This year she has been offering a series of fat quarter or half-yard bundles selected by bloggers.  For this month's bundle, she asked me! Little did she know that I am a September baby, so I really like many of the colors of fall and I certainly like colorful fabric!

Here is an artsy picture of the bundle I chose:


Oh, they look so pretty hanging there.  Here's a more sober picture of the bundle, along with fabric names:

Top, left to right: Lacey Star Cosmos by Sharon Holland, Cat in the Flowers, Bear Essentials 3 in violet purple.  Bottom row: Cottagely Posy, Twinkle in orange, and Woodblock Berry by Sharon Holland.

When I was choosing fabric for this bundle, I was thinking mainly of fall flowers.  Most people think of flowers as a spring thing, and I do love spring flowers, but fall has a beauty all its own.  Goldenrod, asters, chrysanthemums, some roses and lilies, astilbes, and Russian sage are just of few of the fall bloomers that add so much to the season.  There are no dainty springtime pinks or yellows here, but lots of deep saturated colors-- oranges, purples, deep reds, deep greens, and deep yellows.

I've started using the bundle to make some flower blocks for a fall flowers quilt, though I haven't made as much progress as I'd hoped:

Flower blocks are adapted from the Intricate Stitches project.

I'm seriously hoping this quilt will be finished sometime this fall, but there are some projects in line ahead of it, too.  But hope springs eternal!

If you're not into flowers, this bundle is pretty versatile as a base for other projects, since it combines well with other colors.  You could go really warm and put it with some more oranges and yellows:


Or go another direction with pinks and reds, and maybe a few purples:


Or try a little cooler with some blues and greens:


It even looks really good with last month's blogger bundle:


For my project, I chose to add a green and a couple of the fabrics from last month.  I might add another purple, too, to balance the one already in the bundle.  

So that's my bundle and my (incomplete) project, and here is your chance to win one of these bundles for your very own.  Just leave me a comment on this post, and I will choose randomly (using a random number generator thingy) on Sunday night, September 16.  Just to make it interesting, tell me your favorite fall flower.  Mine is actually asters, the bright purple ones, of course!  If you are no-reply, remember to leave a way to contact you or else you can't win.

This giveaway is now closed! Thanks to all, and congratulations to Deb, who won the bundle.

You can find out some more about this bundle at Bernie's post right HERE.  Now is also your chance to hop on over to Bernie's shop  and get this bundle for 20% off until Friday.  To go directly to the bundle listing, click HERE. You might find something else you like, too, if you look around a bit.


Hope there are lots of flowers blooming for you this fall!

Sharing at Let's Bee Social.

Friday, September 7, 2018

Catch a falling star

Hi everyone! Good golly, it's already the end of the first week in September.  How did that happen?  It has been such a busy time for me lately, but I feel like things are finally starting to settle down.  At least I feel a lot less stressed now than I did a few weeks ago.  And though the calendar says September, it still feels like the height of summer around here (97 degrees today!), so at least some things haven't changed.

It's been slow stitching for the last several weeks, what with everything that's been going on around here, but this week I finally finished off this quilt top:


I call this quilt top Falling Stars, because the blocks look like stars to me, and when they're on point they kind of look like they're falling.  Well, you can't always explain a quilt name, right?  I love the colors in this top, and I also love the little shoo-fly blocks that are formed in the center of each block.  Now I want to make a bunch of shoo-fly blocks and put them on point.  There's another idea for the list!


I made this top to use up the last jelly roll in my stash, using THIS block from the Squared Away quilt project. I think it was perfect to make from that jelly roll.   To me, the block really screamed to be put on point, so how could I refuse what the quilt wanted?  The block was pretty smart, because the secondary patterns made by the blocks are really interesting.


This quilt top was pretty easy to put together, because the block is very simple, made mostly of half-square triangles. A *lot* of half-square triangles. There are 512 hsts in this top!  All of those hsts were cut using the Easy Angle ruler, which is easy enough, but is a really unforgiving method for making hsts.  It takes a bit of patience to make all of them, so I could only do a few blocks at a time before my eyes started crossing.


So, there's that top finished!  This one is already boxed up and ready to send off to Diane the longarmer for quilting.   I think it's asking for an allover quilting pattern, so I'm inclined to listen.

Hope everyone has a lovely weekend.  We are jetting off for a small adventure, which may or may not involve some tiny people.  Doesn't that sound like fun?  Hope you have as much fun as we will!


Sharing at Finished or Not Friday, Confessions of a Fabric Addict, and crazymomquilts.

Tuesday, September 4, 2018

Hello there!

Hi everyone, and welcome to The Academic Quilter!  If this is your first time here, I'm thrilled that you're visiting.  If you've been here before, thanks for coming back!
 
For those of you who have been around here for a while, this post is a part of Benita's Quilter's Meet and Greet over at her new blog, Benita Skinner's Creative Space.  Benita has been quilting for a long time and is the creative force behind Victoriana Quilt Designs as well as other ventures, and now she has a blog, too!

https://benitaskinner.blogspot.com/2018/09/2018-online-quilters-meet-greet.html

To celebrate her blogging debut, Benita organized this Meet and Greet for quilt bloggers and followers to find new friends, new projects, and new blogs to visit.  You can find the whole list of participants over at Benita's post HERE.  While you're there, you'll notice that she has a great grand prize to give away, so be sure to check it out and register for that.


So, I'm Mari, the Academic Quilter.  The "quilter" part is self-explanatory, but what about the "academic" part?  In my non-quilty life I'm a college professor and spend a lot of my time with books, papers, and library databases.  You can see why I can't wait to get home and touch some pretty fabric, cut it up, and make something lovely.  I learned to sew as a child, so this has been producing happiness for me for quite a long time.


Benita said to "show you around," so here is a picture of my sewing space:


I call this "the nest" and I love it.  It works so well for me.  True fact: I have a really hard time working (on anything) while facing a wall.  I need to see out into the room!  And don't worry-- it is always much messier.  I cleaned up just to take the picture!

And because I know you'll ask, here's a picture of my fabric stash:


Yep, that's all of it, except for the scraps, which are in the closet in small bins.  I love having it all out here so I can see it and use it, plus I like to keep it small.  Anything bigger than this would overwhelm me and I would find it really stifling.


As for my quilting philosophy, it's basically this: make anything you want, using any fabrics you like, with any methods that make sense to you, in any colors you really love.  Use fabric from a quilt store, a big box store, a thrift store, old clothes, or anything you have.  Use the tools you have or buy the newest thing, whichever works best for you.  There are no rules! Make what makes you happy!


I like a lot of different things, but I really consider myself a traditional quilter with a 21st century twist, and I love making traditional blocks, especially the ones with complex piecing and those that have been "neglected."  I always want to reclaim some of those blocks and get them out of the books and into the quilts.


In addition to my interest in traditional blocks, I have recently discovered that I enjoy free piecing (making things without a pattern or measuring), like the series of churches that I've been working on slowly.


And I do like making scrap quilts, which really appeals to my frugal nature.  Fabric is expensive--use every piece! I guess I really just like all kinds of piecing, and I love looking at all kinds of quilts, from traditional to modern to downright odd.  They're all so pretty!


If you look at the top of this page, ^^ you'll find some links to pages on the blog.  For the last few years I've had a quilt along to make a scrap quilt over the course of 10-12 months.  You'll find the quilts and links to all of the tutorials and instructions for the different quilts on those tabs.  We're coming near the end of this year's quilt, but it's never too late to start!  I've already started to plan for another quilt for next year, too.


Also on a tab at the top is a series of posts called Spring Cleaning, which I wrote to show how I cleared out tons of junk and made my sewing room work for me.  You might find some things there helpful as well.


So, that's the grand tour! In case you're interested, here are a few links to the older posts associated with the pictures in this post.  Feel free to comment on old posts if you feel so inclined-- I'll answer if there's a way to reach you!

Joyful, joyful, joyful!
First things
All dolled up
A church in winter
An old fashioned finish
Flinging some strings
Mary's linens
Mountains, baby!

Thanks for stopping by! I hope you enjoyed the tour and will come back again. If you make any of the blocks or quilts from this site, I'd love to see pictures, too.  Thanks to Benita for arranging this, and best wishes for a fun blogging career.  Be sure and go back over to her site and register for the give away and check out some other blogs.  Blogs are the new magazines, so be sure to check out several!

Click HERE!

Shared at Let's Be Social and on Benita's new blog, Benita Skinner's Creative Space.

Saturday, September 1, 2018

Squared Away Block 9

Hello all, and welcome back to the Squared Away quilt project!  This quilt was designed by me and Angela of soscrappy as a fun, free project to use up some scraps.  If you have just found this quilt along or have missed a block, links to all of the blocks so far can be found on the tab at the top of this page or the tab on Angela's page at soscrappy.  This is our next-to-last block!
 
Here is our block for this month:

Queen Charlotte's Crown, Nancy Cabot, 1930s

This block is called Queen Charlotte's Crown, a Nancy Cabot block from the 1930s.  This block looks complicated, but it's made of the same 25 pieces as all of the other blocks, so just follow the directions and you'll be fine.

This block is usually made with an accent color, though you can choose not to use an accent as well, or you can use multiple accent fabrics.  I used yellows, but green or pink would also look great with dark blues or blacks.  You'll need to decide whether you'd like to use all 2-1/2 inch squares and hsts to make the block, or if you'd like to cut a larger piece and make two 4-1/2 inch half-square triangles for the corners.  This will affect your cutting and piecing, so read all the way through the tutorial and decide what you'd like to do before you do any cutting.

Grab some dark blue or black scraps and let's make some blocks!

Cutting for a 10-inch block:
* for hsts, can oversize to trim down

                                    To use all 2-1/2 inch squares:                         To use larger corner squares:


Cut from the blue:            2 5-3/4 inch squares *                                             1  5-3/4 inch square*
                                                      3 2-1/2 inch squares                                             1 4-7/8 inch square*
                                                                                                                                         2 2-7/8 inch squares*
                                                                                                                                         1 2-1/2 inch square

Background:                         1 5-3/4 inch square*                                                1 5-3/4 inch square*
                                                    2 2-1/2 inch squares                                                2 2-1/2 inch squares

Accent:                                  1 5-3/4 inch square*                                                1 4-7/8  inch square*
                                                    4 2-1/2 inch squares                                              2 2-7/8 inch squares*
                                                                                                                                       2 2-1/2 inch squares

Construction:

The only unit that we're making for this block is half-square triangles. Pair up the 5-3/4 inch squares of the blue, accent and background and use the Magic 8 method to make 8 hsts at a time.  Pair up the other matching squares and make hsts using the conventional method.  All of your hsts should measure 2-1/2 inches, unless you are making the larger squares to make the larger corner hsts.  These larger hsts should measure 4-1/2 inches.


For either option you should have 8 blue/background hsts.  If you are using all 2-1/2 inch squares, you should also have 8 blue/ accent hsts.  If you are using the larger hsts,  you should have two 4-1/2 inch large hsts and 4 blue/accent hsts.

The hsts are all the units we need.  On to assembly!

Assembly:

First, make the corners. If you made the larger hsts, your 4-1/2 inch hsts are used for these corners, so this piece is already made and you can skip to the next step.  If you did not opt to make the larger hsts, use blue/ accent hsts, a blue square and an accent square to make  the first corners:


Make two of these corners.  You can either spin your seams or press to the blue.  

For the second corners, use the blue/ background hsts, the background squares, and the accent squares as shown:


Make two of these corners.  You can either spin your seams or press to the blue, which ever makes you more comfortable.

Finally,  join the remaining hsts to make stacks of two, as shown:


Notice that these face in opposite directions.  You will need two of each combination.  Either press to the lower hsts or press this seam open.  I spun my seams for the corner pieces and found that pressing this seam open worked best since the seams for the corners end up in opposite directions.

That's it!  Lay out the pieces as shown, paying special attention to the directions of the hsts.


Join the units into rows and the rows into a finished block.  Give it a good press, stand back, and admire!


For this month, I made three 10-inch blocks:


For my 15-inch blocks, I had a small problem since my background is dark blue.  Here was my solution:


Gold crowns! For this option, I did not use any accent colors and simply made 12 gold/ background hsts, plus the larger ones for the corners.  I think this looks really good with the dark blue.

That finishes off 90% of our quilt!  As always, go on over to Angela's to see some more blocks and some of her variations.  If you'd like, remember that Angela has a linkup at her blog every Saturday, and we would all love to see your blocks.  You can also link up Instagram posts there, and be sure to tag me (@academicquilter) and/or use #squaredawayquilt so I won't miss seeing your pretty blocks.

Next month is our last block!  It will be posted right here on Saturday, October 6.  See you there!

Sharing at soscrappy for RSC18.