Showing posts with label Intricate Stitches. Show all posts

Friday, January 27, 2017

It's Complicated

Happy weekend, everyone, and welcome to a very late edition!  The delay has been caused by the problems getting some lovely pictures of the Intricate Stitches quilt top to show off.  Between the rain, freezing rain, winter darkness, and the wind (which almost threw my quilt top into a stream), it has been really difficult to get pictures, and I've tried for a few days now.  Maybe it's just shy?  At any rate, the few good pictures I have will have to suffice.

So, to get right to it--I've finished the Intricate Stitches quilt top!  Here it is:
 

This is the final quilt top from last year's Rainbow Scrap Challenge project, Intricate Stitches.  It has a *ton* of pieces and a lot of different colors of hand-dyed fabrics, and I am very happy with how it turned out.  I'm still a bit unsure about the dark frames for the blocks, but looking at it all together I think it makes the blocks stand out a lot better.  They would get lost in the quilt without frames and I didn't like any of the other colors I tried. 

Nothing like a little wind!  The freezing rain started as I was taking this picture.

The colorful fabrics in this quilt are all hand-dyes from Vicki Welsh.  These were wonderful fabrics to work with and even stood up to the ripping that inevitably happened.  The backgrounds are just Kona white and the block frames are also Kona, a beautiful blue called Celestial.  My quilt top finished at just about 65 by 65. 


I really had a great time all year making this quilt, and I learned a lot.  And I really want to make more of these blocks!  I can see a quilt made with any one of them.  Can't you just picture repeats of any of these blocks as a whole quilt?  I think the feathered star on the right is calling my name!  And speaking of names--I think the name of this quilt might be "It's Complicated."  Happy to hear any better suggestions!

Okay, I give up!

Hope everyone has a wonderful weekend.  My plan for the weekend is a nice nap, followed by something warm to drink, and then another nap.  Isn't that a nice plan?  I'll actually be scrubbing the bathtub or getting groceries or something, but it's good to have a plan!

Sharing at Finished or Not Friday, crazy mom quilts, Confessions of a Fabric Addict, and soscrappy for RSC16.

Wednesday, December 7, 2016

Feeling centered

Hi all!  How are things going for you?  We are in a tizzy here, as the semester is wrapping up with exams and papers and all, plus the carpenter has promised to show up this week to finish in the living room.  Cross your fingers that he actually shows, because I am tired of living with construction.  Plus it has been raining like crazy! Too many years of 20 degrees in December has me a little freaked out by 50 degrees in December.  And the allergies hate this!

When I get tired of reading papers, I've been working on the center for my medallion quilt.  After about a half dozen different tries, here's where I am now:


I don't know if this looks boring to you, but it looked the best to me.  I tried several traditional things, like flying geese and diamonds, and none of them looked good to me.  I really wanted the central block to stand out, and everything else detracted from it.

This border is a 1 inch green frame, a 1 inch white border, a colorful rectangle border that finishes at 1 inch (!!!) and another 1 inch white border so that the rectangles seem to float in the white space.  And how happy am I that that rectangle border actually did finish at at 1 inch? 


Happy dancing!  And just for grins, the 4-patches in the corners also finish at 1 inch:


The next "round" is the pieced blocks.  My current plan is to frame those blocks as well, but I'm not sure what color to use.


I'd hate to use gray, but that's what I keep coming back to.  If I had more of the green, I might use that, but I don't have enough of any one color to use it for all the blocks.  I do have some solid gray, though.  I guess I'll have to try out some things and see.  The seam ripper is getting a huge workout on this quilt.

Finally, I want to recommend this book:


It's a little bit older book (2012), but I did find it really helpful in testing out different border options and thinking about which borders would best enhance the quilt.  Bet you could find this one at the library, too!

Hope you're all having a great week!  Off to read more papers, grade more exams, and ponder the border options!

Sharing at Let's Bee Social, Oh, Scrap!, and soscrappy for RSC16.

Friday, December 2, 2016

More testing

Hi all!  Did you have a good week?  The weather here was awful and so I spent a little more time in the sewing room, still cleaning things out.  Still feels like a mess in there, but at least I'm making some progress.  I finally packed up some things that are getting donated and emptied almost the last of the boxes.  I never want to move again.

I did make some progress on the medallion quilt, which I said I would have finished by this coming Tuesday but I probably won't.  Oh well.  Here's what I'm playing with for the first border around the medallion:

Just a mock-up!  White borders to be added in construction phase.

Somehow it always looks better in my head than in fabric.  I'm not sure I like this.  I like the unbalanced part, but I'm not sure the geese are going to work out.  They might be pulling attention away from the center block.  Maybe smaller ones would be better? What do you think?  I think I have to let it marinate for a little longer.

This quilt is all made out of hand dyes, and so is the Grandma's quilt.  I cut all the border pieces for that quilt, but I was left with smaller pieces that won't work in either one.  What's a frugal quilter to do but start making some crumb blocks?


I love it!  These are 6-1/2 inch blocks.  Don't know what they'll become, but those little pieces make a pretty block, don't they?

In a few spare moments I also made up these neutral 4-patches:


They're prettier than I thought they would be.  I don't know what they're for, either, because I am definitely not making Bonnie Hunter's mystery quilt, even though I just painted the guest room green and hung a purple and green quilt on the wall in there.  Frankly, I don't think a new one would work out, so it's definitely not on the agenda.

One last thing to show you.  This is how I'm storing my fat quarters now:


Wow, I can't believe how well this works.  I saw this on Pinterest and didn't really know how well it would work, but I found this shoe holder at Target for less than $10, so what was the harm in trying?  The silly thing is great!  The fat quarters fit just great, and frees up some shelf space.  And if I ever use those fat quarters, maybe I could put some shoes in it.  Or maybe some notions, it works either way.

Everybody have a great weekend.  We are going to the movies, which is good, because I'm really tired of working on things for the house.  Plus--movie theater popcorn.  Yum!

Sharing at Confessions of a Fabric Addict, Finished or not Friday and soscrappy.

Tuesday, November 15, 2016

Layout auditions

Hi everyone!  How is your week going?  I've done a hundred things already this week and it hasn't hardly made a dent in my list! 

This week I am auditioning layouts for the Intricate Stitches quilt.  I know that I drew this all out before I even started, but now that the blocks are done I want to try something new and different with them.  Story of my quilty life--get halfway through the pattern and decide that I'd rather do it differently.  (As a side note, it's the story of my professional life, too.  I'll get halfway through writing something and have an even better idea so that I have to start over.) Anyway, here's the basic layout that I drew out a year ago:


Basic is the word for it, isn't it?  It's my intention to add some pieced borders like a traditional medallion quilt, but also to have plenty of space for the blocks themselves to shine.  What would we call that?  Modern traditional? Modernitional?  Heritage modern?

Here's the same blocks but in an on-point setting, what I'm calling the diamond layout:


This would give a lot of  more modern "wiggle room," but I don't really like it.  Too much empty space and not a great way to include any pieced borders. 

I thought I would like this one, which I call the crowded layout:


The string blocks and cut fabric pieces are stand-ins for some new, smaller blocks that I would have to make.  I really thought I would like this, but there is just too much going on.  Lots of white space and plenty of room for pieced borders, but just visually awful.

One more layout to audition:


I call this the modern layout.  I'm really surprised how much I like this one and how harmonious it seems.  Lots of space for the eyes to rest. I considered this for a long time and had it up on the wall for several days.  Ultimately, though, it doesn't fit with the vintage blocks or have the feel that I'm going for.  I do think this would be awesome with all one block in the two different sizes.

So, I guess we're back to basics!  Now to consider some other piecing that will bring these all together. I know that I will have to incorporate a lot of white space because this is already a riot of color, but I think the empty space will seriously enhance the blocks.

So which layout is *your* favorite?  Any good suggestions for pieced borders to consider?  I have a couple in mind, but I'm always open to new ideas.

Hope you're all having a good week!  Can you believe we're halfway through November?  Yikes!

It's almost here!

Sharing at Let's Bee Social and soscrappy for RSC16.

Tuesday, October 4, 2016

Intricate Stitches--Orange renewal

Hi everyone!  Today is the last block for the Intricate Stitches quilt!  The color for the month is orange and yellow, like a sunrise.  I decided to go with the orange end of that spectrum and used blue as an accent color.  Not really sure about these colors because the hubs took one look and said "oh, early Miami Dolphins," but I like the way the block turned out. Besides being the last of the 12-inch blocks for this quilt, this is the first stitching from my new sewing room.  Yay!

Here is this month's beauty of a block:


This is Flying Shuttles, a Nancy Cabot block from 1937.  It's number 1699 in Barbara Brackman's Encyclopedia, and this is something of a magic block because it is much easier than it appears.  There are only 2 units to make for this block and the arrangement of those units is what gives it an intricate look.  It's not that hard to make, though, so let's get to it!

Cutting:

You will need two colors plus a background for this block.  As always, I used plain white Kona cotton for my background, plus a bright, happy orange and a cooler blue.


From the orange, cut:

     3 3-3/8 inch squares
     6 2-7/8 inch squares (can oversize)

From the blue, cut:

      12 2-1/2 inch squares

From the background, cut:

      12 2-7/8 inch squares (can oversize 6 of these)

Construction:

First, use the 6 orange 2-7/8 inch squares and 6 of the background 2-7/8 inch squares to make 12 orange/white half square triangles.  These should measure 2-1/2 inches to finish at 2 inches in the block.


Next, cut the remaining white 2-7/8 inch squares in half from corner to corner.  Use these triangles and the 3 3-3/8 inch orange squares to make 3 square in a square units by adding the triangles to the squares as shown:


These units should measure 4-1/2 inches to finish at 4 inches in the block.

Take the hsts and the blue squares and arrange them as shown:


Make 6 of these little 4-patch squares.  These should measure 4-1/2 inches to finish at 4 inches in the block.

Amazingly, that's it!  The block is now ready to assemble!  (I told you it was magic.)

Assembly:

Arrange the 6  4-patch sub-blocks and the square in a square units as shown, paying careful attention to the orientation of the triangles in the smaller block units:


Once they're arranged, join the units into rows and the rows into a final block.  Give it a good press, stand back, and admire!


This is the last of the 12-inch blocks for the Intricate Stitches quilt.  If you want to, you can stop here and arrange your blocks, add some sashing, and have a lovely lap quilt.  I've chosen to make a medallion for the center of my quilt, and I'll have instructions for that next month.  (Just wait until you see the awesome medallion block!)

All of my Intricate Stitches blocks so far.  Just waiting for the center!

Enjoy making up this last block, and I'll see you back here on November 8th (good golly, really?) for the medallion instructions.  Happy stitching!

Sharing at Linky Tuesday, Let's Bee Social, and soscrappy for RSC16.

Tuesday, September 6, 2016

Intricate Stitches--Red

Welcome back to the Intricate Stitches BOM quilt!  It's time for a red block at last, which will certainly give the quilt a shot of nice, warm color.  This is our eleventh block, can you believe it?  At this rate, we'll be done in no time.

Here is this month's block:


This block is called Arrow Crown, from a book by Thelma Heath from 1940.  This is #1164 in Barbara Brackman's Encyclopedia.  Like all of our blocks, it looks complicated, but is made up of really common units that come together in a nice pattern at the end.

Let's make this block!

Cutting:

You will need two main colors plus a background and an accent color.  I used a deep red and gold, plus a shot of yellow-green for an accent.  I almost went with orange, but the green gave it a nice zing, don't you think?

From the red, cut:

     1 4-3/4 inch square*
     3 4-1/4 inch squares
     4 2 inch squares

From the gold:

     2 4-3/4 inch squares*
     1 3-1/2 inch square
     4 2 inch squares

From the white:

      1 4-3/4 inch square
      2 4-1/4 inch squares*
      4 2-3/8 inch squares
      4 2 inch squares

From the yellow-green:

      8 2 inch squares

*These are for making half-square triangles, so you can oversize these if you need to.


Done with cutting--let's go sew this block!

Construction:

The first step is to make the half-square triangles.  Since we need 8 of each of the colors, let's use the "Magic 8" method, okay?  It's fast and easy!  Use this tutorial and the red, gold, and white 4-3/4 inch squares to make 8 gold/ white, and 8 red/gold hsts.


If you normally oversize your hsts and cut them down to the right size, you can use 5 inch squares and have plenty of room for trimming.  In no time at all we'll have a couple of nice, colorful piles of hsts. These should be 2 inches to finish at 1-1/2 inches in the block.  Here's a tip--if you press the squares after you stitch them together, it's easier to get accurate cuts between the stitching lines.

Is anyone else thinking "Gryffindor"?

Done with those! On to the flying geese--

Take one of the 4-1/4 inch red squares and the 4 2-3/8 inch white squares and make 4 flying geese using the "heart method," found HERE.  These should each measure 2 by 3-1/2 to finish at 1-1/2 by 3 in the block.


On a side note, I've never oversized these to make larger geese to cut down, but if you have, just be sure the final geese measure 2 by 3-1/2 so they'll be the right size in the block.


One more unit to make!  On to the quarter-square triangles--

Take the remaining red and white 4-1/4 inch squares and cut all of them from corner to corner twice to make 4 triangles:


Position the triangles like this and stitch them all together in red and white pairs:


Press the seams towards the red. Stitch the pairs into 4 quarter square triangles that measure 3-1/2 inches to finish at 3 inches in the block.


Yes, there are other ways to make quarter square triangles, but I think this is the fastest way and it goes pretty quickly.  It's also really accurate because you only have to cut and stitch once.  Try it--it's fun!

That's it for the units, now we'll move on to putting them together!

Assembly:

First, take the quarter square triangles and the flying geese and stitch them together as shown:


These are the side pieces.  Make 4 of these.

Next, gather all of the hsts and the squares that you cut at the beginning.


Set aside the gold 3-1/2 inch square for the final assembly.  To make the corner pieces, lay out the squares and triangles as shown to make 4 blocks.  Notice that there are two different layouts and that they are mirror images of each other.  Make 2 of each, paying extra attention to the positions of the hsts.  The golds "kiss" in the center like fun little butterflies.


That's it!  For the final assembly, lay out the corners, side pieces, and the center yellow square as shown:


Stitch the units into rows and then join the rows into the final block.  Press and then stand back and admire your beautiful block!
 

As noted above, this is block number 11!  Just as a reminder, there is one more block for the sides of the quilt, and then in November will be the center medallion block for my quilt.  If you don't want to make the center medallion, you are only 1 block away from a finished quilt! And if anyone has any great ideas for a medallion block, I'd love some suggestions!

Have fun making this beautiful block and come back on October 4 for the 12th Intricate Stitches block!


Sharing at Linky Tuesday, Let's Bee Social, and soscrappy for RSC16.

Tuesday, August 16, 2016

Intricate Stitches--Bonus Block 2

Hi all, and welcome back to the Intricate Stitches quilt!  Today is block number 10!  Recall that the Rainbow Scrap Challenge only has 10 months this year, so we have had to double up for a couple of months so that we can have a full 12 blocks for the quilt.

Here is the second bonus block, which I made up in blue, green, and yellow:


I love this block!  This has a couple of names, the earliest of which is Kansas Star, from the Kansas City Star newpaper in 1932.  Carrie Hall, also from the 1930s, calls this Eight-point Allover.  It's number 1732a in Barbara Brackman's Encyclopedia.  Here is the best part of this block--it is made with 9 repeats of one unit, and the whole pattern comes from the placement of the colors.  This makes it super easy to cut and piece, which means you can knock this one out before school starts up again.  And we all know how fast that's coming!

A note about colors:  I made my block using scraps in various colors.  The success of this block depends entirely on the values of the colors chosen.  Use any colors you would like, but keep the values the same as the ones shown in this block.  Your lightest color should correspond to the yellow, with the darkest color corresponding to the dark blue.  This will make sure that the pattern in the block comes through.

Cutting:

There are only two sizes of pieces to cut in this quilt!

Cut 2-7/8 inch squares:                                          Cut 3-3/8 inch squares:

2 yellow                                                                    4 yellow
2 dark yellow or gold                                                  5 dark blue
4 dark green
4 bright green
6 medium blue


Cut all of the 2-7/8 inch squares in half from corner to corner to make two triangles and you are finished with the cutting!


Construction:

This block uses one unit, a simple square in a square.  Take 4 of the appropriate colored triangles and add them to the edges of the 3-3/8 inch squares.  These units should be 4-1/2 inches each, to finish at 4 inches in the block.


Make one using the 4 dark yellow or gold triangles and a blue 3-3/8 inch square.  This is the center square for the block.

Make 4 using the remaining dark blue squares, 3 medium blue triangles, and one yellow triangle:


Make 4 using the yellow 3-3/8 squares, 2 of the bright greens, and 2 of the dark green triangles:


That's it!  All the units are made!

Assembly:

All the final assembly requires is to lay out the units as shown:


Stitch together into rows and then join the rows to make the final block.  Give it a good press and admire!

A little wrinkled from being carried in my pocket!

One tip for this block--I never advocate pressing seams open, but it helps a lot with this block to press open the final seams that join all the square in a square units.  Backstitch at the ends to be sure the seams don't pop.

Have fun with this not-very-intricate but uncommon block, and be ready for block 11 (!!) coming up on September 6.  We are racing towards the finish of this quilt!

Sharing at Linky Tuesday, Let's Bee Social, and soscrappy for RSC16!

Tuesday, August 2, 2016

Intricate Stitches--Purple again

Hi everyone, and welcome back to the Intricate Stitches quilt block of the month! This month's color is purple tending toward gray, with another lovely green accent.  Green is one of my favorite colors, so let's put a bit of it in this block, okay?  This month's block turns out beautifully and is not difficult to construct, but it does include a partial seam in it's construction, so be sure to read all of the directions before starting.  I promise that it's not too difficult!
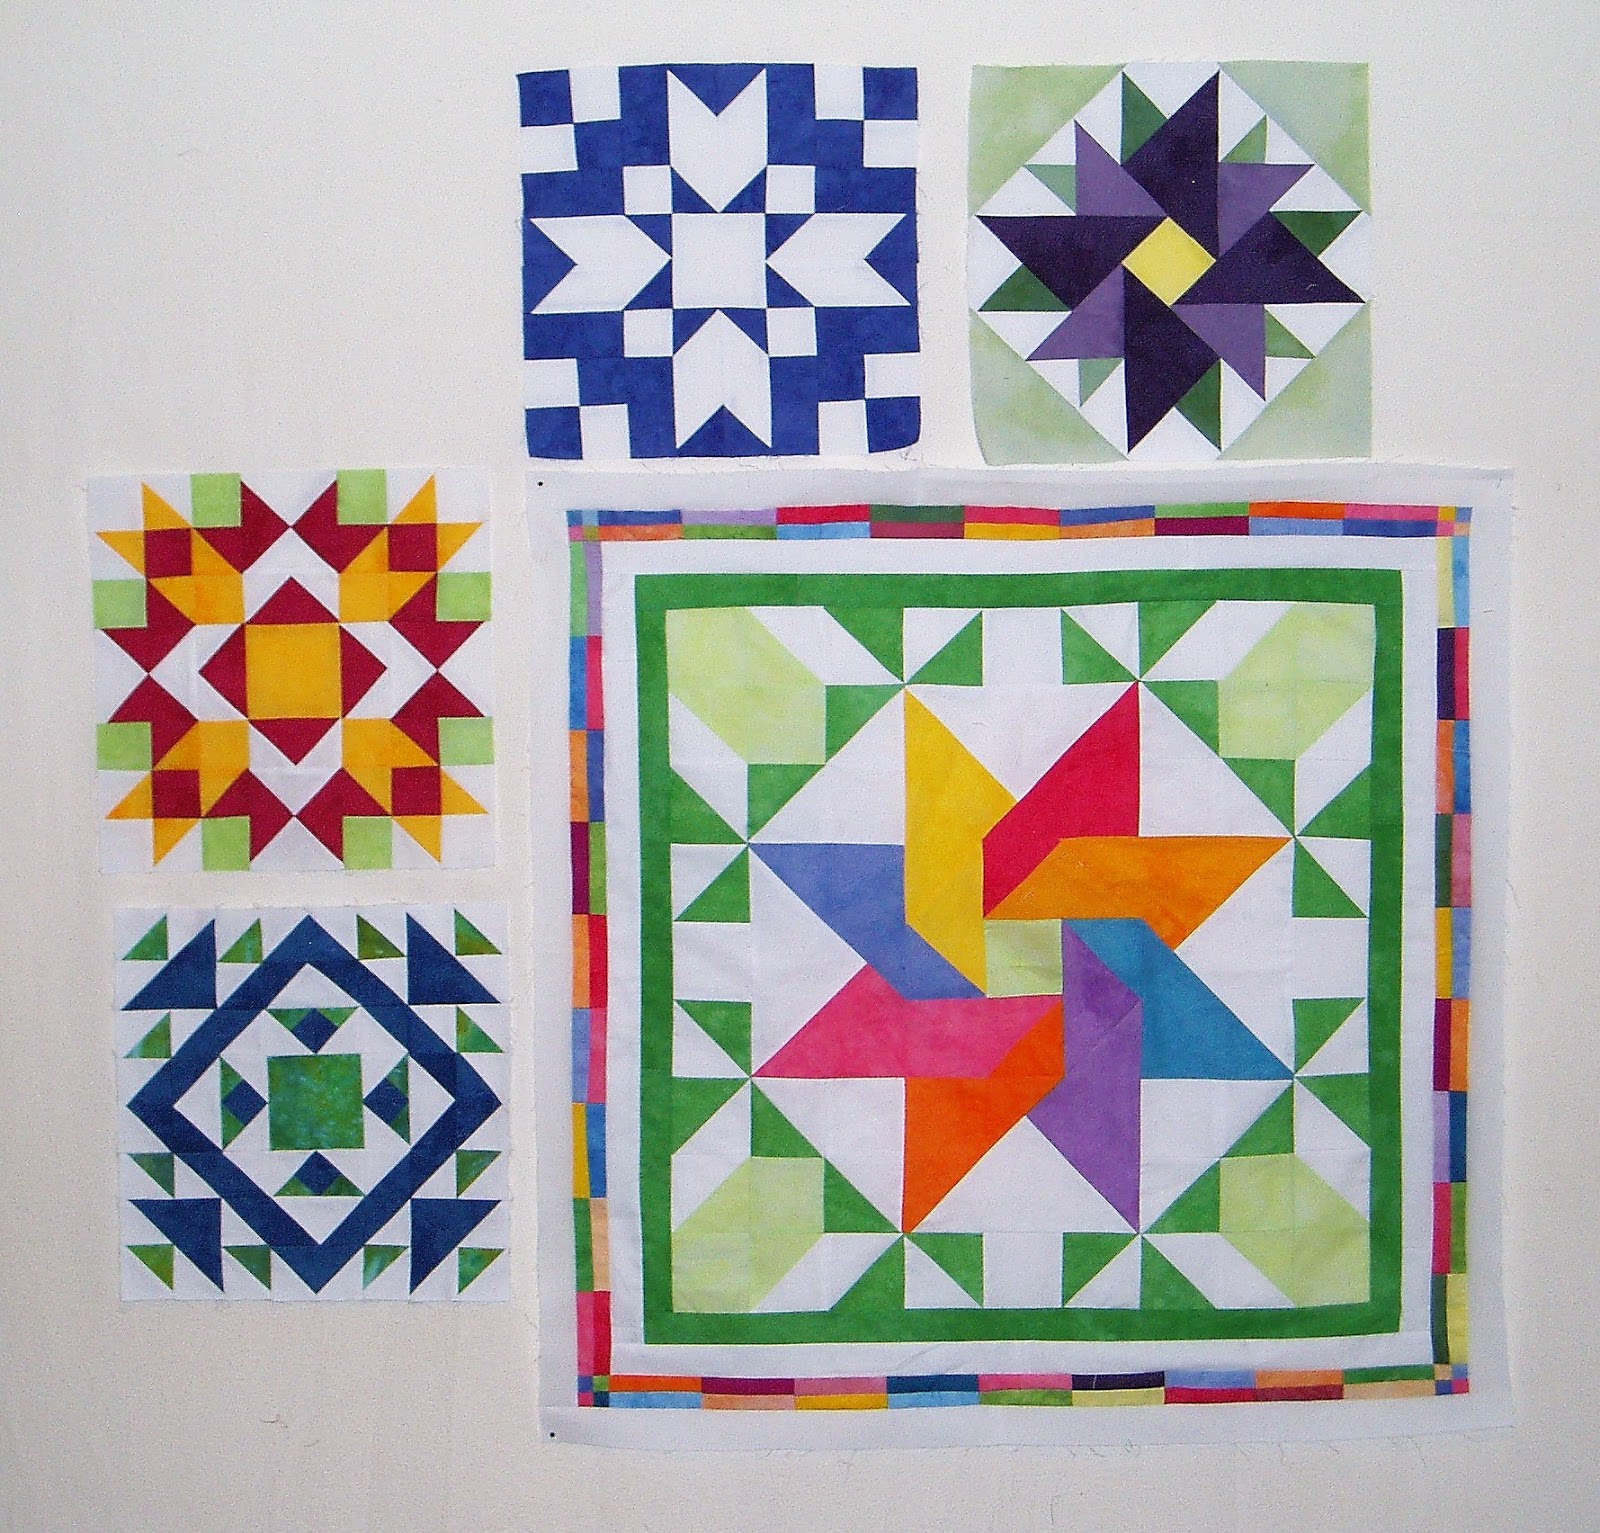
Here is the block:


This is Double Aster, another Nancy Cabot block from the 1930's.  It's number 4206 in Barbara Brackman's Encyclopedia. Asters are very pretty and are the "official" flower for September, which is my birthday month, which means that I like them very much.  This block takes longer to describe than to sew, so let's get going!

Cutting:

You will need 2 purples, at least one green, and a yellow scrap, plus a background.  I used a deep purple, a lighter purple, and two different greens, plus a scrap of yellow for the center.  I used the different greens because I wanted to use up some pieces, but you could definitely use the same green and have the block turn out great. You could also make the center green, or the background color, instead of yellow.  Also, some of these may seem oddly cut, but cutting them this way keeps the grain lines correct and makes the cutting easier.  Feel free to adjust the cutting as you deem necessary!


From the dark purple, cut:

One 7-1/4 inch square
(If you don't have a piece this large you could cut 2 5-1/8 inch squares instead)

From the lighter purple:

2 3-7/8 inch squares

From the green:

2 5-3/8 inch squares* (the lightest green)
1 4-1/4 inch square (in my block, the darker green)
2 2-3/8 inch squares (lighter green)

*These squares are used for the corners of the block.  I chose to use green, but you could use yellow, white, or a pale purple for your block.

From the white:

3 4-1/4 inch squares
2 2-3/8 inch squares

From the yellow:

One 2-5/8 inch square.

Construction:

It's all about making units and combining them!  The first unit is green half-square triangles.  Take one of the white 4-1/4 inch squares and the (darker) green 4-1/4 inch square.  Cut each of these from corner to corner twice to make 4 smaller triangles.


Pair the triangles and stitch to make 4 half-square triangles.  Pro tip:  If you stack the two squares together and then cut, the triangles will be properly paired already. The hsts should be 2-5/8 inch square.

Next, take another white 4-1/4 inch square and cut it the same way, corner to corner twice.  Add one of the resulting small triangles to the top of the green hsts as shown:


Note that the seam allowance of the triangle hangs over the edge.  Align the pieces along the right edge and it will be fine.


First unit finished! You should have 4 of these units. Put these aside for now.

The next unit is the main flower unit.  Take the (lighter) green 2-3/8 inch squares and 2 white 2-3/8 inch squares and cut them in half once diagonally to make two triangles.  Pair the triangles as shown and stitch:


Make 4 of these.

Next, take the remaining white 4-1/4 inch square and cut it in half twice diagonally to make 4 triangles.  Arrange these triangles and the units you just made as shown and stitch:


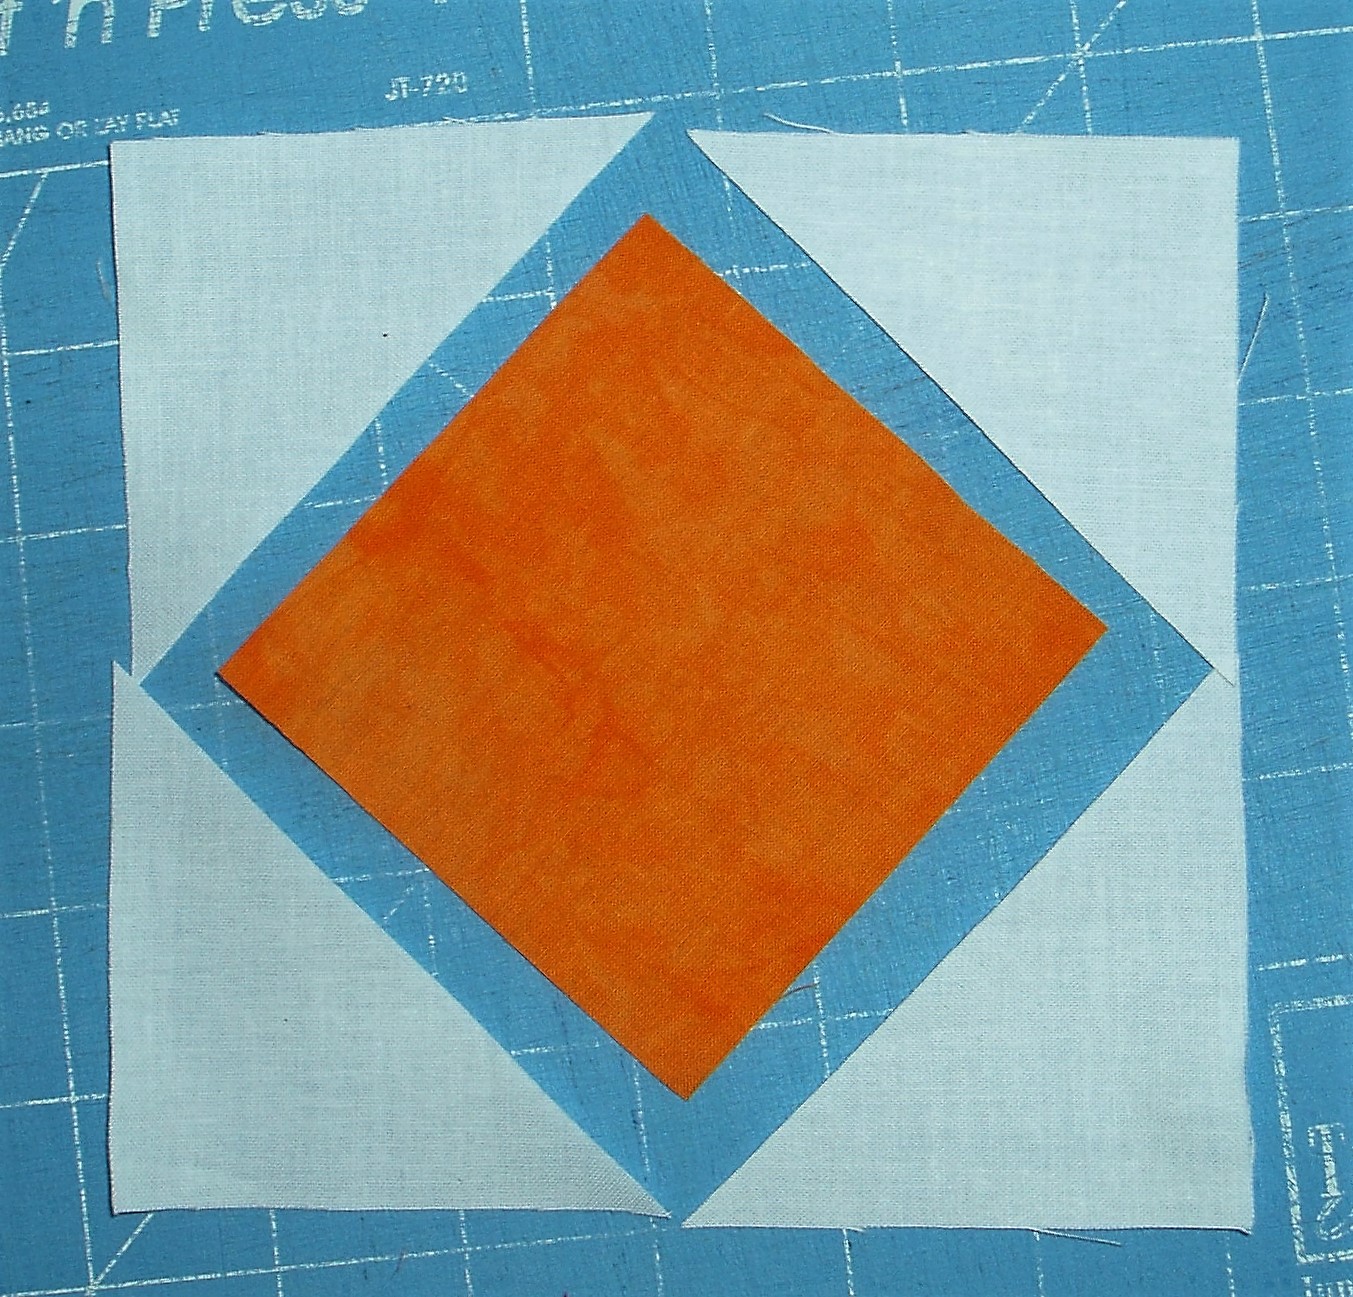
Moving right along!  The next step is to take the lighter purple 3-7/8 inch squares and cut each of them in half diagonally once to make 2 triangles.  Arrange these triangles and the previous units as shown and stitch:


Only one more step in the flower units!  Take the darker purple 7-1/4 inch square and cut it twice diagonally to make 4 triangles.  Arrange each of these triangles with the previously made units as shown and stitch to make 4 flower squares:

These units should measure 4-3/4 inches square. Take a second to admire these units, then arrange them with the hst units made previously as shown and stitch:


All the units are made!  On to the assembly of our block.

Assembly:

Take the green 5-3/8 inch squares and cut them each once diagonally to make 4 triangles.  Arrange these, the yellow 2-5/8 inch square, and the units you just made as shown:


The final assembly is not difficult, but does require some attention.  First, take one of the flower units and the yellow square.  Put a pin in the yellow square from the right hand edge over about 1 to 1-1/4 inches.  This measurement doesn't have to be precise but should be just less than half the length of the yellow square.


Stitch to the pin and STOP.  Backstitch a couple of stitches to keep the seam from coming apart in handling.  This is your partial seam which makes it possible to construct the rest of the block. The left edge of the flower unit should be free.


Add the second flower unit as shown.  You should stitch a full seam here.  Do the same with the third flower unit.


For the final flower unit, join it to the piece with a full seam.  Fold the free edge of the first flower unit away from the piece to give you access to stitch this seam.


After the fourth flower unit is added, return to the first unit, fold it over to match the seams, and finish stitching the partial seam.  You should now have a complete flower unit where all the seams are secure.

Eep!  I'd better press that better!  Bad quilter!

The final step is to add the remaining triangles to the corners.  Give your block a good press, stand back, and admire!


I think this block would look spectacular with the pink flower block from last month!  A whole garden of lovely flowers.

This is block 9 for the quilt, and August is a two-block month so that we can end up with 12 blocks for the quilt.  Block 10 is coming up on August 16, so have fun with this one and come back for the next exciting installment!

Sharing at Linky TuesdayLet's Bee Social, and soscrappy for RSC16.