Just a small update on my 1-1/2 inch squares project. I tried a new method to get the 100-patch blocks to go a little faster. They turn out cute, but they are somewhat tedious to make. Here's the latest one, and the first one with this method:

Well, I do love yellow, and it looks pretty springy there in the mulch. Some yellow flowers would be nice to go along with it, though. Just saying.
Anyway, I've made a couple of these now using the interfacing method. This involves fusing the individual squares to interfacing and then picking up the whole piece and stitching the seams in sequence. This way you only handle the tiny pieces once, and it does make for less distortion in the seams.
Here's how I did it. First, I cut a piece of freezer paper and drew out a grid of 100 1-1/2 inch squares. I used the freezer paper because it's nearly impossible to draw on the interfacing, and who wants to draw it all out every time anyway?

I understand that there is interfacing that is pre-printed for just this purpose, but all I could find had 1 inch squares, which is too tiny even for me. So I just got the lightest fusible interfacing I could find, which is barely more than tissue paper.
I ironed the freezer paper right onto my ironing board and then cut a piece of the fusible interfacing and pinned it glue-side-up over the freezer paper.

Trust me--pin the interfacing! You don't want to knock it all on the floor just as you've gotten them all in place, do you?
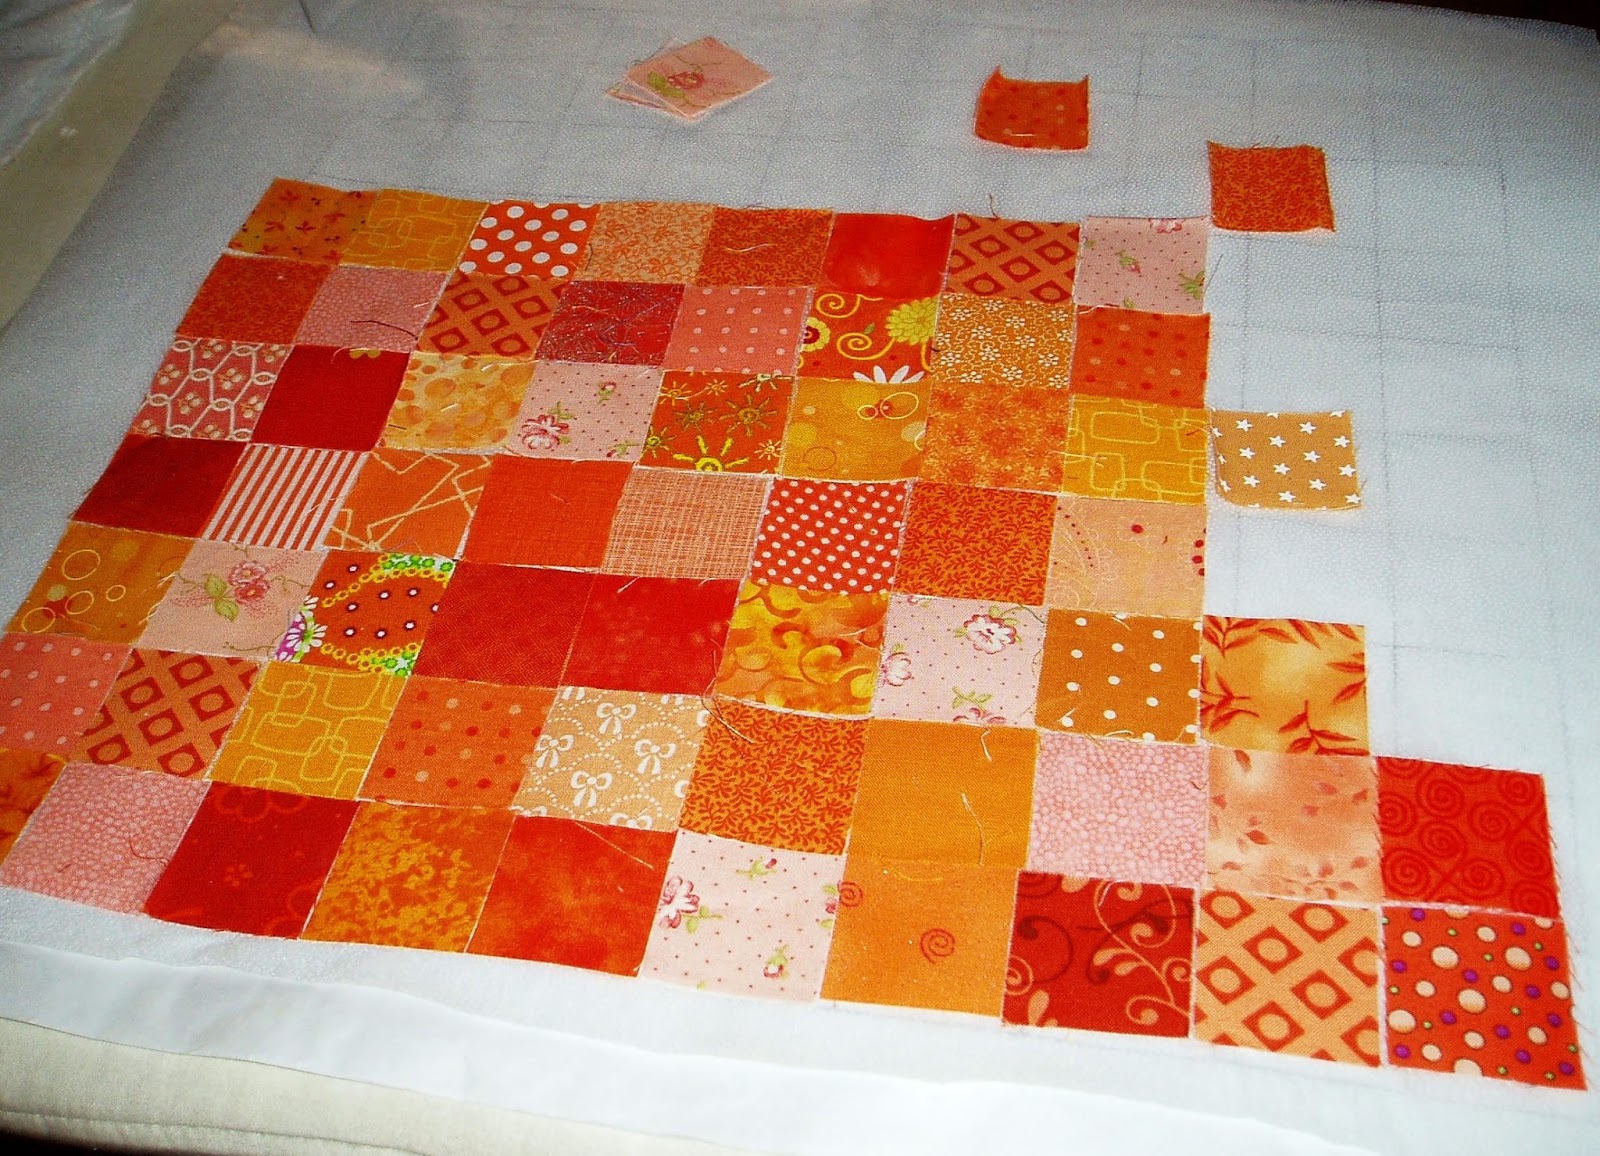
After that, I just started placing the squares on the interfacing, aligning them with the grid:

The block itself builds pretty fast:

Once all the squares are in place, just fuse them down. They don't have to be perfectly fused, you just want them not to fall off the piece. At this point you can still peel off any pieces you don't like and replace them, too.
Then you just take the piece to the machine, fold over the first row onto the second, finger press, and stitch. Keep doing this until all the rows are stitched. I didn't get any pictures, but the piece will curl up a little as you go, since I didn't stop to press between seams. I did press after I got all the seams in one direction finished. Then I turned the piece and stitched all the rows in the other direction. These were definitely bulkier, but I didn't have any problems stitching them.
Here's the finished back of the piece:

I liked using this method. It went pretty fast and it was good to see what the finished block would look like before it was actually stitched. The finished piece is definitely bulkier than without the interfacing, though. The interfacing is very light, but it does build up in the seams. For the next block I'm going to try cutting open the seams and pressing them open before I stitch the rows in the other direction. I think that will help some, even though I really don't like pressing the seams open.
Okay, I'm off to do some actual work for my actual job! Have a wonderful week!
Sharing at Linky Tuesday, Let's Bee Social, and Oh Scrap!
16 comments:
I did this technique and opening the seams really help. Love the result
Mari this block is so wonderful! All those little squares are so appealing. This method of sewing the pieces is my favorite when you have this many tiny squares. I have never seen anyone do it like you have with the freezer paper under the interfacing. That's pure genius!
Wow. That looks like a lot of work. Good for you getting it done mire than once...
Seems like a lot of work, but obviously worth it. So pretty.
What a terrific idea....I use this process in my watercolor quilts but then I'm working with 2 inch squares....I just may try the 1 inch grid now....or start with 1.5 and work down.
I have never seen this before. Interesting. Too small for me though.
Wow, I haven't seen that technique before, very clever. You have some lovely colours there.
Pretty! Putzy enough to drive me nuts..but pretty! They will be striking when all put together!
Tami
Sewmuchforfreetime.blogspot.com
It is gorgeous. It reminds me of my Rainbow Bites Mini. However, yours is bigger, better and awe-inspiring :-D I am so looking forward to the finished quilt. Kudos to you, Mari.
Hugs,
Preeti.
http://sewpreetiquilts.blogspot.com
I have heard about this method but it helps seeing all of the details. Love the freezer paper idea. Stroke of genius! I would think this method helps to minimize any distortions. very cool tutorial.
This is my favourite way of sewing those tiny pieces too. I like using the mini charm squares. The freezer paper idea is brilliant. Wonderful tutorial and all that yellow in your block is so cheerful!
-Soma
Thank you Mari for sharing the process. The result is wonderful. This is a new method for me and I shall certainly be trying it. Hello perfect points and straight lines!
I've read about this method, but was always concerned about the weight and stiffness the interfacing would add. Maybe a washout interfacing? But does that come in an iron-on form? Hmm...
Love that freezer paper idea!
Such a great idea for all those little squares! Thanks for showing us so much detail. I love your results!
Thanks for sharing the freezer paper tip. Love all those yellows! Thanks for linking up to Oh Scrap!
Hi again Mari! Well, aren't you just so darn clever. This is a great way to audition the fabric pieces before sewing, and even more that this would diminish the distortion of the fabric as well. ~smile~ Roseanne
Post a Comment