Saturday, December 30, 2017

Squared Away-- 2018 BOM!

Hi all!  It's the last Saturday of 2017, can you believe it? I hope everyone had a great holiday and is ready to start a happy new year.  2018 is going to be awesome, I just know it.  We already have a lot of happiness coming down the road, so I'm looking forward to the new year.

Since we're about to start a new year, it's time to think about 2018 Rainbow Scrap Challenge projects.  For this year, Angela from soscrappy and I have collaborated on a block of the month quilt! You know I like doing these, and this year's project is going to have really easy blocks and a spectacular setting that will make an awesome quilt. 


For this project, we have chosen traditional blocks that each finish at 10 inches square.  The twist for this year is that all of the blocks are made up of only three units in various combinations--squares, rectangles, and half-square triangles.  This means the quilt is absolutely suitable for quilters of all levels of skill and experience.  There are also lots of options for the quilt, including a couple of setting options that will be given at the end. My quilt will finish at about 70 by 87, but you don't have to make one that large if you don't want to.


The first Saturday of every month, I'll be posting a tutorial for that month's block, starting next Saturday.  There are 10 blocks, January through October, then in November we'll have the setting and finishing instructions.  My plan is to make three blocks each month so that I have 30 blocks for my quilt, but you can make as many or as few blocks as you like.  The setting and finishing instructions are based on 30 blocks.

Since this is a scrap quilt, there aren't any yardage requirements to give, but I do have a couple of yards of a white on white to use for the backgrounds.  For the main colors each month I plan to use some of my many, many scraps as well as some scraps that I've already cut into 2-1/2 inch squares. Those bins are never empty, are they?

These will be much happier in a quilt!

So there's the plan for 2018's quilt!  There is a tab at the top of this page with more detailed information.  If it sounds interesting, come on along and try a few blocks!  It will be fun to sew along together and use up a bunch of those scrap pieces.  And at the end we'll have some lovely quilts!

Hope everyone is having a lovely holiday and that you all have a wonderful new year celebration.  Bring on 2018!

Sharing at soscrappy, Linky Tuesday, and Let's Bee Social.

Wednesday, December 27, 2017

Another year in the archives

Hi everyone, and welcome to the end of 2017!  It's been an adventure hasn't it?  What a crazy year! When we were kids, who could've imagined what would be in 2017?  For our family, this was a good year that got even better towards the end, when we added two more grandbabies to the family.  In the sewing room, I made some pretty things and some useful things and had some fun. How about a look back before we welcome the new year?  Here we go!

According to the spreadsheet I keep on these things (yes, really), I had 22 quilty finishes this year.  To me, this means either finished tops or quilted and bound finished quilts.  Some of these never made it to the blog, but of those that did, these two string quilts were the most popular ones in 2017:


I have to admit that I like them, too! These are string quilts made from patterns in Amanda Nyberg's book No Scrap Left Behind.  Both of these lovely quilts used up florals that I'm no longer really interested in and turned out way better than I anticipated.  These were gifted to two of my adult nieces, and both of them promptly sent me pictures of the quilts in use, which is a great way to insure that you get more gifted quilts!

I can't ever pick a favorite quilt, but this one certainly made me happy:


This is the Happiness quilt, a wedding gift for my daughter and son in law that finally got finished this year.  I love this one so much, and thank goodness they do, too!

This was probably the most useful little quilt of 2017:

On Deck

This quilt lived on our deck from the day it was finished until it got too cold to be out on the deck.  Based on this year's use, it will likely be used out there until it falls apart and I have to make another!

This year, I also finished off the It's Complicated quilt:


and finshed the top for this year's BOM, Constellations:


I made some small quilts:

Rustic Heather


Prairie Queen door hanging
 
And some fun quilts:

A little I Spy quilt for my grandson!
And a couple of table toppers:

Loyal Union table topper

And I ended the year with some free-pieced projects:

Free as a bird

There are too many other fun quilts to show them all, but overall, this has been a great sewing year for me.  Thanks to all of you for coming along and sharing the adventure.  It's been a lot of fun, hasn't it?  I'm really grateful for all of you in this fun and supportive community, and I hope to see you all again in 2018.  I already have some fun things planned for 2018, including a new BOM, so it already looks to be a good start to a good year. Until then, may your needles be sharp and your bobbins be full, and your new year be joyous!

Bring on 2018! 

Joyful!

Sharing at Let's Bee Social, Confessions of a Fabric Addict, crazymomquilts, Finished or Not Friday, and the Best of 2017 linky party at Meadow Mist Designs.

Tuesday, December 19, 2017

Misfit Toys quilt top

Hi all! How have you been? Well, I have met some of my deadlines, waved at others as they went past, finished the things that I absolutely had to do, and I finished the Christmas cards!  Oh, and I apparently decided to keep Amazon in business single-handedly, but that means fun packages keep showing up at my house.  It's like my own private present opening every day.

In the midst of all that, I also managed to find some time to squeeze in some stitching for one more finish this year. Here is my final finish for 2017:


When I started this quilt I was really unsure about it, but now I really like it! This is the quilt made up entirely of orphan blocks and failed experiments.  I connected all the blocks with strings from the string jar.  Again, I was unsure, but it worked out great!  I call this one Misfit Toys because I'm feeling like all of these blocks found a way to fit in together.


Those of you who have seen this top before will notice two things-- first, I rearranged the blocks a bit more and added a few more things from the parts and pieces bin to fill in some of the bigger spaces.  That bin should be the next one I clean out because it's stuffed full too.


The second thing you might notice is that I ripped out a bunch of strings and basically started over.  I had started using the colorful strings as sashing in between the blocks, but then I ripped those out and used all the light strings to connect the blocks.  Yes, it was tedious, but look at the result!  From a distance it looks like they are all white or beige, but there are plenty of pale colors in there as well, including a few prints.

A very messy process!

I thought I might have to cut some more light strings to have enough, but I didn't, which is pretty scary, actually.  I did use up a whole lot of them, which is super because I never seem to have a use for the light-colored ones.

The border is made up of the colorful strings from the jar.  I pieced these in three rounds, going all the way around the quilt three times, twice from the medium pile and once from the pile of wide strings. The outer border measures about 3-1/2 inches, and the quilt as a whole measures about 65 by 70. 


This was a fun quilt to make.  There was no stress here beyond choosing which strings I wanted to pull out of the pile. I measured almost nothing.  Mostly I just joined up some strings and then trimmed them all to the width of the narrowest string, then stitched them on.  The only real measuring was to make sure that the rows were all the same width so they would all fit together properly.  If I were to do this again I would trim the strings to standard widths, which would make putting them together much easier.

When I started, I sorted out the strings into three general piles of wide, medium, and narrow strings, then put the narrow strings aside.  What did I do with these? Take a look:


I made about 20 of these 4-1/2 inch string blocks.  Yes, it's a sickness.  Some of the strings here started out as narrow as 3/4 inch. But I'm no longer saving any strings smaller than an inch to an inch and a quarter.  Really, I swear!

After I finished this quilt top and all the string blocks, I did something radical with all the rest of the strings-- I threw them out.  What?  Yep.  If I didn't use them in this project, I'll probably never use them, so they're gone.  I'll be starting 2018 with a nice empty jar.  I wonder how long it will take to fill?


With that, I am closing up the sewing room for the rest of 2017.  We have a lot of travel and relaxation (and a professional conference) to get to, and I have to spend a bunch of time hugging some babies.  I have a couple of posts already scheduled, so there will be some new things, but otherwise 2017's sewing is finished for me.

Whatever holidays you celebrate at the end of the year, I hope you have a wonderful, relaxing, happy time, and that all your holiday wishes come true.  Peace and joy to you and yours!


Sharing at Confessions of a Fabric Addict, Finished or Not Friday, crazymomquilts, and Oh Scrap!

Friday, December 8, 2017

Fall into winter

Hi everyone!  Somehow we have gotten all the way to December 8 and I just noticed that it's December and the holidays are bearing down on us like a freight train.  How did this happen?  I currently have zero Christmas spirit and zero gifts and zero plan to get any.  I guess I really need to get my butt in gear!  Think making some Christmas cookies would help?

While we're waiting for the holidays, it is still officially fall until December 21, so how about we wrap up fall with something nice and cozy? This week I put the binding on a fall quilt, which means it's done!  Here it is all quilted and bound:


Isn't that pretty?  I made the top of this little quilt last year, during the blog hop that was a launch party for Bernie's online fabric shop.  It must have worked because her store is still going strong!  It was just quilted up a little bit ago and I finished the machine binding this week.


I call this little quilt Autumn Jewels because it's made from the jewel box pattern, which is a really common and looks great in a lot of different colors.  If you go to THIS POST you will find all the details about the fabrics as well as the measurements and a diagram so that you can make your own jewel box quilt.


Autumn Jewels was quilted by Diane Minkley, another friend who has her own quilting business and does awesome work.  I'm sure she'd love to quilt one up for you, too!  She is in Wisconsin but does do some mail order, and she has tons of experience and lots of designs.  This was quilted with an antique gold thread in a pattern called Loose Leaf, which is perfect for a fall quilt. 


I got lucky when I went to take photos of this quilt because the light was just right and the wind cooperated and it wasn't too cold outside.  This never happens to me, how about you?  Our weather is supposed to change very soon, though, and we may get some snow later this weekend. It is December, after all.  Good thing we have quilts around here to keep the chill away.


And that winds up fall for me.  This might be my last finish for 2017, but I have high hopes for one more completion before getting totally slammed by the holiday and end of year hubbub.  The end of the year really has snuck up on me, so keep your fingers crossed that everything gets finished, not just the quilting.


I hope everyone has a good weekend.  I am going to try very hard to get in the holiday spirit, which will be just in time because I have a Christmas party to go to on Sunday.  Then there are a ton of other things to do-- I'd better make a list and check it twice!

Sharing at Confessions of a Fabric Addict, Finished or Not Friday, and crazymomquilts.

Tuesday, December 5, 2017

Constellations-- Finishing up!

Hi all, and welcome to the last step in our Constellations quilt!  Today we are finishing up with the borders and completing the quilt top.  Since we did most of the work already, this step goes quickly and you should be quilting this up in no time at all.  I used the same blue print that I used for the background and sashings for the final border, but you should feel free to use whatever borders you want for your quilt.

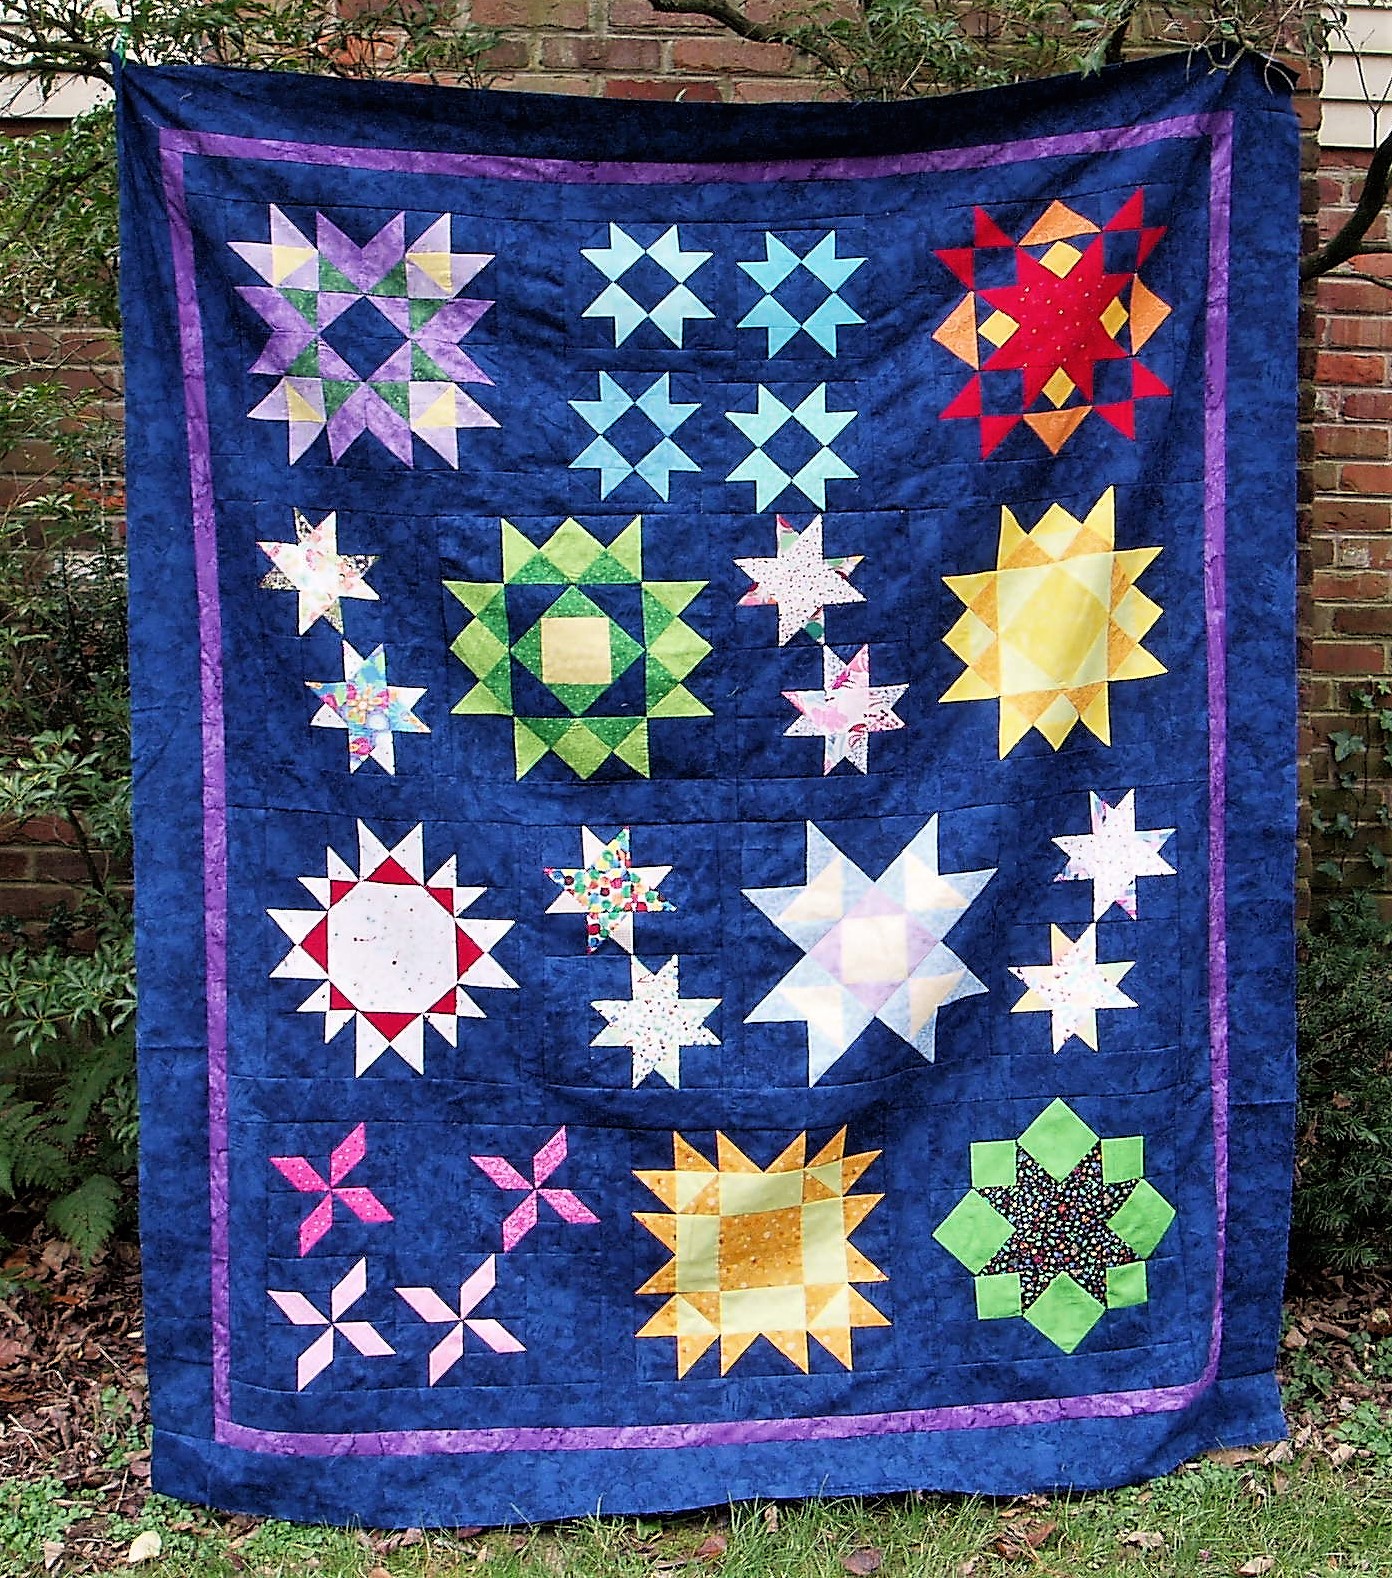
Here is my finished top, with the borders:


This quilt top finished at just about 57 by 68 inches, a nice couch size.  I made one significant change to the top from the way that I had first constructed the blocks.  If you look, you can see that I changed the corners on the Magic Cross blocks (the aqua blocks in the top row).  I had originally had a coral on the corners, but I decided that I wanted to make them look more like they're floating, so I replaced the coral corners with background blue ones. 


I also rearranged them a little bit, though I kept the block the same size so it would fit in the same space.  If there's anything in your top that you don't like, I really encourage you to fix it or rearrange it.  No sense finishing off something you don't like!


Back to the borders: you can see that I used three borders.  The first border was already integrated into the top and was made month by month.  The second is a 1-inch finished purple border, and the last is a 3-inch finished blue border from the same fabric as the backgrounds of the blocks.  I had planned to use a border of pieced squares instead of the purple, but I got one side done and really didn't like it.  It pulled too much attention away from the stars.  So I changed my mind and went with the purple, though any color would work. 

I know that everyone has probably put borders on a quilt before, but I want to walk you through how I do it.  This way gives you nice flat borders that are easy to quilt and lay flat in the finished product. The key to this is measuring, so grab your measuring tape and let's finish this quilt top.

First spread out your quilt center on a nice flat surface, like a floor, a bed or table large enough to hold the whole top without the edges hanging over, or a design wall.  Fold the top in half vertically to find the center, then mark the center with a pin or chalk mark at both the top edge and the bottom edge.  Open the top out again, then fold each of the edges to the center to divide the quilt into fourths.  Mark the fold with pins or chalk marks, again at both edges.


Now, smooth put the top so that it's nice and smooth with no wrinkles, and measure right down the center from the center pin at the top to the center pin at the bottom.  Don't worry if the measurement is not what you expect or is an odd fraction. This is your measurement for the side borders.

Decide on a color for your narrow border, then cut 1-1/2 inch strips and join them together to make a sufficient length for your narrow borders.  The number of pieces you need to join depends on whether you are using yardage or scraps and on the width of your fabric.  The piece I cut the purple border from was only 34 inches wide, so I needed 7 width-of-fabric cuts.  If you are using yardage, you'll likely need 5 or 6 1-1/2 inch by width-of-fabric cuts.

From the larger strip that you just created, cut two pieces the length of your center measurement.  For example, suppose that the length you measured was 59 inches.  Join your 1-1/2 inch strips and cut two lengths, each 59 inches.  Fold each strip the same way that you folded the quilt top to find the center and the quarters.  Mark the strips with pins or chalk.


Match the marks on your strips to the marks on the quilt top.  Pin and stitch.  **Important** If your edges don't match exactly, match the marks and stitch with the longer piece on the bottom.  This will generally provide enough ease for the border to fit exactly.  Repeat for the other side of the quilt top, matching the centers and quarters.

Follow the same steps to add the narrow border to the top and bottom of the quilt, measuring through the center of the quilt horizontally and matching the centers and quarter marks of the border strips and the edges of the quilt top.  Press well.  Your narrow border is done!

For the final border, follow the same steps, cutting your border strips 3-1/2 inches wide and remembering to match the centers and quarters.  Press well and admire your nice flat borders!  Your quilt top is done!


You know the next steps-- layer, quilt, and bind!  Depending on the size of your top, you will need about 4 yards for the backing.  I got this lovely star print for my backing:


This is actually a Christmas print from the 'Tis the Season line by Red Rooster Fabrics, and I got 4 yards from Bernie's shop.  I managed to save a half yard of the blue background print for the binding, and I am sending my quilt off to be custom quilted. 

That brings us to the end of this project!  I hope you have enjoyed it as much as I have and that your quilts turned out just as you wanted.  Thanks for coming along with me!  I'd love to see a picture if you're so inclined!

Look for an announcement about a new quilt along for 2018 (eep!) coming on the last Saturday of this month.  Angela of soscrappy and I have collaborated on a really cute quilt for next year, called Squared Away.  It will be lots of fun, so come back on the 30th for more information.  Hope to see you then!

Sharing at Let's Bee Social and soscrappy for RSC17.

Friday, December 1, 2017

Joyful, joyful, joyful!

Hi everyone!  Today's post has massive doses of joy and happiness, along with lots of bright, happy colors.  There are at least three joyful things happening today, so come on in and let's talk!

Since this is a quilt blog, let's start with the quilt top:


I call this quilt Joyful, because really, what else could you call it?  Doesn't it just scream "joy?" This is the patternless medallion quilt that I've been working on for a few weeks.  I started with the orphan block in the center and then just built rounds around it, making it up as I went.  There are eleven rounds plus the center block.


Every bit of this quilt is scraps, including the leftover hunks of black and white fabrics.  If you saw the earlier posts you can tell that I made one significant change-- I changed the first "round" around the center block to white from a pale yellow.  This just makes it stand out a little better and coordinate with the rest of the rounds. 

It's hard to pick a "favorite" part of this quilt, but I really like how the round of flying geese turned out:


I made the geese and then just added a 1 inch finished strip to the bottom of each goose, then turned them in opposite directions.  I think it's a great effect.


This was very fun to work on since there was no pattern and therefore no rules.  It let me sew without thinking about it too much, which was great for the stress I've been under lately.  Maybe I should have called it "thankful" instead.  This happy quilt finished at 66 inches square, which is plenty big.  I had planned a piano key border, but really I just didn't want to cut up more fabric. 


The second joyful thing around here is a bit of family news-- on Wednesday, our son and daughter in law had twin babies, a boy and a girl! These are our second and third grandchildren and we are still dancing on air.  Mom, babies, and big brother are all doing great.  Dad is a little freaked out.  Of course the babies are completely adorable and I can't wait to see them in person. I can't post pictures on here, but if you hop over to Instagram (@academicquilter) you'll find the first picture of them together!

Which brings us to the third joyful thing in this post:


These two quilts are called Happy and Lucky and were made by my friend Preeti, who sent them off to me for my new grandchildren.  What a kind and generous gift! Thank you Preeti!  I know these will be used and loved, and probably be fought over by siblings, if my own siblings and I are any indication.


These two scrap quilts are wonderful, with lots of fun things to look at, like I-Spy quilts. And I have to tell you that the bindings are absolutely perfectly stitched and flat, way better than any binding I've done. Maybe I can get her to teach me how to do that.

So there we are-- joyful times three! I think I could burst from happiness!  I may come down by Monday, but I wouldn't count on it!  Hope you all have some serious joyfulness in your life, too, and that everyone has a great weekend.  I think I might shop for some baby girl clothes, how about you?

Sharing at crazymomquilts, Confessions of a Fabric Addict, Finished or Not Friday, and Oh, Scrap!