Friday, March 30, 2018

The stitching of the greens

(For anyone interested, the monthly scraps giveaway is at the end of this post!)

Wow, March is pretty much over!  How did that happen?  No idea, but since we're at the end of the month, it's time to show off some of my RSC progress for March.  This time around it was light and bright greens, which was certainly appreciated because I am so ready for some greenery in the form of spring flowers and actual leaves on the trees.  There are a few buds, but no leaves just yet.  Just look at the backgrounds of my pictures!

One of my RSC projects for this year is the patchwork scrap stars.  Here are this month's green ones:


As you can see, I made one that's the lighter green and one that's brighter, with a purple star and an aqua star.  Usually these are made with white stars, but I thought that would be too boring for me.  I like how these are turning out.  Here's the lot of them so far:


Aren't those festive?  Imagine how they're going to look once we add in some warmer colors!

Another one of my projects is making these scrappy 9-patches to use up some of my treasure trove of 2-inch squares:


These are so easy to make and go so fast.  I made 8 of them this month, which gives me 45 all together:


I think these look great together, and I really am glad that I made them all with white centers.  Once we get through the year, I'm going to make these into some donation quilts, probably using Bonnie Hunter's free pattern for dancing 9-patches.  I'm hoping to have enough for two quilts, so I'll need a bunch more.  Good thing there's a bunch of colors left!

So, those and my Clay's Choice stars are the blocks that I managed to make from what I pulled out of the scrap bin this month.  I also dug deep and cut up all the green pieces for my version of Bonnie Hunter's En Provence quilt:


Most of those are somewhat darker than the other scraps, more medium greens than lighter ones, but I did manage to pull most of them from the "light green" bin.  And now they'll be used in a nice, happy quilt, so it won't matter what we call them.

So now that the greens are done for this month, as I promised at the beginning of the year, I am giving away what remains in the light green bin at no charge at all to one lucky winner:


Since I used up a lot of the greens, and because there are some small pieces here, I'm also including some 2-1/2 inch strips that are kinda green, along with an unopened spool of white Craftsy thread and the usual handfuls of 2-inch and 1-1/2 inch squares.  I don't know anything about the thread, but they sent it to me with another thread order, as a sample, I guess.  I almost never use white thread, and I have plenty, so it will go to whoever takes these remaining scraps off my hands.

This giveaway is now closed!  Thanks all!

To enter the giveaway, just leave a comment on this post!  Really, that's all! Since this is a holiday weekend for many people, I will use the random number generator thingy sometime on Tuesday morning, April 3. Of course, if you want to leave a comment without entering the giveaway, you absolutely can.  Just let me know to leave you out! And if you are no-reply, please remember to leave a way to reach you.  If I can't reach you, you can't win!


Hope everyone has a lovely weekend. We will be celebrating Easter, and many of our friends will be having Passover Seders.  I certainly wish you a blessed time if you're celebrating either one, and if you're not, have a lovely weekend as well!

Sharing at Confessions of a Fabric Addict, Finished or Not Friday, and soscrappy for RSC18.

Wednesday, March 28, 2018

Block parts everywhere

Hi all! If any of you are familiar with Sandra's blog, mmm quilts!, you may have heard of Dreami moments (Sandra explains it really well HERE.) Dreami stands for "drop everything and make it," which pretty much describes the end of my quilt-making process.  I usually work on the quilt a bit at a time until I just have to make that final push to finish it.  I've been having on of those moments this week, though there is probably zero chance that I'll actually finish this quilt right now.

For the last few days I've felt like working on Bonnie Hunter's En Provence quilt, which I started a long time ago. I finished cutting all the green pieces for the quilt and was just seized with a major desire to make some blocks. Cutting green pieces doesn't seem like much progress! So I cut some more yellow pieces and made a couple of the blocks:


Okay, I know that the purple 4-patches are wrong. Somewhere between the design wall and the machine they got turned around. I don't know how that happened.  But it's one block made for the quilt, so that's a good thing!  Progress!  (For those of you who have made this quilt, I switched the greens and yellows so that I would end up with yellow stars instead of green ones.)


I was so happy to have a couple of blocks done that I cut the rest of the yellow parts and started making the units that use those, and then it was time to use the pink triangle squares to make some sashing.  Turns out I hadn't squared those up yet, so I spent a bunch of time sliver trimming.  After I did a few dozen of those, I made another block, then trimmed some more, then made another block. You get the picture.


There are a *lot* of parts to this quilt, so there are currently block parts everywhere, like a quilt exploded or something.  It's messy, but fun.  And I'm making progress a little at a time, so I can put up with a little mess.  For a little while, anyway! 

Hope everyone is having a good week and making lots of progress.  If you have a few minutes, head over to Preeti's blog to check out the fundraising and giveaways that she is having.  Your heart will be warmed! And while you're there, I'm pretty sure there will be some elves that come along to clean up that sewing mess. I hope so, anyway!

Sharing at Let's Bee Social.

Friday, March 23, 2018

Mountains, baby!

Well, that was an exciting week, wasn't it?  We had a big spring snow storm and virtually no work got done by anyone all week, except by the snow plow drivers and the guys with chain saws who spent quite a bit of time cutting up the massive tree that fell down across my neighbor's driveway.  We lost a few branches, but nothing that required a chain saw, thank goodness.

We all know that a snow day is a free day, right?  So instead of working on real things that I need to get done for my real life, I used the whole day to finish a baby quilt for my friend's first grandson. His parents chose mountains, along with navy, gray, and aqua for him, which was quite the challenge.  I'm afraid there is no aqua in this quilt, but I think I got the style and tone right. Here's how it finally worked out:


How better to photograph a mountains quilt than against the snow? Of course the day after the storm it was bright and perfect outside when I wanted to take pictures, so I had to wait until later in the evening to get photos that weren't totally bleached out.All that snow was pretty blinding!


Except for the center panel with the mountains, this is nothing like I started with. It was lovely to have time to work on it and try things, rip them out, and try something else until I felt like I got it right.  I ended up deciding that piecing of any kind would distract from the mountains, so I just used graduated strips of color, with grays on the bottom and blues on top.


This quilt turned out to be just about 40 by 48, almost exactly where I wanted it to be.  I think that will be a nice size for a tiny boy and still be good when he's a little bigger.  I quilted it with organic lines that were not straight but not curved, either.  These are easy enough in theory, but it's hard to get them to look consistently graceful.  It was a nice couple of hours while I listened to the plows and the wind.


For the backing I used a pretty blue called Prism by P and B Textiles.  It made a nice complement to the colors on the front.  The binding is Kona Celestial.  I was going to use navy but it looked pretty harsh.  This one is just a little bit softer which made it perfect for this project.  And because I like things all blendy, I used a perfectly matching blue thread in the bobbin and 8 different colors of thread in the top. To match the different colors, you know?


When you give a baby quilt, do you wash it first?  I washed this one, then I ironed it so that it will look "new" when little Otto's parents take it out of the box.  Is that weird? Whether it is or not, this little quilt is on its way to its new owner, who is still pretty new himself.  I'm so happy to have this done, and so happy for my friend, because being a grandma is pretty much the best thing ever.  I know this little guy will bring them all so much happiness.

Hope everyone has a great weekend.  Our snow is pretty well melted (since it was 50 degrees today) and I have some fun plans for the weekend.  It's my daughter's birthday, so we'll get to see her, and I'm hopeful that there will be some celebrating.  I can't have cake any more (gluten, bah!) but you know what *is* gluten free?  Most wine.  True fact!  I'll test some for you just to be sure!


Sharing at Confessions of a Fabric Addict, Finished or Not Friday, and crazymomquilts.

Wednesday, March 21, 2018

Making a mountain

Hey, it's yet another snow day here! What is happening to our weather?  It has snowed more since mid February than it did all of the winter previous to that and we are in line for some serious snow the next few days.  So, yes, pretty much everyone has a snow day today.  Our homeowner's association even sent out a message that they wouldn't be able to pull people out of ditches in the snow, so everybody stay home and don't bother us. Really!

Since it's a snow day, I am hoping to finish off a special baby quilt before Friday.  One of my very best friends just became a grandma for the first time! Her grandson is really cute and obviously he needs a special baby quilt.  His mom and dad chose mountains and the colors gray, navy, and aqua for him, so of course I want to combine all of those for his quilt.  Here's where I am:


That's the most important part of the quilt, the mountains.  I think they look okay, don't you? And of course there is a lot of gray in there, even in the green at the bottom.

The mountain panel is pretty big, about 24 by 40, but the quilt needs to be bigger.  I want it to be about 40 by 50, and I want to incorporate some other colors.  I thought about just putting a light gray at the top and a darker gray at the bottom, but that's a little sedate for a baby, don't you think?  So I tried using some aqua and green tumblers, along with some gray ones, at the bottom:


Hmmm.  That's not good at all. I thought I would use some light blues along with the grays for the upper part, but now I'm not sure what to do.  Maybe strips instead?  Dark grays at the bottom, lighter ones at the top?  Four patches? Anyone have any other ideas?  All I know for sure is that I'm using navy for the binding.

Well, I'm sure I'll figure it out.  Half the point of experiments is to figure out what doesn't work, right? I just want it to be  really nice for the tiny boy and his folks and grand-folks.  I have the back and the batting all basted and am ready to quilt this just as soon as I figure out the front, and with a snow day I should get it worked out really soon.  I also made these baby blankets for the little man, which are supposed to coordinate with his quilt:


Those are really cute, aren't they? I was surprised by how many different grays there were to choose from in the baby section of the flannels.  Who knew?

Hope everyone stays safe in the different weather events happening right now.  Before I head back to the sewing room, I need to ask you all to head over to Preeti's blog (right HERE) for a very important post.  She's hosting a fundraiser for a special little boy and offering some prizes for participation. There are also pretty quilty pictures, but the story will really touch your heart, so be sure to hop over and read it and consider donating.

Of course, if you have good ideas about the mountains quilt, send them along!  Otherwise, stay safe!

Sharing at Let's Bee Social.

Saturday, March 17, 2018

A new galaxy quest

Hi all, and happy St. Patrick's Day!  My family always celebrates today even though we're not the tiniest bit Irish, because today is my brother's birthday.  Well, one of my brothers.  It's totally his fault that I'm craving cake with green frosting today.  And, no, his name isn't Patrick, but if you buy him a beer today he'd be happy to answer to it!

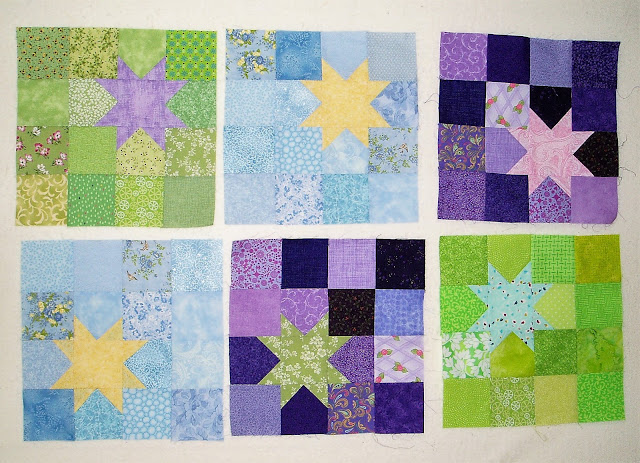
I've started on another project for RSC18.  I can hear you now, "Mari, don't you have enough projects?"  Well, yes, but what I don't have is projects to use up some larger scraps.  Specifically, I need to use up a bunch of dark blue half yards that I bought to test fabrics for my Constellations quilt. I almost never use dark blue, so why not combine those half yards with my RSC scraps and make those a quilt? So here's what I've come up with:


More stars!  The wind was blowing so badly when I took these pictures that I could only get ones out on the deck where I could chase them down when they started blowing away.  These stars are a Clay's Choice variation and you can find a tutorial for them HERE.  They're pretty simple to make and go pretty fast.  And don't they just sparkle?  I made these stars in an 8-inch size instead of 6-inch, which will mean fewer stars to make a quilt.


I think that I'll need about 40 stars to make a decent-sized quilt, so these 6 will be a good start.  If I make some more light blue or purple scraps along the way this year, I'll add in a couple of purple or light blue stars, but otherwise I'm starting right here. 

The worst part about making these blocks was going to be drawing lines on the back of squares to make the diamonds, but somewhere I saw a tip about using gridded plastic as a guide so that you don't have to draw any of those lines.  It worked great!  I bought a piece of this template plastic at a big box store:


This sheet was way too big, but only came in one size.  The squares there are 1/4 inch apart, which also makes them handy for aligning seam allowances.  I cut out a small piece, then aligned one of the heavy lines with the needle and taped it to the machine:


Instead of drawing lines, I just kept the tips of the pieces lines up along the heavy line as I stitched so that it stitched a straight line right on the diagonal.  The first couple of tries were a little shaky, but as soon as I got the hang of it, it worked great and saved me a ton of time.  I know that some people use graph paper or even regular paper with a line drawn on it, but the fabric slides very nicely right along the plastic.  I did take it off the machine once I finished the stars, but I saved it, and if I lose it, I can cut another piece!

Hope everyone has a great weekend.  If you're reading this on Saturday, chances are that we're outside digging right now.  The time for the nightmare drainage project has finally come.  I have a ton (literally!) of gravel and 150 feet of drainpipe waiting for me. If you're looking for something to do, grab a shovel and come on over!  There will be takeout!

Sharing at soscrappy for RSC18.

Wednesday, March 14, 2018

Building begins

Okay, I'm just going to say this:  I have too many quilt ideas! You know how sometimes you have zero ideas and sometimes you have a whole lot of ideas? Right now I have tons of ideas and I want to start all of them.  The only thing really stopping me is that I have no empty project boxes.  Otherwise I would be cutting 50 different things this week.  Luckily, I am holding myself back writing down all my ideas, and working on my current projects.  Let's hope that I'm still excited about these ideas when I have time to start something new.

Since I'm working on my regular projects, these last few days I've started working on building my "winter" church panel for a seasonal church sampler.  So far I have the door portion done:


If you recall, I am piecing a panel of a lovely colonial-era church near Wilmington, Delaware, as the "winter" portion of a seasonal church sampler.  I started with the door portion because that seemed like the most detailed part of the building to me.  The little windows in the door took forever, but I think all the trimming and ripping was worth it.  Could use some more pressing, though, so it looks less crooked.

Last time I showed some beige-ish fabrics that I might use for the building itself, but I actually purchased some Grunge fabric for this project. 


I've not been a big fan of Grunge--fabric that's already dirty!--but it works for this project.  If a 200-year-old building doesn't need grungy fabric, what project does?  If you look, those are two different colors, which I got because there are two distinct colors in the building.  I'm pretty sure these are Vanilla and Cream, but I also got a couple of tans so I can see if I like the contrast using those better.


If you look, the building has a lot of concrete over fieldstone, and the center portion is smoother concrete than the remainder of the building, so I had to have two different colors.

I think getting that door finished is a good step forward.  I really like this so far, too, and I've had a good time puzzling through it.  Next I plan to make the windows for the center portion and then the sides, then I have to think about how to make the grounds. The windows are colonial "12 over 12" windows, so right now I'm thinking that the panes will have to be stitched in and not pieced. We'll see how it works out.

And in case I didn't mention it before (and gosh, I'm sorry I didn't!), I'm using Julie Sefton's book Build a Barn, No Pattern Construction as a guide to free-piecing the churches.  It's very helpful!  You can get it from Amazon or a signed copy from Julie.  You'll enjoy it!

The church project is fairly monochromatic, which makes this post a little dull!  I've also made these:


That's some nice color! These are for the Community Sampler being run by Sharon Holland and Maureen Cracknell.  I'm making mine in pinks, yellows, and greens.  Can you tell that I'm thirsting for spring?  I especially like the fussy cut fabric in the center of that first block.


Hope you are making some progress on your projects this week, too. I am supposed to be working outside over the break but we're having some weather, so I'm dodging that for now.  Thanks to all of you who offered your support and some recipes that are definitely not taste free.  We taste tested a bunch of things and I'm making progress on knowing what to eat.  I can personally vouch for THIS recipe for Maple Bourbon Chicken.  Yum!

Sharing at Let's Bee Social.

Friday, March 9, 2018

Snow day finish

It seems like my life has been full of a lot of unexpected things recently, including the snow storm that happened on the East coast this week.  It was wild! Heavy, wet spring snow that made the roads an absolute mess.  For a while there it was really hard to see outside.  We got hit on Wednesday, and the people to the north had to suffer through Thursday as well.  And of course everything was closed.  And we all know what that means, right?  Bonus sewing time!

I didn't think I'd have a finish this week, but I settled in and finished this little lovely:


If you recall, this is a little string top that I made a couple of months ago.  I made the blocks at the end of last year from the smallest of my strings.  The 16 little blocks were just destined for a box but they became this little top instead. While it was snowing, we were lucky enough to still have power (some people didn't) so I sat down and quilted this up.


The quilting for this little top went pretty quickly.  I used a walking foot to make a simple crosshatch through the string blocks, and then to outline the small inner border.  Then I used some chalk to draw in some scallops on edges of the inner border and echoed those twice to make a nice frame.  You can see it a lot better on the backing:


Well, I hope you can see that. After I finished it up, I had to add in that glass button in the center, you know, just to give it some color. All together, the quilting for this piece only took about an hour and a half, including drawing in the scallops.  I used the walking foot for the whole thing, which was awesome.  I think I could do a lot with this, and it makes me want to at least look at the book by Jacquie Gering on machine quilting with a walking foot.  It's so much easier for me than free-motion.  And it turned out great!


At about 24 inches square, this quilt is obviously wall-hanging size, and it happens that we just bought ourselves a lovely sideboard for some extra storage.  It's on a wall that spans the kitchen and dining room, which is all open.  I hung the quilt right above the sideboard, where it certainly shines:


The picture here doesn't do it justice because of the indoor lighting, but it looks really good against the blue-green wall.  I especially like how snappy that green binding looks.  It adds a nice happy spot to the kitchen, kind of like a stained glass window. I used Command strips to hang this directly on the wall.

So there's what I did on my snow day!  It was actually quite relaxing since I had no where else I could be and nothing else I should have been doing.  Oh, sure, I could have looked harder, but why?


Hope everyone has a good weekend.  Believe it or not, I'm going to be. . .cooking.  I know! But I really have no choice but to learn some new things in the kitchen.  I've been having some health problems for a little while now, and a couple of weeks ago I was (finally!) diagnosed with an autoimmune disease which is going to require me to eat gluten-free, sugar-free, and dairy-free.  If you know any recipes which are not also taste-free, I'd love to hear them!


Sharing at Finished or Not Friday, Confessions of a Fabric Addict, and crazymomquilts.

Wednesday, March 7, 2018

Building plans

I read this week that spring is running 20 days ahead of schedule for the Mid-Atlantic states, which is where I live.  I believe it, because the hubs and I made a quick trip last weekend to celebrate our grandson's second birthday (!!!) and when we got home, I noticed that there were already weeds growing in the lawn.  How can this be? It seems impossible, but there it is!

Since we are racing to spring, I thought that I had better get started on a "winter" project before we're well into planting and all that.  Remember a bit ago I made a free-pieced version of the Joan of Arc chapel?  I said then that I wanted to make a seasonal sampler of different churches or chapels.  With winter ending I'd better get started on the winter church, don't you think?

Here's the church I've chosen for the winter panel:

That center tree is going to need to be edited out.

This is St. James Episcopal Church on St. James Church Rd. in Stanton, near Wilmington, Delaware.  It may not look like much in the pictures, but it is an awesome church! The people there are very nice, of course, but the building is very interesting.  The congregation itself was founded sometime before the land for a church was purchased in 1714. The first church building was built in 1716 and was replaced by this building in 1821.  The church is listed on the National Register of Historic Places and still has an active congregation that uses the church all the time.

Well, that will be a challenge to construct!

There are a lot of colonial-era churches in the area, but I'm drawn to this one because of the asymmetry of the building and the interesting setting, right there in the middle of the cemetery, with the fieldstone walls right at the street.  (The first grave there is from 1726, and many of the stones are still readable.)  I think this will be good for the winter piece because it has an almost monotone quality in the winter.  The church itself is a little more yellow than it appears in the picture, but almost everything is a shade of the same colors.  Plus, once the trees leaf out the building itself is hard to see.  It's beautiful with flowers, but not for my purposes.

So, with all of that, what am I going to do for fabrics?  Well, here's what I have so far for the areas surrounding the church:


The main color here is going to come from the sky fabric, and all of these blues are wrong.  I want a brilliant blue, but the darker one here is too bright and the lighter one is too light, so I guess I'll have to go shopping. (Gosh, I hate it when that happens!)  The tans are for the grounds, which don't show too much in the photos, and the greens are for the evergreens and tree trunks.  I admit that there will not be a lot of color here, but I think that's a plus.

For the building itself, I have these so far:


The grays are for the gravestones in the cemetery, which have more variation than you'd think.  I might need a darker gray for some parts, too.  The greens there are for the low fieldstone walls in front of the property, which are very weathered and have been capped off with weathered copper (which ages to a green patina).  The yellowish beiges are obviously for the church. I'm drawn to the one in the center top, mainly because it has splotches on it and looks weathered.  The one at the top right also looks good, but those figures in it are leaves, so I'm not sure how that will look.  Experimentation is in order.

So, there we go! I'm ready to make the first sampler panel.  (Why, no, I haven't quilted the first chapel yet!  What are you implying?)  I'm open to suggestions and ideas for building. Pretty sure I'm going to have to applique the bell in the tower, unless someone has a great piecing idea to share!

Hope everyone is having a good week!  For anyone who's interested, the birthday boy was delightful, and his twin brother and sister are adorable.  Who knew this much happiness was possible?

Sharing at Let's Bee Social.

Saturday, March 3, 2018

Squared Away Block 3

Hi everyone, and welcome back to the Squared Away quilt!  We are all the way up to block 3! If you've just found this quilt along, come on and jump right in.  It's not too late to start!  This quilt was designed by me and Angela of soscrappy as a fun, free project, so there are no signups or fees.  Just start sewing and you'll fit right in.

Our colors for this month are bright and light greens, just to get us in the mood for spring. Here is our block for this month:


Believe it or don't, this block is called Red Cross and was in the 1897 publication of the Ladies' Art Company catalogue.  This is one of those blocks that can look very different depending on your fabric choices.  I've tried  different colorways and you can see those pictures near the end of this post, so be sure to read all the way through before you start cutting.

On to the tutorial for the block!

Cutting for 10-inch blocks

This block is something of a magic block.  It requires 16 half-square triangles, but if you have an Easy Angle ruler, this entire block can be made from one 2-1/2 inch by width of fabric strip of green (like those in jelly rolls) and one 2-1/2 by width of fabric strip of background.  This is the way that I made my blocks.  If you want to make your half-square triangles a different way, I've listed some cutting instructions by block component, not color, so you can mix and match depending on how you want your block to look.

As always, if you already have squares cut, use those! No need to let good scraps go to waste.


To make a 10 inch finished block the way I made mine, cut:

1 2-1/2 by width of fabric strip of green
1 2-1/2 by width of fabric strip of background

Alternate cutting instructions to use other sizes of scraps:

For the hsts:

To use the Magic 8 method:
2 5-3/4 inch squares of green* 
2 5-3/4 inch squares of a background or accent color *
(can both be oversized and hsts trimmed to size if desired)

For use the more traditional method for hsts:
8 2-7/8 inch squares to make 16 hsts

For the crossbars:

4 2-1/2 by 4-1/2 inch rectangles of green or background

For the center:

1 2-1/2 inch square of green or background

Construction:

This block is very easy to make.  First, make 16 half-square triangles using whichever method you prefer.  Your hsts should measure 2-1/2 inches to finish at 2 inches in the block. To make them from the 2-1/2 inch strips, follow these steps.  HERE is an old video from Bonnie Hunter that explains a lot better than I could, if you find videos helpful. (My pictures are a little different from hers.)


First, put your two strips right sides together and align the edges carefully.  I found it helpful to press the strips together.  Trim off the left selvage so that you start with a nice square end.


Using the Easy Angle Ruler, align the 2-1/2 inch line along the bottom of the strips, with the small black triangle hanging over the top edge.  Cut along the slanted edge.  You should have a piece that looks like this:


Flip the ruler around to cut the next pair, and then continue along the strip until you have 16 pairs.


After you have all of the pairs cut, stitch each of them, open, and press.  These will not require very much trimming, if any.  Once you get the hang of it, it's very easy and goes fast, but it can be unforgiving. Not aligning the pieces correctly can lead to hsts that are too small, so be sure to cut carefully.

Once you have 16 hsts, separate what remains of the two strips.  From one, cut 4 2-1/2 by 4-1/2 rectangles for the crossbars.  From the other strip, cut one 2-1/2 inch square.  You will have some leftover from one strip but very little from the other.


Arrange your hsts as shown, in four groups of four hsts each.  Pay close attention to the directions of the colors, stitch together, and press well.  You can press in any direction that the seams fit best since they won't be attached to other pieced units.

Make 4. These units should measure 4-1/2 inches square.

Assembly:

That is it!  Time to assemble the block--

Lay out the units you just made, the rectangles, and the center square as shown, paying attention to the directions of the hsts:


Join the units into rows and the rows into a finished block.  I found it easiest to press toward the rectangles.  Give your block a good press, stand back, and admire!

This block looks very different depending on the color choices.  Here's my first block from above along with a second block with green crossbars instead of white ones:


Whichever way you decide to distribute the colors, make sure that the center square and corner triangles form a small Shoo Fly block in the center of the block:


This insures that the hsts are in the correct orientation and your block turns out with the right effect.

Even though there are a lot of hsts in this block, it goes pretty fast.  You can also have fun choosing some different background colors to coordinate with the greens.  In the block above, I used a light purple to set off the bright green.

Our quilt is 30% finished! Here are my versions of all the 10-inch blocks we've done so far:


And for those of you who are into dark backgrounds, here are my larger blocks:


These are going to be some great quilts!  I just love seeing the pretty greens.  It gives me some hope that spring is actually on the way.  Don't forget to visit Angela's blog today to see her blocks and get some more ideas for variations and maybe some tips or tricks, too.

The next step in our quilt will be ready April 7, so meet back here for the next block!  In the meantime, we'd love to see your blocks at Angela's weekly linkup so we can all admire them. And if you're sharing pictures of your blocks on Instagram, remember to tag them as #squaredawayquilt or #squaredawaybom so that we don't miss your pretty blocks!

Sharing at soscrappy for RSC18.