Friday, January 27, 2017

It's Complicated

Happy weekend, everyone, and welcome to a very late edition!  The delay has been caused by the problems getting some lovely pictures of the Intricate Stitches quilt top to show off.  Between the rain, freezing rain, winter darkness, and the wind (which almost threw my quilt top into a stream), it has been really difficult to get pictures, and I've tried for a few days now.  Maybe it's just shy?  At any rate, the few good pictures I have will have to suffice.

So, to get right to it--I've finished the Intricate Stitches quilt top!  Here it is:
 

This is the final quilt top from last year's Rainbow Scrap Challenge project, Intricate Stitches.  It has a *ton* of pieces and a lot of different colors of hand-dyed fabrics, and I am very happy with how it turned out.  I'm still a bit unsure about the dark frames for the blocks, but looking at it all together I think it makes the blocks stand out a lot better.  They would get lost in the quilt without frames and I didn't like any of the other colors I tried. 

Nothing like a little wind!  The freezing rain started as I was taking this picture.

The colorful fabrics in this quilt are all hand-dyes from Vicki Welsh.  These were wonderful fabrics to work with and even stood up to the ripping that inevitably happened.  The backgrounds are just Kona white and the block frames are also Kona, a beautiful blue called Celestial.  My quilt top finished at just about 65 by 65. 


I really had a great time all year making this quilt, and I learned a lot.  And I really want to make more of these blocks!  I can see a quilt made with any one of them.  Can't you just picture repeats of any of these blocks as a whole quilt?  I think the feathered star on the right is calling my name!  And speaking of names--I think the name of this quilt might be "It's Complicated."  Happy to hear any better suggestions!

Okay, I give up!

Hope everyone has a wonderful weekend.  My plan for the weekend is a nice nap, followed by something warm to drink, and then another nap.  Isn't that a nice plan?  I'll actually be scrubbing the bathtub or getting groceries or something, but it's good to have a plan!

Sharing at Finished or Not Friday, crazy mom quilts, Confessions of a Fabric Addict, and soscrappy for RSC16.

Tuesday, January 24, 2017

Utility sewing

Hi all!  Is it raining and gross where you are?  It's better than snow, but we have had some really strong storms. It's warm, so it's rain and wind, but no fun at all. Our house has a lot of trees surrounding it, so the strong winds had us holding our breath for a bit. My heart goes out to those of you who live in areas that had tornadoes this past week.  Hope you all came through okay.

So far this week, I've had to do a bunch of sewing chores that are not very exciting but need doing, things like hemming pants and putting a lining in some curtains.  I also made up these denim bags (temporarily stuffed with quilt batting to make them stand up):


The little birds are in there just to add some color! These are just some quick grocery bags for hauling provisions home.  Everybody needs these, right? I hate the ones they sell at the stores--they don't hold much and they're made of some weird fabric that doesn't wash well.  I made these from some denim I've had for years and years.  Why not use it up? I don't make many clothes any more, so it's just going to sit there otherwise.

These are super-simple.  All I did was cut 24-inch lengths, fold the fabric in half, then cut 5 inch squares from each corner. 


Stitch the sides and you should be able to stitch a straight seam for the corners.  Hem the top, make the handles, and voila--grocery bags with style!  I did use French seams so that the insides won't ravel and be a mess, but otherwise it's just plain straight stitching.

So there was that.  I also made some bindings from leftover backings:


These are from the long straight pieces that are trimmed off after the quilt is quilted.  The rest of the trimmings get cut up into scraps, but it's awfully handy to have these bindings on hand.  They're especially good for scrappy quilts.

So, as I said, lots of boring sewing.  Does it get more boring than hemming pillowcases?


I have to shorten them because I have a king-sized bed but regular-size pillows.  Every time I do this I'm reminded that my grandmothers used to iron their sheets.  Why, I don't know, but they did, every week.  Thank goodness we have moved on from that!

Just to have something inspirational hanging up, I pulled these out so I could figure out what to do with them:


I didn't make these blocks.  Believe it or not, I got these in a scrap bag!  Every year Patched Works has Scrapfest, where you buy scraps by the pound. We were in Wisconsin over the holidays, so of course I went shopping there and of course I got some, because I need more scraps.  Obviously.  These great blocks were there for the taking as well!  Who could resist?  Right now I think they'll make a nice, fast donation quilt that I can practice quilting on. 

 Hope your stitching this week is less boring than mine!  I do have something lovely coming up for Friday, though, so be sure to come back for that!  Happy stitching!

Sharing at Linky Tuesday and Let's Bee Social.

Friday, January 20, 2017

Steps to the garden

Hi all!  How was your week?  It has been a heck of a week around here, and I've been having some stress because I haven't been able to sew.  Do you ever get like that?  Classes started this week, but I'm pretty sure that doesn't have anything to do with the stress, right?  Oh, plus we're ripping up carpet, which is actually a decent stress reliever, but raises a ton of dust

All that I managed to make up this week were these:


This is my second project for RSC17.  Apparently I have this thing for making the same block over and over.  Doing that makes for spectacular quilts, but can be very, very boring if I try to do it all at the same time, so I've been breaking them into 3 or 4 blocks at a time.  The colors this month are the rejected purples from the En Provence quilt that I'm working on sporadically.


This block is Steps to the Garden, a Nancy Cabot block from the 1930s.  This was a block I used for the Intricate Stitches quilt last year, and you can find the tutorial for it HERE.  Here's how stressed I was--I had a heck of a time making sense of how to put the block together, and not only had I made it before, but I wrote the tutorial!


For this year, I pulled 2 constants to use with the color of the month each month.  The darker green will make a lovely trail through the quilt, and the lighter green is a better background for a "garden" quilt than a white or cream.  I tried them out with a range of colors and they look okay, so there we go.


I have a bunch of the darker green, but I realized after I made these three that I probably don't have enough of the lighter green.  Not sure what to do there.  Anyone have any of this "Nancy's Favorite Holidays" that they'd be willing to part with?

Hey, here's a tip I used while stitching these:


Stick your seam ripper in a spool to make a great stand-up cutter!  It works so well!  I saw this online somewhere, so I don't know who to credit, but it's genius.


Hope everyone has a great weekend.  We are ripping up some more carpet!  Yay! Then we're going to visit our daughter, so that will balance it out, I'm sure.

Sharing at Finished or Not Friday, Confessions of a Fabric Addict, Oh Scrap! and soscrappy for RSC17.

Friday, January 13, 2017

Small finishes

Happy Friday the 13th, folks!  I hope it's going well, because it turns out there are a bunch of these this year.

One of my "unofficial" goals for this year is to do something with all the unquilted/ unfinished pieces that I have hanging in the closet. For this week, I finished two small pieces that have been in the closet for a while, at least a couple of years.  Here is the first one:


This is a little house wall hanging, about 20 by 20, that's going to live in the entryway to our new house.  I made this from the traditional schoolhouse block pattern before we moved from Wisconsin. It hung out in a box in storage for a long time, then spent time in the closet. I thought it had marinated long enough, so I spent a lovely afternoon quilting it up this week.


I used this little house as a practice piece, so it has a lot of different motifs in it.  I definitely need more practice!  Thankfully, I have plenty of unquilted pieces to practice on. For some reason, stippling is my worst skill.  Don't know why, but it really never clicked for me.


This has a single-fold binding and I used a couple of squares as hangers on the back, too.  It was fun to work on this one and I'm happy enough with how it turned out.

This is the second piece I finished this week:


This also spent some time in storage, and all it needed was a binding!  I made this a while ago from pieces that a friend gave me.  No pattern and not my colors, but it turned out okay.  I straight-line quilted it a long time ago and I think that turned out okay. Yesterday I zipped on a binding and now it's ready to donate. Whoo-hoo!  Let's hear it for more space in the closet!


Hope everyone has a lovely weekend.  It was 60 degrees here today and is supposed to snow on Saturday.  What the what?  Best to stay inside and stitch, I guess!


Sharing at Finished or Not Friday, Confessions of a Fabric Addict, and crazymomquilts.

Wednesday, January 11, 2017

Accidental quilting

Friends, we have a situation here.  I accidentally made something and I'm not quite sure what it should be, or even what it is right now!  And I sure don't know what to do with it next.  But I know I kind of like it!

Let's talk after the photo:

I love this tree!

Whatever it is, it's darned cheerful! Here's what happened: I decided to make a temperature quilt this year.  There are a ton of ways to do this, and I considered a lot of them, but in the end I decided to use plain old 3 inch squares.  It's all I felt I could keep up with for a whole year.

Then I had to decide on fabric to use for the temperature scale.  There are a lot of ways to do this, too, but I decided to use a bunch of fat quarters to make a temp scale in 5 degree increments from 0 degrees F to 100 F.  Why that increment?  Because I am a little crazy, and also because I wanted to have a lot of variety in the blocks, avoiding big stretches of one color.  Also, it gave me an opportunity to use a lot of fat quarters and prints.  I want the finished quilt to be fun to look at, after all.


It took a long time to work that out!  It was fun, though, and made a total mess with all of the discarded fat quarters, that I still have to pick up off the floor and the table and everywhere else.  I'm really pleased with the scale, too!  And look--there are prints!

The winning selections

So then I needed a visual to keep the colors straight, right?  Yes, I did!  Just stitch the squares together in color order and pop them up on the design wall so I can see which color to use for that day, right?  Sure, except in retrospect it would have been better to use 1-inch squares rather than the 3 inch squares I'm using for the quilt.  That would have made more sense, because I ended up with a very colorful strip that measured about 60 inches long.

Then I thought it might make a cute quilt on it's own as a thermometer, so I grabbed some Kona Snow and put a narrow strip on one side with the wider piece I had on the other side.  I had every intention of trimming it down, but then I looked at it and now I'm not so sure.  Maybe it's a quilt top of its own just like this. Right now, it's about 40 by 60, which strikes me as a bit narrow.  Not enough to cuddle with, but too big, really, for a baby quilt.   And a white baby quilt just gives me the willies.

Kona Snow in the snow

So, what do you think?  Do I add to it?  If so, what?  Trim it down?  And how on earth would I quilt this? What would you do? 

And in case you're interested, here is the strip for the first 10 days of 2017:


So much for avoiding big blocks of color!  I may have to change my strategy.  I saw one that is made up of half square triangles of the high and the low for the day, which sounds intriguing.  And heaven help us if we have to use those lighter purples (or the deep reds at the other end).

Any suggestions welcome! Hope you're having a good start to stitching in 2017!


Sharing at Let's Bee Social.

Saturday, January 7, 2017

Rainbows redux

In her post this week inviting people to participate in the Rainbow Scrap Challenge for 2017, Angela asked veteran RSC quilters to post some of their finished rainbow quilts as encouragement to those of you who may be on the fence. Oooh, fun! I've made several RSC quilts from scraps. so consider this your encouragement! Except for the first one, these are in no particular order.

First up is this quilt, Odd Fellows:


This could be my favorite quilt ever, and that's saying a lot!  It lives in my living room and gets used and loved all the time. This is made entirely from scraps, including scrap white on whites.  I made a couple Odd Fellow's Chain blocks each month in the color of the month and then put them together at the end.  I just love how it came together, and how it turned out.  I think this quilt also involved the first tutorial I ever wrote, for the Odd Fellow's block.  (You can find that HERE.)

That same year I made this one, Triangle Surprise:


This was just half-square triangles in the color of the month put into 6 inch finished blocks.  At the end I set them on point and made a very simple quilt.  This one went to live at my daughter's house.

The Framed quilt was also an RSC quilt:


For this one I made crumb blocks for the centers of the stars, and then used the Moda Love pattern to make the frames around the stars.  These are also from leftovers, including the backgrounds, which used up a lot of my leftover white on whites (which I never seem to run out of.)  This one is on the guest bed at our house, because it's huge! But cozy!

Of course, there are a few others.  There's this one:


Sewing Lessons, made from scraps for the Classic Stitches BOM.  (Check out the tab at the top of the blog.)  This quilt also came from those tutorials:


Serendipity! Also all scraps! I think the hubs is napping under this one right now.  He really finds it comfortable for some reason. I think it's just the right size for him.

So that's some of the rainbow quilts I've made as a part of this challenge.  I'm sorry to say that I'm not done with last year's yet, but I'm working on them!  I also have plans for this year, including another BOM and a quilt using multiples of the same block. If you just make a few a month, it's not nearly as big a deal as if you sat down to make 30 copies of the same danged block at once.


Hope that's enough encouragement for you!  Come on along and join the fun.  It's nice here!

Sharing at soscrappy for RSC17 (!!).

Wednesday, January 4, 2017

Constellations Quilt-- Purple

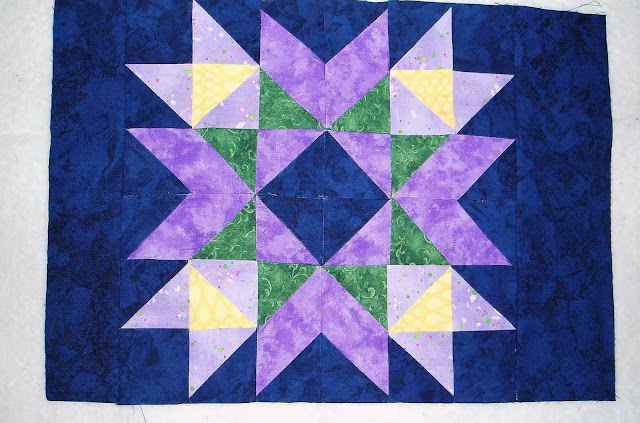
Hi all, and welcome to block one of the Constellations quilt!  This month's color is purple, which is good because I have a bunch of purple scraps hanging around from another quilt I'm working on.  I've chosen this lovely block for this month:


This is the Wyoming Valley Block, and it is not nearly as difficult as it seems.  It's mainly made from half-square triangles that finish at 2 inches, which we all know how to make, so let's start sewing!

For this block, you will need scraps of two different purples (I used a light and a medium), a green, a little bit of yellow or another accent, and the background (mine is the dark blue).

Helpful tips:

Just a few things to note before we start sewing.  I'm going to assume that you all have some experience sewing and that you know how to make basic units like half-square triangles and the like, so I'll leave out those specific instructions.  If you need a tutorial for some units, I'll do my best to link to one.

*It's really helpful to read the whole tutorial before cutting anything.  

*I don't press seams open, but you may find that you get the flattest block by pressing your seams open.  Otherwise, press toward the darker fabric or toward the least-pieced units.

*It helps a LOT to square up as you go and make sure that each of the units is the correct size before proceeding.

*It also helps to use a slightly smaller stitch length.

*Accurate 1/4 inch seams make life easier! 

Cutting:


From the background, cut:

6 2-7/8 inch squares (for hsts, so can oversize to trim down later, if you do that)
12 2-1/2 inch squares

1 2-1/2 by 12-1/2 inch strip
1 3-1/2 by 12-1/2 inch strip
2 2-1/2 by 17-1/2 inch strip

From the lighter purple:

6 2-7/8 inch squares (for hsts, so can oversize)

From the medium purple:

8 2-1/2 by 4-1/2 strips
2 2-7/8 inch squares (can oversize)

From the green:

8 2-1/2 inch squares

From the yellow:

2 2-7/8 inch squares (can oversize)

Now to sew!

Making the units:

First we're going to make a bunch of half-square triangles.  Use the 2-7/8 inch squares to make the following hsts.  All of these hsts should be squared to 2-1/2 inches to finish at 2 inches in the block:


8 of the lighter purple/ background
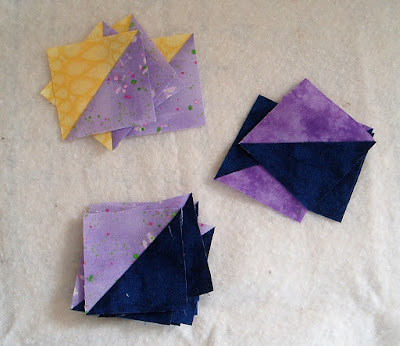
4 lighter purple/ yellow
4 medium purple/ background


To make the corner pieces for the block, take the light purple/background hsts, the light purple/ yellow hsts, and the 2-1/2 inch background squares and lay them out as shown:

This is the last of one of my favorite purples ever!

Make 4, and be sure that the light purples are positioned correctly, with one pair "kissing" in the center of the unit.  Each unit should measure 4-1/2 inches square.

Next, take the 4 medium purple/ background hsts and arrange them as shown. 


Stitch and press.  This is the block center and should measure 4-1/2 inches square.  [Alternate method: This unit can also be made as a square in a square, using a 3-3/8 inch background square and 2 2-7/8 inch squares.]

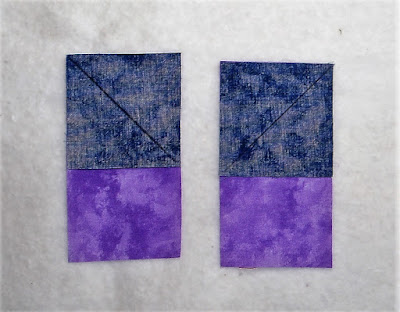
The next units to make are the "rays" of the star. You should have 8 2-1/2 inch squares of background and 8 2-1/2 inch green squares.  Draw a line from corner to corner on the back of each piece, as shown:


Take the 2-1/2 by 4-1/2 medium purple pieces and position the background squares at one end as shown:


Notice that these go in opposite directions.  Stitch right on the line, then trim and press.  Make 4 in each direction:


Next, take the green squares and position them on those same pieces as shown:


Notice that the lines on the green squares go in the same direction as the stitched lines on the background squares.  Stitch right on the line, then trim and press.  You should have 4 of each of these units:


[Alternate method: Make 8 purple/ green and 8 purple/ background hsts that measure 2-1/2 inches to finish at 2 inches in the block.  Arrange to make units that look the same as those above.]

Stitch together the units as shown above, matching the points.  Make 4.  Even if you don't press seams open, this one is a good choice to do so because it is quite bulky.


Units should measure 4-1/2 inches square.


All the units are made, let's make a block!


Assembly:

That's it for the units, so let's put this block together! Lay out the units you made as shown, paying attention to the directions of the hsts:


It's essentially a 9-patch block now, so join the units into rows and the rows into a block.  Press, stand back, and admire!


Completing this section:

This quilt was designed as a "progressive" quilt, where one section is completed each month and the sections are joined as we go.  You can also just make the blocks and lay them out any way you choose, or finish assembly of the quilt at the end. 

To complete this section of the quilt, stitch the 2-1/2 by 12-1/2 inch piece to the left side of the block, and the 3-1/2 by 12-1/2 inch piece to the right side. 


Attach the 2-1/2 by 17-1/2 inch pieces to the top and bottom.  Press well and admire!


Congratulations!  The first section of the quilt is done!

Have fun creating this first section, and come back on February 7 for the next exciting installment of the Constellations quilt!

Sharing at Let's Bee Social, Oh Scrap!, Finished or Not Friday, Confessions of a Fabric Addict, and soscrappy for RSC17!