Friday, August 25, 2017

One World

Hi all!  I hope you have had a lovely week this week.  We have been soooo busy, mainly because we were away from it all for a while.  On the upside, though, the weather has been amazing.  I just want to be outside all day.  Good thing the humidity dropped, too, because students were moving in all over the city yesterday.  Lower humidity means less stress for parents, and much less danger of anyone passing out. Hey, it happens at least once every year!

This week I wanted to finish my Sewcial Bee Sampler in time for the end of summer, but when I sat down to do it I just wasn't feeling it.  Too much structure, maybe.  Instead I just wanted to play, so I made this:


This is a large pillow, about 20 inches square, that was made from a hand-dyed panel that I bought at a quilt show sometime last year.  It was fun to make!  The photo above is stuffed with quilt batting until I get a pillow form, so here is a flatter picture of it pinned to the design wall:


I almost like it better flat!  Hmmm. . .

Since I was playing, I did try a couple of new things.  When I layered the panel with batting and backing, I used two layers of batting. (Yes, it's poly. It was left over from long ago. Finally used up that last piece!)  First I stitched the circle, then I folded the panel back and trimmed away the second layer:


This made the "earth" part of the panel really stand out, and I really love the effect. Sort of a super-simple trapunto without having to stuff anything or densely quilt areas. I had thought that I would just keep it unstitched, but there was too much area there for it to be unquilted.  Plus, some texture really enhanced it, don't you think? 


For this part, I used some green thread and just kind of followed the swirls of the marbling on the fabric.  This kind of suggests the Earth, but doesn't copy the continents or anything, which I really couldn't do, after all.  Plus this part was really thick and couldn't take any dense quilting.  It does feel really cool, though.  Lots of  deep texture!

The second experiment that I tried on this piece was using two threads in the needle.  I used a blue and a variegated yellow Aurifil and simply threaded both threads through the same needle:


It actually worked great.  The picture is a little fuzzy, but I used the weird extra spool pin that came with the machine to hold the second spool.  I was worried that the thread was too thick and would get hung up or that it would twist and break, but none of that happened.  Honestly, the worst part was burying the three threads instead of two.


I used the twin threads for the "rays" that emanate from the Earth section.  It's hard to see in the pictures, but sometimes the yellow is on top and sometimes the blue is more prominent.  It makes for some nice variations around the piece.  I spaced the rays pretty roughly,  starting by stitching the corners and then just estimating the distances in between stitching lines.  I think they turned out okay.

I've been calling this piece "One World,"  partly because it kind of reminds me of the very famous picture "Earthrise," taken by an Apollo astronaut.  I did get a *tiny* bit emotional when I stopped to think about things, and not to get political at all, but we really could use some unity, couldn't we?  I did have the Bob Marley song in my head the whole time, though, so that was all right.


So that was my playtime for this week!  I really enjoyed this, mainly because I went into it with very few expectations and therefore very low stress.  I was pretty sure from the beginning that it was going to be a pillow, so no disappointment there. Pretty sure one of my girls is going to make off with this when they come to visit next week, too.

Have a wonderful weekend, and I hope everyone makes it to school for the first day.  Friends in Texas, I truly pray for your safety.  Hope Harvey peters out before it gets to you.

Sharing at Finished or Not Friday, Confessions of a Fabric Addict, and crazymomquilts.

Wednesday, August 23, 2017

Back home again

Hi everyone! (waving wildly) Did you miss me?  I certainly missed you!  That was a longer time away than I had planned, but what can I say?  We had perfect weather and a tiny grandson to chase around.  Wouldn't you have stayed longer?  I actually forgot how fast toddlers can be.  That little boy was into everything.  But it was a great, great time.  Plus, I am now allowed to tell you all that we are going to be grandparents again!  To twins!  Yes, they are expecting a boy and a girl at the end of the year.  We are beyond thrilled. How much happiness can one family stand?

We got home to an almost-finished renovation, too.  All that's left is paint and trim, though I think we both know that those things can take forever, too.  Then I get to go shopping for some furniture and rugs! (I may have done some of that already.)

Needless to say, there has not been a lot of sewing going on, what with all the traveling.  I did take a hand project with me, though:


This is a Bridal Bouquet or Nosegay . some blocks that I've been basting and English paper piecing as we go.  I basted more of them than I put together, though, so I still have a bunch of parts to stitch.


I got a package of precut papers from Paper Pieces, which made everything really easy. The papers are HERE, and I got the 10-inch blocks. Bigger pieces, you know. The fabrics are all scrap pieces, which has made for some fun and interesting combinations.

And of course I carried everything around in this great zipper pouch that Preeti made for me:


The bonus for using this is that it makes a great place to stick threaded needles in the car. Plus it kept everything all together so I never left anything behind.  (Which we all know is a real possibility with me!)  And don't worry, no needles ever went near a curious toddler, though I'm sure he would have loved discovering those.

So that's just a small update from here, just to let you know I'm still alive and back to it.  I did do some planning for some fun projects for the fall, too, and I'm ready to get to them.  First, though, I'm hoping to have the Sewcial Bee Sampler quilt finished this week, so be sure to come back to see if I've succeeded.

Hope you are having a lovely end to the summer!

Sharing at Let's Bee Social and Oh Scrap!

Friday, August 4, 2017

Leftovers in the oven

Hi all!  Can you believe it's August already?  Where is the summer going?  I even bought some school supplies this week.  Something must be wrong with me.  Maybe it's the heat.  Do you think some ice cream would help?

This week I have a small finish to show off.  I took these pictures just as it started to rain, so they don't really do the quilt justice in terms of colors.  They're much more saturated than they seem. Any spots you see are raindrops, not dirt:


This is an unexpected little quilt.  I call it "the leftovers quilt" because it is made entirely of fabrics and pieces from other projects. The starting point was obviously the blue triangles, which are leftover from the Ocean Waves quilt.  I made these in 2014, and I knew that if I put them back in a zipper bag they would never see the light of day again.  


To use them up, I thought I would use the blue and white triangles to make giant quarter square triangles.  I tried it and it was boring.  Then I tried a smaller version:


I didn't like that at all either.  Yellow to the rescue!  I love yellow and I always have a bunch of yellow pieces laying around.  I used up scraps of about 5 different yellows in this quilt top.  Along with all the blues, that makes for a lot of scrappy goodness.


All I did was use the blue triangles as they were and stitch them into quarter triangle squares with the yellows.  Once they were all trimmed to the same size, all it took was turning every other block to get the pattern shown.  I also used up the fabrics for the borders, which were also leftover pieces from other projects.  I used up every inch of the inner border fabric, and I have about 10 inches left of the outer border.   I call that a win, don't you?

This little quilt measures about 42 by 52, which is a bit on the small side.  But I actually really like it, and it turns out to be the perfect size for my office.  As with most offices, it gets pretty chilly, both in the air conditioning and in the winter.  I have a thermostat, but I suspect that it's mostly a decoration.  This will be a great quilt for my lap or for students to wrap up in.  I have some dark blue Cuddle fabric, but I don't know if I want that on the back or not.


With that little finish, we are off!  We have some vacationing to get to, including a trip to see our tiny grandson, so I will be gone for a little while, though I will be posting some things on Instagram (@academicquilter).   See you there, and I'll see you back here in about 10 days!  Enjoy August while I'm gone!

Sharing at Confessions of a Fabric Addict, Finished or Not Friday, and Oh Scrap!

Thursday, August 3, 2017

Constellations--Light neutrals

Hi everyone, and welcome back to the Constellations quilt!  This month we are using light neutrals to make a spectacular block that will really add some zip to the quilt.  If you're also constructing the quilt as we go, as I am, we are also finishing off the third row, which means we'll be finished with 3/4 of the quilt!

Here is this month's block:


Isn't that lovely? I didn't realize it would be so patriotic-looking. In my head I've been calling this the "supernova" block, but it's real name is Rising Sun, which appeared in the Dakota Farmer in 1926, and appeared in other variations as far back as 1895. This block looks complicated but it has nice sized pieces and easy units, and it goes together quickly.  I had to adapt it a little bit to fit modern methods, but it looks substantially the same as the historical block.

For my block, I used a white print for the neutral, along with some red to bring the warm colors down to this end of the quilt.  The center is quite large and would be great for a fussy cut piece if that's something you do.  Orange or yellow would also look good as an accent if you don't want to use red.

Let's get to it!

Cutting:


(pieces marked with a * can be oversized if that's something you do)

From the white, cut:

1 6-1/2 inch square
2 4-1/4 inch squares*
8 2 inch squares (see instructions before cutting for an alternate method)

From the red, cut:

1 4-1/4 inch square*
4 2 inch squares

From the background, cut:

1 4-1/4 inch square*
4 3-1/2 inch squares
8 2 by 3-1.2 inch rectangles (see instructions before cutting for an alternate method)

To complete the quilt section:

Cut from the background:

1 2-1/2 by 12-1/2 inch strip
1 2-1/2 by 14-1/2 inch strip

Construction:

There are only three easy units to make for this block.  Let's start with the center square.  First, take the 4 red 2-inch squares and draw a line on the back of each square from corner to corner.  Arrange the squares on the corners of the 6-1/2 inch white square as shown:


Stitch on the line on the back of the red squares to "snowball" the corners of the white square.  Trim 1/4 inch from the stitching and press the red square up.


This unit should measure 6-1/2 inches square.

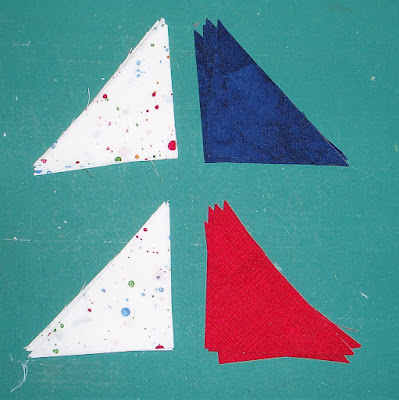
Next we are making some quarter triangle squares.  Take all of the 4-1/4 inch squares and cut them all (in all colors) from corner to corner twice to make 4 triangles:


Arrange the triangles as shown, with white on the left and red and blue on the right:


Stitch the center seams.  You should have 4 pairs of each color.  Press to the red and blue triangles.

Arrange the pairs as shown and stitch, matching the center seam:


Press in either direction.  Each quarter triangle square should measure 3-1/2 inches square.  Trim if necessary. Make 4.


The final unit is a unit I call flags.  The flag units are made by stitching a square to one end of a rectangle, forming a triangle at the end of the rectangle.  They're very easy, but if you are nervous about making them, I suggest cutting all of the pieces 1/4 inch larger, then trimming down at the end.  (An alternate method for these units is below.)

Take the 8 white 2-inch squares and draw a line on from corner to corner on the back of each one.  Arrange the squares on the triangles as shown, with the lines facing in opposite directions.  You should have 4 squares with the line to the left and 4 with the line to the right:

I drew on this photo to enhance the lines.  My stitching is not really that messy!

Stitch right on that line, then trim 1/4 inch from the seam and flip the triangle up, making a flag unit.  Make 4 in each direction.  These flags should measure 2 inches by 3-1/2 inches.


Alternate method for flag units:

Use a 4-3/4 inch square of both the white and the blue to make 8 2-inch half-square triangles.  Arrange the hsts in the correct direction, then add a 2 inch blue square to the bottom of each hst.  These should measure 2 inches by 3-1/2 inches.

That's the end of the units!  Let's put this block together!

Assembly:

First, make the side pieces.  Take the quarter triangle squares and the flag units and arrange them as shown, paying special attention to the direction of the flag units.


Stitch and press in either direction.  Make 4 side pieces.

That's it!  For the final assembly, lay out the units as shown, making sure that the red accent pieces form the circle in the center of the block:


Join the units into rows and the rows into a finished block.  Give it a good press, stand back, and admire!

Your block should measure 12-1/2 inches square and look spectacular.  Take a small break, have a cool drink, and let's finish another part of this quilt.

To complete this quilt section:

Add the 2-1/2 by 12-1/2 inch strip to the left side of the block.  Press well, then add the 2-1/2 by 14-1/2 inch strip to the bottom of the block.  Press well.


Take the quilt section that was completed last month and join it to the Rising Sun section to make a complete row.  Make sure that there is a 2-1/2 inch strip at each end of the row.  Row 3 is complete!


Measure your new row and the larger quilt that has already been assembled.  Adjust your row at the the seam between the sections if necessary to make sure that the larger section and the row you just completed are the same.

Adjust at this seam if necessary.

Be sure to measure, because being off by just a little bit on each of those seams can make your row too long.  And who wants wrinkles stitched into their new galaxy?  I had to adjust mine by about 3/8ths of an inch.

Fold row 3 in half to find the center of the row, and mark it with a pin or chalk mark.  Fold each end to the center pin and mark at the folds as well. Do the same for the larger section. This seems like a waste of time, but the row is long and has no seams to match, so it's important to keep the new row from becoming stretched out while stitching or otherwise becoming askew.

Join the new row to the larger quilt, matching the centers, other pin marks, and the seams at the sides.  Interior seams will not necessarily match. Don't worry about this. This is what keeps the quilt from looking "blocky."  Be sure to match the seams at each end as these are a part of the first border.


Press well and do a happy dance.  75% of your quilt is complete!

Thanks for coming along on this quilt with me!  Next month we start the last row, with the big finish in sight.  Meet back here on September 5 for that exciting chapter!


Sharing at soscrappy and Let's Bee Social.