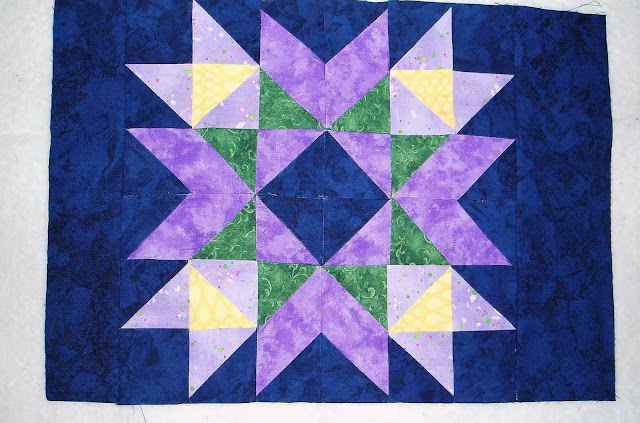
This is the Wyoming Valley Block, and it is not nearly as difficult as it seems. It's mainly made from half-square triangles that finish at 2 inches, which we all know how to make, so let's start sewing!
For this block, you will need scraps of two different purples (I used a light and a medium), a green, a little bit of yellow or another accent, and the background (mine is the dark blue).
Helpful tips:
Just a few things to note before we start sewing. I'm going to assume that you all have some experience sewing and that you know how to make basic units like half-square triangles and the like, so I'll leave out those specific instructions. If you need a tutorial for some units, I'll do my best to link to one.
*It's really helpful to read the whole tutorial before cutting anything.
*I don't press seams open, but you may find that you get the flattest block by pressing your seams open. Otherwise, press toward the darker fabric or toward the least-pieced units.
*It helps a LOT to square up as you go and make sure that each of the units is the correct size before proceeding.
*It also helps to use a slightly smaller stitch length.
*Accurate 1/4 inch seams make life easier!
Cutting:
From the background, cut:
6 2-7/8 inch squares (for hsts, so can oversize to trim down later, if you do that)
12 2-1/2 inch squares
1 2-1/2 by 12-1/2 inch strip
1 3-1/2 by 12-1/2 inch strip
2 2-1/2 by 17-1/2 inch strip
From the lighter purple:
6 2-7/8 inch squares (for hsts, so can oversize)
From the medium purple:
8 2-1/2 by 4-1/2 strips
2 2-7/8 inch squares (can oversize)
From the green:
8 2-1/2 inch squares
From the yellow:
2 2-7/8 inch squares (can oversize)
Now to sew!
Making the units:
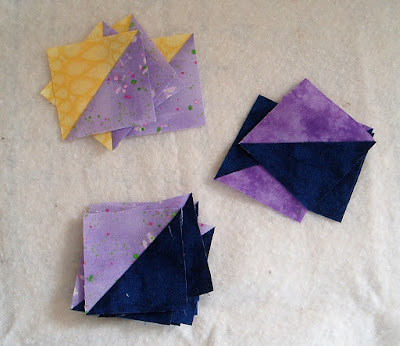
First we're going to make a bunch of half-square triangles. Use the 2-7/8 inch squares to make the following hsts. All of these hsts should be squared to 2-1/2 inches to finish at 2 inches in the block:
8 of the lighter purple/ background
4 lighter purple/ yellow
4 medium purple/ background
To make the corner pieces for the block, take the light purple/background hsts, the light purple/ yellow hsts, and the 2-1/2 inch background squares and lay them out as shown:
 |
| This is the last of one of my favorite purples ever! |
Make 4, and be sure that the light purples are positioned correctly, with one pair "kissing" in the center of the unit. Each unit should measure 4-1/2 inches square.
Next, take the 4 medium purple/ background hsts and arrange them as shown.
Stitch and press. This is the block center and should measure 4-1/2 inches square. [Alternate method: This unit can also be made as a square in a square, using a 3-3/8 inch background square and 2 2-7/8 inch squares.]
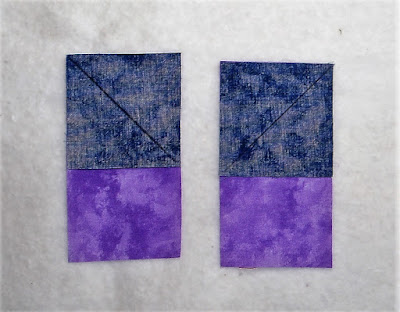
The next units to make are the "rays" of the star. You should have 8 2-1/2 inch squares of background and 8 2-1/2 inch green squares. Draw a line from corner to corner on the back of each piece, as shown:
Take the 2-1/2 by 4-1/2 medium purple pieces and position the background squares at one end as shown:
Notice that these go in opposite directions. Stitch right on the line, then trim and press. Make 4 in each direction:
Next, take the green squares and position them on those same pieces as shown:
Notice that the lines on the green squares go in the same direction as the stitched lines on the background squares. Stitch right on the line, then trim and press. You should have 4 of each of these units:
[Alternate method: Make 8 purple/ green and 8 purple/ background hsts that measure 2-1/2 inches to finish at 2 inches in the block. Arrange to make units that look the same as those above.]
Stitch together the units as shown above, matching the points. Make 4. Even if you don't press seams open, this one is a good choice to do so because it is quite bulky.

Units should measure 4-1/2 inches square.
All the units are made, let's make a block!
Assembly:
That's it for the units, so let's put this block together! Lay out the units you made as shown, paying attention to the directions of the hsts:
It's essentially a 9-patch block now, so join the units into rows and the rows into a block. Press, stand back, and admire!
Completing this section:
This quilt was designed as a "progressive" quilt, where one section is completed each month and the sections are joined as we go. You can also just make the blocks and lay them out any way you choose, or finish assembly of the quilt at the end.
To complete this section of the quilt, stitch the 2-1/2 by 12-1/2 inch piece to the left side of the block, and the 3-1/2 by 12-1/2 inch piece to the right side.
Attach the 2-1/2 by 17-1/2 inch pieces to the top and bottom. Press well and admire!
Congratulations! The first section of the quilt is done!
Have fun creating this first section, and come back on February 7 for the next exciting installment of the Constellations quilt!
Sharing at Let's Bee Social, Oh Scrap!, Finished or Not Friday, Confessions of a Fabric Addict, and soscrappy for RSC17!


20 comments:
Beautiful block!!! I love the colors you used!!
Yes, so pretty. Getting my fabrics and ready to sew this block :)
Sounds like a fun BOM, love stars.
Beautiful block! Love your color choices.
A lovely block! I just might set some fabrics aside while I'm digging through stored boxes! Perfect tutorial! XO
What a wonderful block, I love the colors you used!!!!
Off to a great start! It is wonderful to watch your creative juices flowing.
What a beautiful block! Love the colors; so rich and vibrant
Very pretty! Great color choices. Thanks for sharing with Oh Scrap!
Beautiful block! Thanks for this new BOM - I'm always a sucker for constellations! 8)
Your patience is exemplary. Each square each triangle seems so lengthy a process. I am so impatient. And then the final result - wow it is definitely worth the work.
hugs,
Preeti.
That is one beautiful block.
Thanks for the tutorial for this stunning block.
Beautiful block! Love the way the colors came together.
Great tutorial, very dramatic block.
It's a beautiful block.
Beautiful block!
Beautiful block. Love the indigo background you are using.
I finally got my January block completed. All ready for February :)
This is a beautiful block. Excellent RSC choice. I'll enjoy watching your colorful quilt come together.
Post a Comment