Friday, March 31, 2017

A quilt made of happiness

Hi everyone!  How was your week?  Mine was very full, as usual, and full of lots of noise, hammering, and the descent of the pollen monster.  I've had a headache for days.  But it was still a pretty good week, with the end of some major home projects in sight.

I hope you're all in the mood for some happiness today, because I have a very happy finish to share!  You may recall that our daughter got married a year ago--really, it's been a year!  Hard to believe.  For their wedding present, I made them a quilt! (Of course.)  After hundreds of hours of work, I was finally able to give it to them, so now I get to show it to you!


Yahoo!  I think it turned out great!

They loved the quilt and were willing to hold it up, but wanted to be cropped out!

This is the Eureka quilt, made from a pattern by Jackie Robinson at Animas Quilts.  The pattern is amazingly good, with very clear directions and very logical construction.  It's broken into easy steps and goes together well.  However!  The blocks have so many pieces that it took forever to make them.  After making the "A" blocks, I kept track of time for making the "B" blocks.  I stopped counting at 30 hours for those blocks alone.  FYI, the blocks are different configurations from A through I.  So, yep, lots of hours! 


I think this was totally worth the time, though!  And even though the pattern is great, I still managed to mess up.  See the center blocks bordered by those pretty dark blue triangles?  The blocks there are supposed to be arranged to make a star.  I somehow turned the blocks so that there is no star.  I didn't realize this until after it was quilted, of course.  I felt bad for a little while, but I think I'm over it.  I'm calling mine a "variation."

Another thing adding to the hours in this quilt was a poor color choice at the beginning, which meant a lot of ripping to change things.  You can read about that HERE.  I think it worked out for the better, though!  Sometimes time spent ripping is time well spent.


The wedding quilt was quilted by Alycia of Alycia Quilts, and she did an amazing job.  I told her it was a wedding quilt and that I wanted it to be special, and she really made it that way.  She must have spent forever on this, and it turned out so great.  Thanks Alycia!  (I bet she would be willing to quilt one for you, too!)


This quilt is about 87 by 105, which the pattern calls a full/queen.  In reality, I think this will fit even a king bed if it's turned sideways.  I think a king size would actually be enormous and really too big.  I used a cotton/wool blend batting that is fairly thin and light.  The top itself was very heavy because of all the seams, and wool is always nice and warm in addition to being light. 

Overall, this quilt just screams happiness, and I hope the kids enjoy it for many, many years. Even with all the hours in this quilt, I would make it again. Smaller, and in different colors. And with an actual star in the center. I'd like to make one for myself in pink and green, maybe with a black accent.  Let's put that on the "someday" list, because I have other things to do right now!

Hope everyone has a wonderful weekend!  I have fun weekend plans--a trip to the AQS quilt show in Lancaster, Pa! I'm meeting up with a friend there and I'm sure it will be a great time.  May not be great for my pocketbook, but I know I'll have fun!


Sharing at Confessions of a  Fabric Addict, Finished or Not Friday, and crazymomquilts.

Tuesday, March 28, 2017

New scrap project and a new goal

Holy cow, friends, it's the last week in March!  How did that happen?  The older I get, the faster the time goes.  At this point, the time has passed us out of winter and into spring, even though it's still a bit chilly.  I can tell that it's spring because the landscapers are here to do a major outdoor project for us, and because the leaves are coming out on the trees. That means pollen any second. Let the sneezing commence.

I've started a new project that I hope will use up a bunch of the scraps I've had laying around forever.  Because I don't have enough projects already, you know.  But I have been making good progress on my UFOs, so I feel good about this:


This is the start of a Scrap Happy Rails quilt from Amanda Jean Nyberg's new book, No Scrap Left Behind.  (Not a compensated endorsement!)


These blocks go together really fast and use a *lot* of scrap pieces.  The strings are really easy, though I did have to do mine a bit differently from the pattern.  If you look, you'll see that several of my strips are pieced together from squares and rectangles to make them the right size.  That's because the scraps that I'm using for this little quilt come from this bag:


When we were living in the condo last year and I had no space, I ended up giving away most of my scraps, because I had nowhere to put them and because I was just tired of them altogether.  Somehow this bag escaped the purge.  This included some small pieces, which led to the pieced strips.  All of these pieces will become a charity quilt for the Hands to Help Challenge over at Confessions of a Fabric Addict.  I'm planning to make it smaller than the pattern, lap size instead of queen, but I'll still have to add in a few more scraps to fill everything out.  Wonder where I'll find those?

I think this should make up pretty quickly, but April promises to be a very full month, so I'm making this my One Monthly Goal for April.  I just want to have it pieced by then. I'll worry about actually quilting it in May.  Unless a miracle happens, of course.

So I'll be stringing along for a while this week!   Hope you have a great week with a minimum of sneezing!

Sharing at Linky Tuesday, Let's Bee Social, Oh Scrap!, and One Monthly Goal.
 Elm Street Quilts

Thursday, March 23, 2017

Grand Opening celebration--with a giveaway!

Hi everyone!  Today we are celebrating my friend Bernie and the expansion of her Etsy fabric store, Needle and Foot Fine Fabrics.  You can find the shop HERE.  Bernie has had a shop for a while, but a couple of months ago she expanded it into a full service fabric store carrying new fabrics and some vintage pieces and patterns.  Bernie is also sponsoring a great giveaway, which appears at the end of this post.

To the project! Here is what I made with fabric that I got from Bernie's new shop:


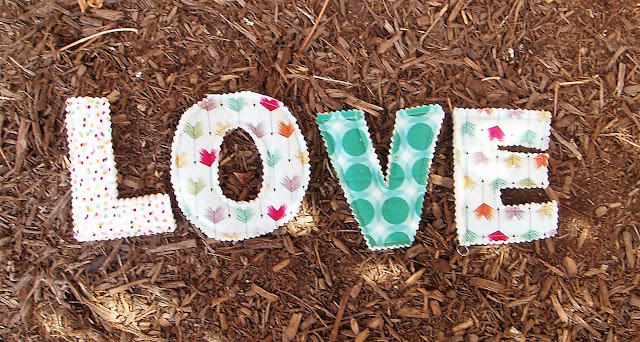
I used the Modern Tykes line and made alphabet letters and a storage basket for my tiny grandson!  He can't read yet, of course, but it's never too early to start. And based on how much he's chewed on them, he already loves them.  As a bonus, these are genuinely some of the cutest and easiest things I've ever made.


These letters are super-easy to make.  The biggest challenge is deciding on the alphabet font and the size that you want.  My letters turned out to be about 4 inches tall (the width depended on the letter, of course).


To find an alphabet, you can go into Microsoft Word, look at all those fonts and choose one, then go to Text Effects, and (I assume) say some magic words and wave a magic wand to get the alphabet you want.  Or you can go to Pinterest or Google and search for alphabet printables or alphabet coloring pages and find one that way.  That's what I did.


I used the Modern Tykes fabric for the fronts of the letters and solid charms for the backs.  Once I printed the letters and cut them out, I traced them on the solids backwards in chalk.  This ensures that the solids will always be on the backs of the letters, with the fun fabric on top. Then I sandwiched them with two layers of quilt batting and just straight stitched around the letters.  This is a great place to use up those trimmings from the sides of quilts.  Two layers makes them extra nice and puffy.


After stitching, I just cut out the letters with pinking shears.  Pro tip: do this over a table!  You will have a huge thready mess after trimming.  Seriously, thread and lint everywhere. 


If you're giving these to a small child you may want to wash them before gifting them.  (The letters he got went straight into my tiny grandson's mouth, after all.)  I suggest washing the fabric before construction and then tossing the finished letters into the dryer to get some of the lint off.  When they're washed, the letters shrink a little and twist, which is not a problem except when you want something to look "new" for a gift.  Otherwise, you can wash them and then iron them out again.  Your call!


What about this cute basket?  I made this from a tutorial by Film in the Fridge, found HERE.  It's super-easy  and only took two fat quarters.  I used a piece of leftover quilt batting instead of interfacing and it worked great.  Best of all, that size basket holds more than one entire alphabet.  This is the small, but she also gives instructions for a larger bin as well. 


My grandson's full name is really long, and I wanted hm to be able to spell out the whole thing eventually,  so I made him two sets of consonants and five sets of vowels.  I was able to get all of those letters plus the basket out of the set of fat quarters I received from Bernie.  I did add a whole mess of solid charms and the lining for the basket from my stash, but you should be able to get at least two full alphabets from the fat quarters if you use them for both the front and the back.


Now for the giveaway!  Bernie has generously offered one winner from each participating blogger a choice of either six fat quarters or three half yards from her new shop!  Your choice!  To enter, go on over to Bernie's shop (click HERE) and find something you like, then come back here and leave a comment letting me know what you might get if you win.  (Do yourself a favor and "favorite" her shop while you're there so you can find it again easily!)  For a second entry, follow Bernie on Facebook or on Instagram and leave a comment back here to let me know.  Two entries per person, please.  (Don't make me be an enforcer!  I hate it!)  International readers can also win, but will have to split the shipping with Bernie.

**If you are a no-reply blogger, make sure to leave an email where I can reach you!  If I can't notify you, you can't win!**

***This giveaway is now closed!  Congratulations to Allison!***

I will choose one winner randomly at noon on Tuesday, March 28.  But you can have many other chances to win by visiting all the other great bloggers who are participating in this hop!  Here is the schedule:
As an added bonus for everyone who has made it to the end of this blog post, Bernie is offering 15% off any orders of $5 or more from her shop, through Sunday, March 26.  Fifteen percent! That means the Modern Tykes fat quarter bundle would be only $14.45 before tax and shipping!  Use the code NANDFREADERS15 at checkout to get your discount.

Good luck to everyone, and be sure to go over and check out Bernie's shop even if you aren't entering the giveaway.  She's standing by with rotary cutter at the ready and is just itching to fill your order!  Seriously, she's very easy to work with and ships fast.


Have a great weekend!

Sharing at Confessions of a Fabric Addict and Finished or Not Friday.

Tuesday, March 21, 2017

A few more steps

Hi everyone, and happy spring!  Every year I think that I will get tons of things done over spring break, and I always do, but somehow the things I get done are never the things I think I'll get done.  So I got a lot of work stuff and house stuff finished (including ripping up carpeting) but not a lot of sewing stuff.  Oh, well!  I did have a great idea for a new quilt in the middle of some research, but I'll tell you about that another time.

For today, let's talk about the blocks I did manage to make up in the last few days:

Aaahhh!  Yep, there's a mistake in the middle block, two rows put on incorrectly.  I looked at these 100 times and still missed it.

These are the next blocks for the Steps to the Garden quilt I'm making for the Rainbow Scrap Challenge this year.  I really don't have a lot of red, but I managed to scrape up these bits.  I admit that the butterfly print is more like a pink or a coral, but it's cute so I used it.  The one on the right is a Christmas print, but it got used too.  I don't think it's super obvious, do you?


There are a lot of pieces in this block but I think I've finally worked out the most efficient way to make these.  If I concentrate I can do three blocks in about 2 hours, which sounds like a long time, but there are a *lot* of seams here.  And I'm getting way better at pressing open seams, which I suspect will be the key to success for this quilt since every seam will need to be matched.

Speaking of which, I've now got 9 blocks.  I think the red ones fit right in:


These blocks look way better in person than in photos.  The greens aren't quite as strong as they appear in the pictures.  Overall, I'm pretty happy with how it's turning out, though I am not looking forward to matching those seams!

In other news. . . my friend Bernie at Needle and Foot has expanded her Etsy shop into a full service fabric shop!  To celebrate, there is a Grand Opening blog hop going on, with a great giveaway from each blogger.  My day on the hop will be coming up on Thursday, but here is the schedule for everyone: 


Be sure to check out all these great projects and giveaways and come back here on Thursday to see my project and enter my giveaway.  My project is a fun one, suitable for children!

https://needleandfoot.com/

Hope everyone has a great week with lots of sewing time!  The flooring guys come back on Wednesday, so I expect lots of hammering and dust.  Maybe I'll try to stay at work for a while!

Sharing at Linky Tuesday, Let's Bee Social, and soscrappy for RSC17.

Thursday, March 16, 2017

Up for adoption

Twice a year, Cynthia at Quilting is More Fun than Housework holds a "quilty adoption" event, where people can offer their unwanted quilty projects to others who who will want them and love them and finish them.  Great idea, isn't it?  I think so, so today I am offering some kits for quilty adoption to someone who will do just that--love them and finish them.  Here they are:


These are two unstarted McKenna Ryan kits from the Home Tweet Home line.  Each of these make one 8 by 8 block.  These are laser-cut fusible applique kits, with all the pieces already cut (but not completely punched out) and labeled, with fusible already on the back so that you can skip right to the assembly part.  The background fabric is also included, along with beads and other little trinkets for embellishments.  Complete instructions are included, along with a full-size diagram.

Also included is this piece:


Yep, this is an already-fused piece for a completely different kit in the same line.  The main pieces are already fused but not embellished, and all of the embellishments are still in the envelope, along with the diagrams and patterns in case you want to make another one.  Also included, but not in the photograph, is an 8 by 8 stretched canvas, still in the package.  I had this idea that I would make all three and display them on canvases after quilting and embellishing, but I never did it.

I am offering these free to one lucky winner!  All I really want is for these to go to someone who will commit to finishing them, though you don't have to finish them according to my original idea.  These would make a nice table runner or wall hanging, or anything your heart desires. This giveaway is open internationally, but if you are overseas I'll ask you to split the shipping with me.  This would still be quite a deal!

All you have to do to enter is leave a comment on this post!  To make it a little more fun, how about suggesting a movie or TV show to stream while I sew?  I could use the suggestions because I'm just about done with The Crown. I will choose the winner randomly using a random number generator on Monday, March 20, the first day of spring.  How appropriate for these cute little birdies!

The adoption is now closed!  Thanks to everyone, and congratulations to Thearica. 

The last number has to come up randomly some times!

Good luck to everyone, and be sure to stop over at Cynthia's to see the other projects up for adoption.

Sharing at the quilty adoption linkup.

Tuesday, March 14, 2017

Out in the weather

Wow, anybody else need a sweater?  I don't know about where you are, but it's been a crummy day here weather-wise.  First it snowed, then sleet, and now it's all ice.  We ended up with about 4 inches of snow, but the ice on top is making it hard to get around.  Not that I left the house!

What better day to show the progress on my temperature quilt for 2017?  Here's where it stands right now:


Yes, I braved the snow to take this picture.  It stunk, and this was the only good one that I could get because the wind was really blowing.  But it's still better than an indoor picture!

If you recall, I am making a quilt that shows the high and low temperature for every day of 2017.  This has a *lot* more color variation than I expected. Who would have expected the dark yellows (60s) and orange (70s!) this early in the quilt?

Check out the ice on those branches!

I decided to have rows of 18, and the rows alternate between vertical and horizontal placement for a more interesting quilt.  The square for each day finishes at 3 inches.  The half-square triangle and the square in a square are important days for our family, so they get a special shout-out, too.  I've been doing the squares every few days and it hasn't been bad at all. I finished the fourth row just today, which means waaayyy too much of this year is already gone.

So there's that! I think it's looking pretty good and is more interesting than I thought it would be.  Since it's a cold and crummy day, how about a shot of sunshine to finish this post?  Here we are:


These are two more blocks for the Sewcial Bee Sampler, a block of the week by Maureen Cracknell and Sharon Holland.  (More info HERE.)   There's still time to jump in, and the blocks are pretty easy.  No sign ups and no fees, which is the kind of quilt along I really like!

Hope all of you are staying warm and aren't completely stuck in your homes.  I'm voluntarily stuck, but only because I don't want to go outside and chip away at the ice.  I'll be spending tonight worrying about the ice on the tree branches while baking something good for the floor guys who are supposed to come tomorrow.  I think they'd like brownies, don't you?

Sharing at Let's Bee Social.

Friday, March 10, 2017

Knocking at the door

Hi everyone, and welcome to another weekend!  Are you as happy to see this one as I am?  It has been a hard week, but I did get some important work stuff done.  Details, details.

This week, I finished quilting up this little row quilt made of Prairie Queen blocks, which I plan to hang on the front door.  Really!  Inside the glass, though:


Isn't that cute? I made this in 2014 and it only got quilted now.  Yes, I know, but I bet you have some of the same! I've actually been making some real progress on getting things out of the closet and into use or, you know, gotten rid of.  Whatever works.


I quilted this one on the 1968 Pfaff.  It makes a great quilting stitch and I've left it in "quilting mode" for quite a while now.  It's just crummy to change all the settings on the machine.  Thank goodness I have the original manual or I'd be totally lost.  I did remember all the oiling spots this time, though.


I used this little piece to practice some motifs and such, including scallops.  I've never done those before and need a lot more practice.  I think I've lost a lot of skills through disuse.  For a long time I made larger quilts that I really couldn't do on my machine, so I sent them out, and all skills atrophy after a while.  I guess that means that I have to quilt more pieces.  Tragic, I know!


I do have one tip from this project.  You know those Teflon pressing sheets that are used for applique and fusing?  They're essentially plastic-y press cloths that won't melt from the iron.  Well, they're also pretty slippery, so I cut an unused portion and taped it to the bed of the machine. It makes a nice surface that the quilt can move on, not too slippery but definitely better than just the machine bed.  I don't know if it's as slippery as one of those "super slider" sheets, but this one only costs a few dollars.  I thought it was useful and I am planning to use it again.  Heck, it's on the machine, why take it off?  Of course, the Pfaff is basically a tank and has a bit of a pebbly surface, so it may not work as well on a machine with a plastic bed.


That's my big finish for this week!  The weather this weekend is supposed to be really crummy, so I'm hoping to get a few more things done, including some basting and maybe some quilting.  Next week is spring break--hurray!--and I plan to do a LOT of quilting and also some painting in the house.  I am so ready for this home improvement stuff to be finished!

Hope everyone has a wonderful weekend!  Stay warm!

Spring is coming!

Sharing at Confessions of a Fabric Addict, Finished or not Friday, and crazymomquilts.

Tuesday, March 7, 2017

Constellations --Red

Hi everyone, and welcome to the next exciting episode in our quest to make a lovely star quilt!  This month's color is red, which is a color that I have a problem with.  I just don't have very much red at all.  Even in my stash I have only 4 short red pieces.  It's just not a color I use.  I was able to scrounge up some small pieces, though, and ended up making this block for the next section of the quilt:


This block is called Best of All and is a Clara Stone block from 1906.  It looks like a complicated block, but it is much easier to make than it looks.  The effect of this block can change a lot depending on color choices.  For a block like mine, you will need a 6-inch wide strip of red about 20 inches long or so, a square of a second red for the center square, a piece of orange about 6 inches square, a 4 inch gold scrap, and a background.  The block would also look great all in red, or with a contrasting color replacing both the orange and the gold.  The center square could be a good place to put a large scale print or a fussy-cut piece, or you could replace it with a background square for a more open look.

With that said, let's make a block!

Cutting:


For the center square, cut:

1 4-1/2 inch square.

From the red, cut:

1 5-3/4 inch square (for hsts, so can oversize if that's something you do)
4 2-7/8 inch squares

From the orange, cut:

1 5-1/4 inch square

From the gold, cut:

1 3-7/8 inch square

From the background, cut:

1 5-3/4 inch square  (for hsts, so can oversize)
1 5-1/4 inch square
4 2-7/8 inch squares
8 2-1/2 inch squares

To complete this quilt section, also cut from background:

2 2-1/2 inch by 12-1/2 inch pieces
1 2-1/2 by 16-1/2 inch strip

Construction:

This block is constructed of several basic units.  If you have a different method that you would rather use for any of them, go ahead!  Adjust the cutting if necessary.

Start by using the 5-3/4 inch red and background squares to make 8 half-square triangles using the Magic 8 method.  (If you haven't used it before, the tutorial for it is HERE.)


Your hsts should measure 2-1/2 inches to finish at 2 inches in the block.

Next, use the orange 5-1/4 inch square and the 4 2-7/8 inch background squares to make 4 no-waste flying geese using what my friend Linda calls "the heart method,"  also called Fast Flying Geese.  (Tutorial HERE.)


The geese should be 2-1/2 by 4-1/2 inches to finish at 2 by 4 inches in the block.

Pieced geese:

The next unit involves the squares and triangles that I'm calling 'pieced geese' in the center of the block.  I've developed a technique to make these pieced geese quickly without having to fuss with little squares and triangles.  Read the whole description, then decide if you'd like to do it this way.  An alternate method follows this description if you decide not to try my method.

First, take the 5-1/4 inch background square and cut it in half from corner to corner twice to make 4 triangles.


Attach these triangles to the sides of the gold 3-7/8 inch square.  I didn't get progress pictures, but you are making a square in a square unit.  The blue triangles will be oversized and it may look wrong, but it gets trimmed in the next step, so don't worry too much.


Press the square in a square unit well, and trim it to 5-1/4 inches square.  Make sure that there is 1/4 inch seam allowance beyond all of the points.

Use the 4 2-7/8 inch red squares to make the remainder of the geese using the fast flying geese method above.  You should have 4 geese which look like this:


These should also measure 2-1/2 by 4-1/2 to finish at 2 inches by 4 inches in the block.

Alternate methods for making these units:

Alternate 1:

If you don't want to make the fast flying geese above, you could make the geese individually by cutting the square in a square unit as shown:


To get these pieces, cut the square from corner to corner twice, through the points of the blue triangles. After cutting, cut the red 2-7/8 inch squares in half corner to corner and attach to the sides of the pieced units to complete the geese.

Alternate 2:

Cut 4 1-7/8 inch gold squares and 4 2-inch background squares.  Cut the background squares in half from point to point to make two triangles.  Attach the triangles to adjacent sides of the gold squares to make pieced geese sections that look like the photos above.  After you make the pieced geese, the next step is to use the red 2-7/8 inch squares and complete the geese.  Cut the squares in half from corner to corner so that each makes two triangles, then attach them to the sides of the pieced geese to complete the unit.

Assembly:

Let's put this block together!  First, take the pieced geese that you just made and join them to the orange geese as shown:


Make 4. (You may want to press this seam open to avoid bulk in the final assembly.)

Next, lay out the red/background hsts and the 8 2-1/2 inch background squares as shown, so that the red triangles "kiss" in the center of the block:


Stitch and press.  Make 4.

Finally, take the units you've made and the center square and lay them out as shown:


Join the units into rows and the rows into a complete block which should measure 12-1/2 inches square.  Press well and do a happy dance!

Completing the quilt section:

Stitch the 2-1/2 by 12-1/2 inch background strips to the top and bottom of the block.  Add the 2-1/2 by 16-1/2 inch strip of background to the right side of the block, giving you a section that looks like this:


Press well, then join to the first two sections of the quilt:


Row 1 is done!  That means that 25% of this quilt is finished!  Time to take a break and celebrate, perhaps with some nice chocolate or a cool drink.  Or wine, that works too!

Enjoy making this block and come back on April 4 for the next installment!


Sharing at Linky Tuesday, Let's Bee Social, and soscrappy for RSC17.