
Fabric, oh, all that glorious fabric! I just love it, don't you? It's so fun to shop for, cut, and stitch into something even more beautiful. Sometimes I just sit and look at the fabrics I own. True fact! That's why the rocking chair is in there. But I have also experienced the many despairing moments when I look at some fabrics and think "why do I have this?" And I spent years not really knowing what I had because I didn't have a good way to organize and store what I owned.
 |
| I love new fabric! |
**As always, what you decide to do with your fabric is entirely up to you!** Here's something I know to be true: there is no "right" size for a fabric stash. There's no such thing as too big or too small unless you think it is. I've known quilters with tiny stashes and quilters with huge ones. If it's right for you, it's right!
I see fabric as more of a storage and organization problem than a "size" problem, but I highly recommend this post by Rachel at Stitched in Color. It's worth it to consider whether all your fabric "fits" you or not. If you want to pull some of it out of your stash and pass it on, there is plenty of market for fabric! I did Rachel's exercises and ended up getting rid of a lot of fabrics in darker colors and those with the wrong "mood," if you know what I mean. More about where and how to get rid of unwanted fabric later, but for now, let's get organizing!

The first thing to do is NOT to pull out all your fabric! Of course, if you have it stored in different places, it will probably help to get it all in one place, but don't start in on it just yet. Fabric can be so overwhelming that trying to do it all at once will just be frustrating and lead to failure.
The first thing to do is pull out all the non-quilting fabric. Garment fabric and other types of fabric needs to be stored separately from quilting cotton. You'll need a storage solution for these, too, of course, but we're mainly talking about quilting fabrics here. I have had good success with storing garment yardage in see-through plastic totes with lids. Your fabric has to be in the totes for a very long time for the plastic to deteriorate it, so if it's going to be there that long you should consider just getting rid of it. I no longer make many clothes, choosing instead to alter ready to wear so that if actually fits, so most of my garment fabric got donated and some got made into bags and other useful items.

Before you start sorting the fabric, consider how you will store it. No one way works for everyone, and you might have to try a few different ways before you settle on one, but here are a few ideas, with some appropriate links:
*Hang your fabric on skirt hangers, pants hangers or folded over regular hangers in a closet or wardrobe, or on a rod outside of a closet (like a garment rack or even a curtain rod)
*Hanging in a file cabinet drawer
* Folded on shelves, in plastic bins or drawers, or in wire baskets
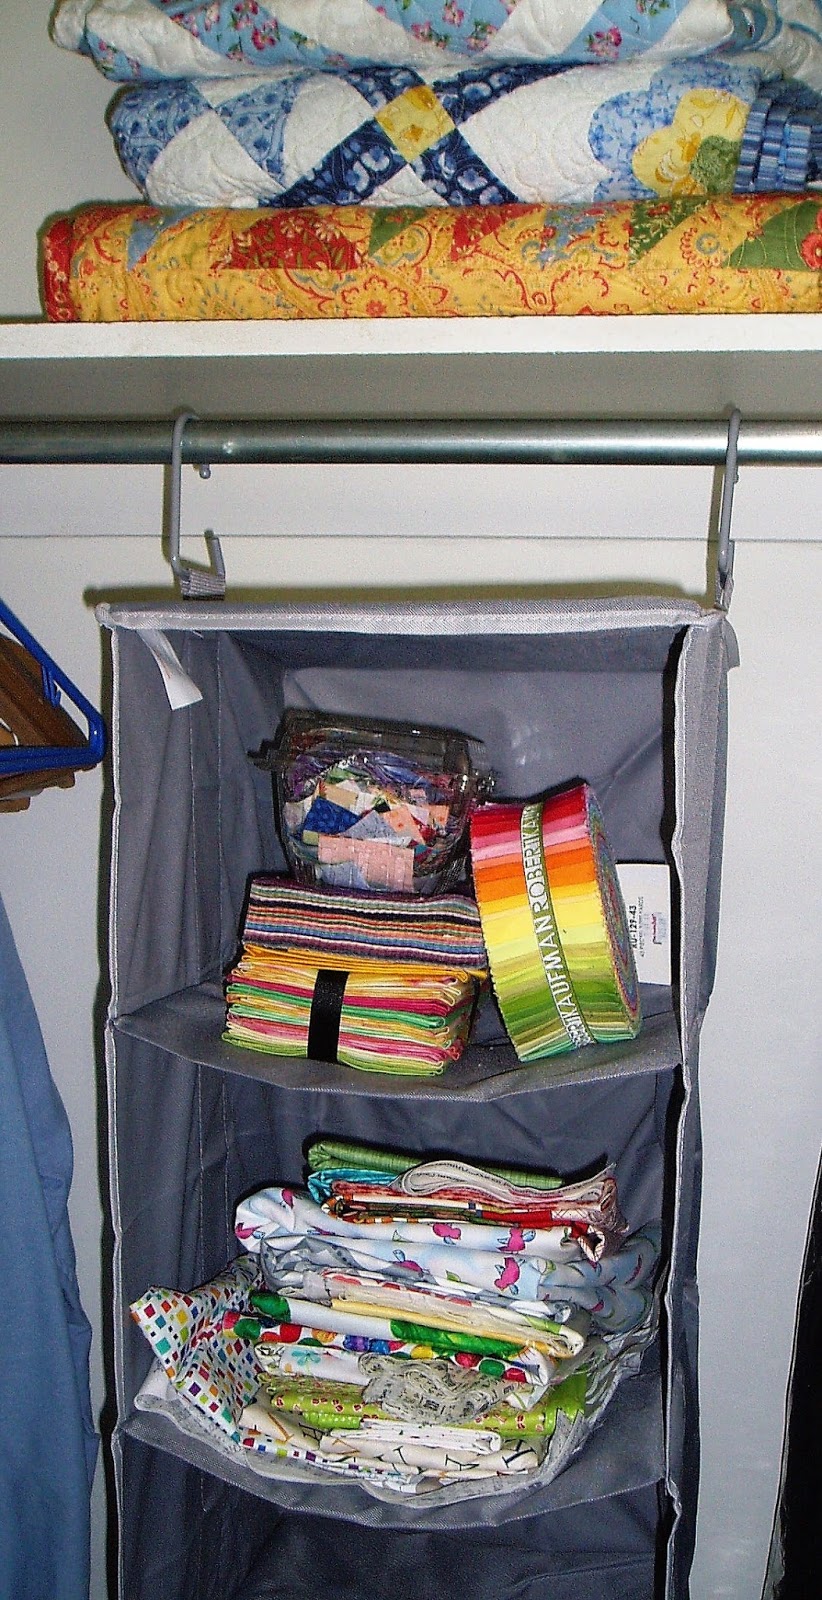
* Folded or rolled and stored in a closet on hanging shelves made for clothes. These come in many sizes and can really expand your storage space.
* Folded on comic book boards, mini bolts, or cardboard that you cut yourself (cereal boxes are about the same weight as comic book boards) and stored on shelves or in plastic tote boxes
*Rolled on empty fabric bolts from fabric stores (they are usually really willing to give these away, and the bolts can be cut down for smaller pieces)

Once you've got a good idea how to store the fabric, it's time to dive in. Just grab about 20-25 pieces of yardage and start folding, rolling, or hanging. Put aside precuts and scraps or small pieces for now and concentrate on the yardage. Don't try to organize too much, but concentrate on getting the yardage pieces folded. Put them right into your new storage space as you go. Take a few breaths, too, and appreciate your fabric. Don't you have great taste?
**Warning: you will come across many treasures that you forgot and be tempted to start putting together new projects right away. Resist this temptation! Focus! That's how we got into this mess in the first place.**
The key to getting this accomplished is not to try to do it all at once. Take frequent breaks and set a few reasonable goals, like getting a set number of pieces folded or rolled per day. This is hard work! Don't let yourself get too worn out, and remember that rewards are good, too. You know--chocolate, wine, a new fat quarter. . . When I get tired I tend to make bad fabric decisions, so don't let yourself get too tired or you may end up tossing out some pieces you'll need later.
It may take a while, but eventually all of your yardage will be folded or hung in your new system. Now you can organize it all, in any way you choose. Many people--if not most--organize by color family, but you can also organize by project, by fabric collection, by manufacturer, by fabric type (regular cottons, batiks, hand dyes, etc), or even by something as unique as fabric mood. Choose something that's going to work well for you.
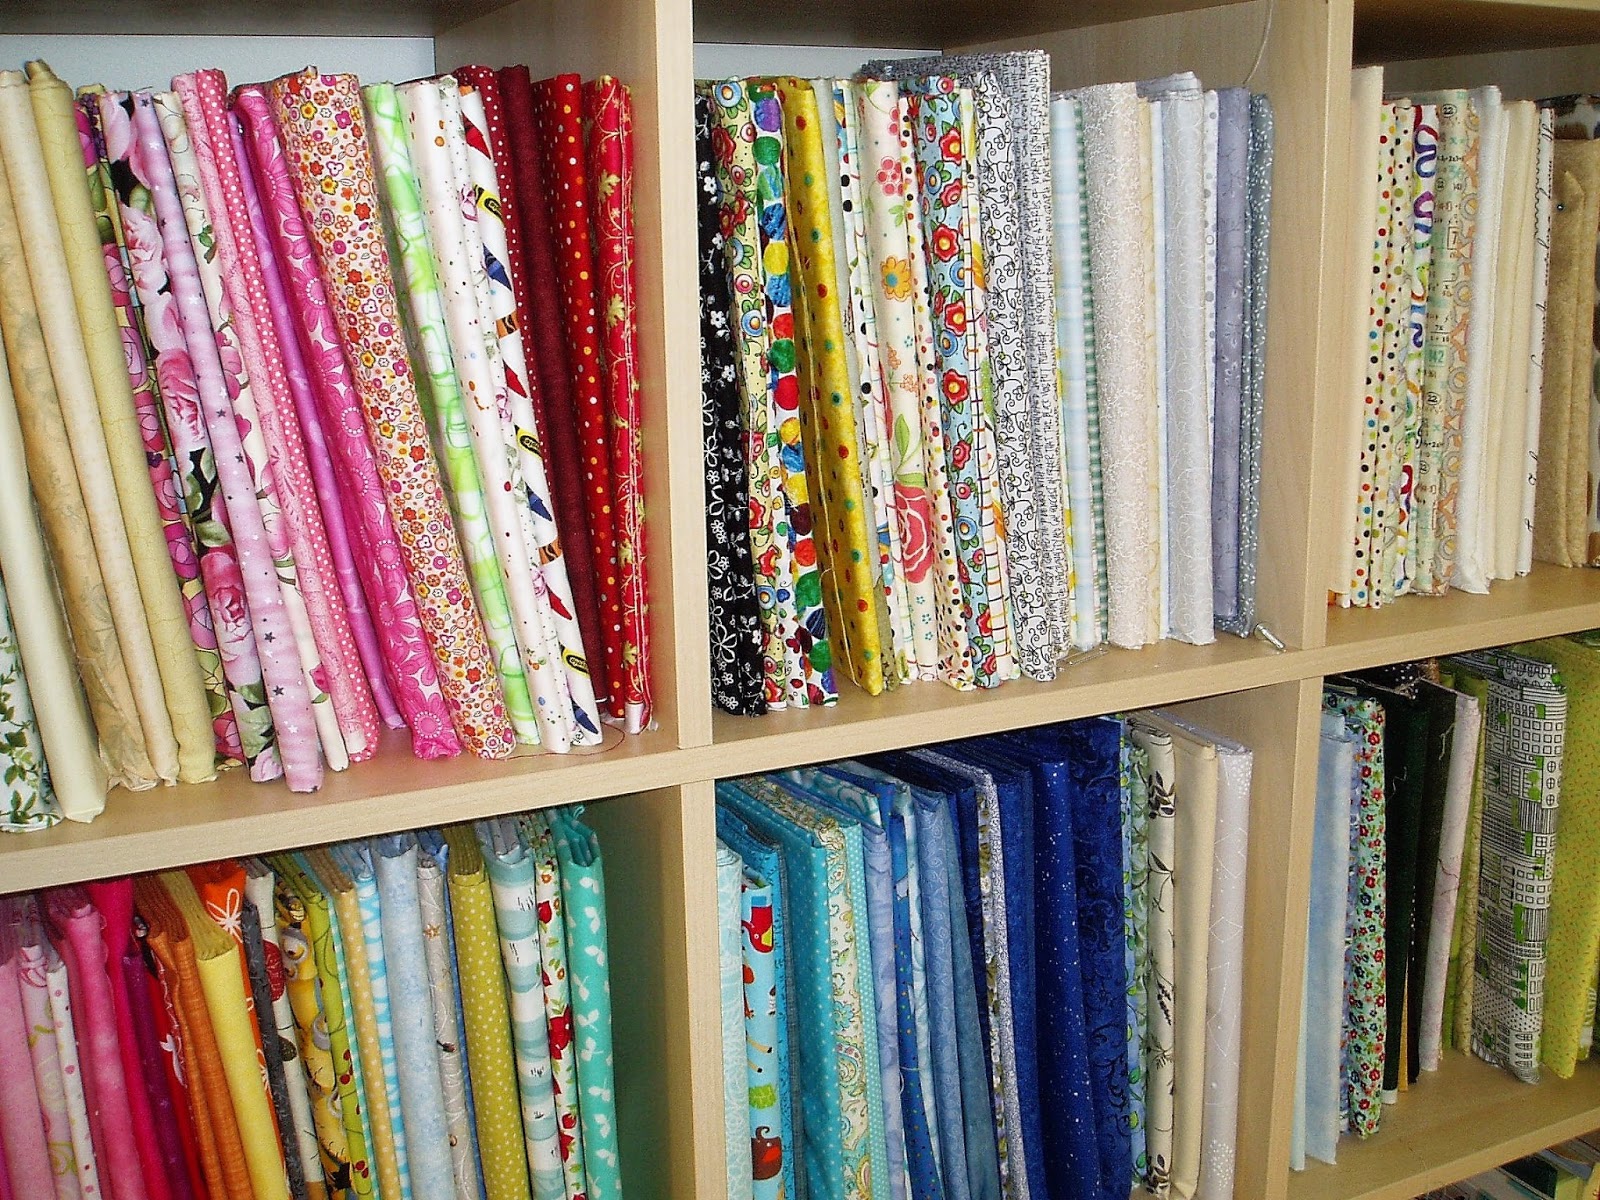
For my own yardage, I used comic book boards and I am so pleased with the results. It's like a library of fabric! I used this size as recommended by the lovely man at the comic book store, but they are also available on Amazon. (They were cheaper at the comic book store and I got to support a local business.) If you do this, get more than you think you need. My stash is fairly small, but I have now used more than 200 boards, with a whole bunch left over for expansion. (Doesn't that sound exciting?)
I arranged my fabric loosely by color family, and separated out the batiks and the solids. I like to keep my stash small and where I can see everything, so it's all out on open shelves in the sewing room.
Precuts:
Earlier I said to put the precuts aside, but those will also have to be organized. You can do this either before or after you tackle the yardage--whichever way makes you feel like you're making progress. I think the key to using precuts is to keep them together so that you can see what you have. I've actually stopped buying precuts, but I still do have some to work with, and I have been known to cut 5 and 10 inch squares.

For organizing purposes, keep the precuts together, or at least keep all the precuts of each size together--all the 5-inch squares in one area, all the 10-inch squares together, and all the jelly rolls together. They can be stacked on shelves or kept in bins, boxes, or baskets, but really, keeping them together is key to knowing what you have and encouraging you to use it. I've got all of mine together on a shelf and am trying to use them all up.
Fat quarters and other small cuts:
While yardage fits well in many different kinds of storage, fat quarters and other cuts smaller than about a half yard can be more difficult. Some people designate pieces this size as scraps, but I think of fabric as yardage until it's smaller than about 10 inches square. A lot depends on how many smaller pieces you have and what you want to do with them. They can be folded and sorted and stored with the yardage if they will fit into your system. You can also keep them together in boxes, bags, baskets, or plastic totes. Shoe-box sized plastic bins should hold a lot of fat quarters and smaller pieces. You could designate an area on your shelves just for the fat quarters and keep them together there. If you have a lot of smaller pieces you could sort them by color and arrange them in separate containers and store them with the yardage.

I used something a bit unconventional to store my fat quarters--a plastic shoe bag that fits on the back of a door. The silly thing works great! It's the perfect size for them. I had been keeping this extensive collection in baskets and totes, but I didn't like that I couldn't see them all. This is much better for me and a lot more of them are getting used. And I didn't have to make shelf space for them!
Project storage:
In addition to yardage, we quilters also have a lot of works in progress that need storing while we work on them (or intend to, anyway). It's a good idea to keep all the fabric for a project together so that it doesn't get used up in something else, or (in my case) so you can find it when you need it. There are a lot of good ways to do this. I know some people who keep their projects all together on shelves, sorted by project. There are wire shelf dividers and wire shelves or bins that hang under shelves that make this easier to organize.
Other ways to keep projects together include extra large zipper bags, baskets, bins of all sizes, or even unused pizza boxes, which are very cheap. All of these can be found in many sizes at big box stores or online. I bought Artbin plastic boxes at a warehouse store, where they came in packages of 6. (I have 12 of these, because I cannot resist a bargain.) These fit nicely on shelves and hold a lot, but are too large for my shelving unit. Clearly I was blinded by the great price.

However you store and organize your fabric, remember that the system has to work for you. I always get jealous when I see perfectly organized sewing rooms, but then when I think about it I realize that how that person has things arranged--or the amount of fabric they have--would drive me crazy. If it doesn't work for you, it doesn't work. It may take a few tries, but working out a storage system that you can use and keep up with will reward you with a much better sewing environment--not to mention a real sense of accomplishment. Then you can sew without any guilt whatsoever!
Batting:
What's a quilt without batting? Very thin, that's for sure. Batting is essential but it can be hard to store because it's so bulky. Fortunately, it squishes. Unlike fabric, there are not a lot of different ways to store batting. It can be folded or rolled or kept in bins or boxes, but its bulk limits where you can keep it. You can fold it on shelves, or roll it to store on shelves or in bins, or squish it into totes or boxes.

The best way I have found to store batting it to keep it in the original packages and stuff as many as I can into a bin, standing them on end if possible. When the bin is full, it's time to stop buying batting and start using it. I only buy batting on sale, so that's not too hard.
What about the smaller pieces? You can throw them out, of course, or use them for dusting or cleaning (which they are great for, especially if you cut them to fit a Swiffer to clean wood floors), but you can also piece together leftovers of all sizes to make larger pieces to use in quilts, which is both thrifty and satisfying. A video and instructions are HERE. Bonnie Hunter does it slightly differently HERE. I do this all the time and call it "Frankenstein batting." I've never had a problem using it any quilt, and I can't even tell which ones I've used it in after they're quilted.
To store the smaller pieces and cut-offs, you can stuff them into anything that will hold them, from boxes and bins to pillowcases. I have had good luck storing batting pieces in blanket storage bags. These are inexpensive and see-through and will hold a lot of pieces of batting. I have a few for different kinds of batting--cotton, wool, blend, etc. You could fold the batting and put it in there nicely, but I just stuff it in there until I'm ready to stitch some of it together.
I know some people purchase entire 30 or 40 yard rolls of batting, but I have never done this, mainly because I don't have the storage area for it. I would either store these rolls upright in a dedicated closet or find a way to hang them horizontally on a rod of some sort. Anyone who uses this have other ideas?
What to do with the fabric you don't want:
As noted above, you may pull out some pieces of yardage that you don't want any more. (This is not a bad thing!) The good news is that there is a very large secondary market for fabric yardage of all types, and even for precuts from manufacturers (not cut by individuals). You will have some success selling yardage through your blog, Etsy, Ebay, etc. If you have a lot to get rid of, you may want to set up an Etsy or Ebay site just for selling it off. As I said last week, there are also Facebook groups for this purpose, but I don't really know anything about them.

If you don't want to sell it, there are numerous places to donate fabric, and better quilt bloggers than I am have gathered several lists. Here are some links:
12 Places to Donate Fabric, Sew Mama Sew
Charities in Need of Sewing and Quilt Donations, Diary of a Quilter
Volunteer Sewing Groups Where Fabric is Always Welcome, Nancy Zieman
Charity Sewing Round Up, Melly Sews
Charities that Take Sewing Materials, People of Everyday Life
If you know of other places to donate fabric, please let us all know in the comments! Choose charities that fit your needs. I really recommend getting in touch with schools, churches, and charities like Project Linus in your own community. Don't overlook retirement homes and places like halfway houses and prisons. Your donation could help keep a program going, and they are always very grateful.
As a last resort, places like Goodwill, the Salvation Army, and St. Vincent de Paul thrift stores will take fabric donations if they are folded and organized. (In other words, not a messy box of scraps.) But really, please consider this a last resort.
That brings us to the end of this topic! I hope it gave you some good ideas and that you have done something to make your sewing space better. Next week we'll talk about some strategies for scraps and other small pieces, which will be entertaining. Meet back here next Wednesday for that exciting chapter!
Sharing at Let's Bee Social.
8 comments:
Wow. What a big post.... I would love to see photos of your stash and how you store it.... I have tubs of stuff and now have limited time to use it. It requires lots of planning to use it.
Wonderful storage ideas. Very creative. Many bloggers, incl. myself, sew pillowcase dresses for Dress A Girl Around The World.com, and can always use good quality apparel fabrics. Their website has all of the details about fabric requirements :)
Love the shoe bag idea. Thank you so much. And yes I believe that your stash is way larger than mine :-) I should go shopping.
I use a mix of ideas from a variety of sources but my system works well for me. I have donated fabric many times to Margaret's Hope Chest (google them) as well as a couple of local comfort quilt makers. IF your local shop has a charity quilting project, they may also be eager to accept your unwanted quilting fabrics (our's does). Another great post, Mari - thanks for putting these together. So much food for thought.
Very interesting post - thank's very much. As you said, everyone's storage solutions are different.
Oh so many good suggestions!
I had my fabric all organised, then after reading a book I decided to reorganise and do it by size rater than just colour, it didn't work. I couldn't find anything. Now I have reorganised again. I don't have a big enough stash or space to have a box for each colour so I mix them such as pinks and purples, yellow and orange etc. Some things need their own boxes of course and I am finding I have colour gaps too. My main problem is using it of course so pretty..........
Hi Mari,
First of all - WI transplant to PA! I live in Wisconsin. I love your warning - you will find fabrics that you forgot about. Resist that urge to start a new project and focus. HAHA Yes, focus. That is the key. Lastly, I love, love, LOVE the plastic shoe holder on the back of the door. Genius! I am going to use that idea today - or when I find my shoe organizer anyway. ~smile~
Roseanne
Post a Comment