Friday, September 29, 2017

Summer's last stand

Hi all! It's the end of another hot, hot week here.  It started out okay, but it has been over 90 degrees for the last several days. It's like summer has refused to give up and is hanging on for dear life.  If it dials back the heat just a little bit, I'm happy to let it stay.  Stick around, summer--we love you!

Anyway, this put me in a summer kind of mood this week, and I finally finished off the Sewcial Bee Sampler from Maureen Cracknell and Sharon Holland!


This quilt was super hard to get good pictures of because in addition to it being really warm, it was also very windy. It almost became a very colorful sail:


This was a sew along that began in February and ran all summer.  For the blocks I used a fat quarter bundle called Fresh Market from Riley Blake that I got as a gift.


This was wonderful fabric and I really loved the colors.  My biggest problem was running out of some of the fabrics I wanted to use.  There was a tiny orange and yellow print that I used for several backgrounds that I really liked, but I used it all up.  That's a good thing, right?  My quilt top is about 74 inches square with a 3-1/2 inch white border.  I think I have *just* enough of the black prints left over to do a scrappy "magic" binding, which will look awesome with that border.


For the block frames, I used Kona cotton solids in Goldfish, Buttercup, Soft Pink, Cabbage, and Bahama Blue.  I think Bahama Blue may be my new favorite, and Cabbage sounds awful but it's a really nice, useful green.  The intro to the sew along included a coloring page, so I planned out the colors of the block frames in advance.  I wish that I had planned the use of the fabric colors for the blocks too, but I wasn't thinking that far ahead.


I'm thinking of calling this the California quilt. Look at those prints!  Don't they just scream sunshine and beaches?  I really am looking forward to getting this all quilted up in the dead of winter when it's hard to remember what warm weather feels like.

Speaking of warm weather-- there is a major humanitarian crisis in Puerto Rico right now in the wake of hurricanes Jose and Maria.  I've been to that beautiful island, and it is magnificent.  It hurts my heart to see it in such terrible straits.  Many of the places we enjoyed while we were there have been completely destroyed. If you are so inclined, please consider making a donation to help those warm, wonderful Americans rebuild their lives. HERE is a good list of reputable places to donate if you need it.  Thanks for considering a donation. They could certainly use all the help they can get.

Okay, enough of the soapbox! Hope everyone has a great weekend.  It's actually supposed to cool off some and you know what that means-- yard work.  Hope you have something happier planned!

Sharing at Confessions of a Fabric Addict, Finished or Not Friday, and crazymomquilts.

Wednesday, September 27, 2017

Construction continues

Hi all, and welcome to the last week of September.  How did that happen?  I had a great birthday celebration last weekend, and the only part you're really interested in is that I got to go fabric shopping with Nancy from Pugmom Quilts.  It was so fun!  I think we hit 5 shops up in Lancaster County, PA.  I spent way too much money but got some great fabrics.  We did take a selfie, but I looked terrible in it, so I'm not posting it.  In my defense, it was a long day.  But a great one!  Thanks Nancy!

This week I've been working some more on the construction of my "barn" quilt.  Here's where I am now:


It doesn't look like much, but it's big progress for me.  All of this represents a lot of trial and error on my part.  I got a couple of different fabrics to try this weekend and ended up using a butterscotch batik for the sandstone around the doors.  It blends better in person than it appears in the picture. 


First, I made another set of doors, which gave me the opportunity to add in some gray at the bottom for a little of the porch, most of which will be added in later.  Then I spent quite a bit of time making the curved section at the top.  All of those are straight seams, but it definitely looks curved, which I consider a win.  I'm not sure I'm really happy with this and I may tweak it so more.


The hardest part of this project is not the actual sewing, but figuring out the proportions without measurements.  To figure this out, I mostly just laid pieces on top of each other until I got something that looked good.  I tried to cut everything really generously to give myself room.  That did mean that I did a lot of cutting down, though.  I'm trying hard to stick to the process outlined in Julie's book and so far it seems to be working out.  You know I'm going to fuss with this some more, though, right?


The next step for this is to make some side pieces to mimic the stones at the sides of the chapel.  If you look, you can see that this is a subtle feature, but one that I want to preserve. I think I'm going to have to make a strip set with another fabric that is very close to the chapel fabric, and then rely on the quilting to make the "stones" stand out even more.  Then comes the top part of the chapel and the roofline, and then landscaping.  Progress!

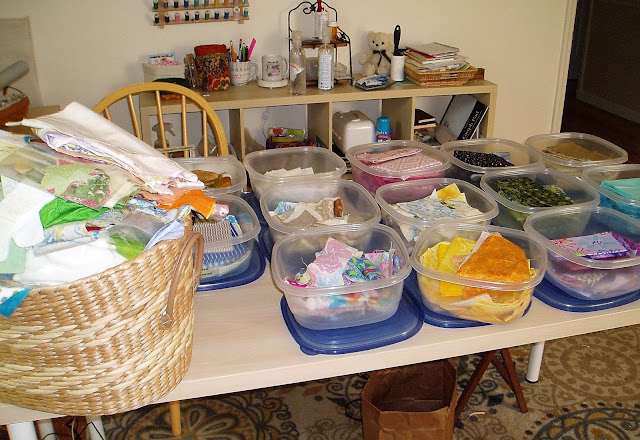
Wow, this is a pretty monochromatic post, isn't it?  Well, here's the other thing I accomplished so far this week--I finally got around to sorting the basket of scraps:


Yep, that was pretty full.  Very few beiges, which made for a colorful afternoon.  Looks like it's time for a yellow quilt, doesn't it?

Hope everyone is having a good week! 

Sharing at Let's Bee Social and Oh Scrap!

Friday, September 22, 2017

Intricately finished

Hi all, and happy first day of fall! Where we live, it feels more like summer has made a return with a vengeance, at least in terms of the temperature.  It's supposed to be 90 degrees this weekend!  I don't know what's happening any more.  I went out walking last night and nearly sweated through my shirt.  It could be worse--it could be about 80 degrees colder.  That's coming down the road, I'm sure.

The happiest thing I did this week is finally, finally finish off the It's Complicated quilt, and I'm doing a happy dance because I'm so thrilled with how it turned out:


Wouldn't you do a happy dance, too?  I am so, so happy to finally have this done. Didn't it turn out great?


This quilt is the final finish from my 2016 Intricate Stitches quilt along, which followed the colors of the Rainbow Scrap Challenge to make one block per month, finished off with the center star.  All of the block patterns--including the pattern for the center star--are still available on the tab at the top of this page.  They have a lot of pieces, and they take a little time, but they are all make-able and each one of them would make a great quilt on it's own.


I made my quilt with all hand-dyed fabrics that I purchased from Vicki Welsh's shop in the RSC colors. The fabrics were fantastic and easy to work with.  And not a single one of them ran when I washed the quilt!  The white sashing and the blue frames and binding are Kona cottons, which coordinated perfectly with the hand dyes.


It's Complicated was quilted by Alycia of Alyciaquilts.  She did an amazing job.  The quilting is a mix of modern and traditional, kind of like the quilt.  Each of the blocks has a great feather wreath that extends all the way into the corners of the block:


and the quilting on the center star is also feathers, which completely look like they're spinning into the star points:


I'm in awe.  There are also some pebbles and other swirls as well as some echo quilting in the border.  The quilting really, really enhanced this quilt and I just love it.  Thanks Alycia!


I feel like this is the best quilt I've ever made.  Okay, I usually feel that way when I finish a quilt, but I really, really love this one.  And I'm pretty proud of it, too.


So that's my quilt, with way too many pictures!  Hope everyone has a good weekend!  This weekend is my birthday, so I have a lot of fun plans, including some fabric shopping with a friend.  Hope yours turns out great, too!

Sharing at Finished or Not Friday, Confessions of a Fabric Addict, crazymomquilts, and soscrappy for the RSC.

Wednesday, September 20, 2017

Quilt festival

Hi everyone!  Today I am showcasing one of my favorite quilts ever as my entry for Blogger's Quilt Festival over at Amy's Creative Side.  Some of you may remember it, but for those of you who are new here--welcome, and I hope you enjoy the quilt!

Here is my entry:


This is the quilt that I made for my daughter and her husband to celebrate their wedding.  I know I should call this the Wedding Quilt, but I think of it as the Happiness Quilt.


This quilt was made from the Eureka pattern by Jackie Robinson at Animas Quilts.  The pattern is terrific and the construction is easy, but this quilt took me forever.  Literally hundreds of hours in this, but it was worth every minute.


The Happiness Quilt was quilted by Alycia, who did a fantastic job.  The batting is a cotton and wool blend that is very light because the top itself was so heavy because of all the seams.  I made the full/queen size, which turns out to be very generously sized.  I think it would probably even fit a king nicely.  The fabrics are all Hoffman batiks from the 1895 lines, which are essentially batik solids.  I think they give a nice texture to the quilt without overpowering the lovely pattern.


My daughter and her husband loved the quilt, and put it on their bed immediately.  I've seen it there and it looks terrific, if I do say so myself.  The room is pretty much decorated around the colors in the quilt, which they chose. I hope they love it for many years to come and that it reflects just a bit of their happiness.

Thanks for stopping by! Hope you've enjoyed seeing this quilt again as much as I have.  It truly is one of my favorites ever.  Settle in with a nice beverage and hop on over to the festival to see even more beauties from all over the web.


Sharing at Blogger's Quilt Festival at Amy's Creative Side.

Tuesday, September 19, 2017

Beginning to build

Hi everyone! How is your week going?  So far, it's yet another busy week around here.  To top everything, the hubs had some serious dental work this morning, but the wifi in the waiting room was not good for writing a blog post, which is what I had planned to do while waiting.  In fact, it was not good for much, so I had a totally unproductive time and learned waaay too much about various celebrities from the magazines they had.  (Who dresses them? Seriously.)  He came out fine, but a little loopy.

After all that, I have a new project to share today.  For some time I've been planning to build a free-pieced barn, as detailed in Julie Sefton's great book Build a Barn, No Pattern Construction.  Those quilts are awesome!  My problem is that I don't like barns.  But I do like churches, and I'm especially fond of this little chapel:


This is the Joan of Arc Chapel on the campus of Marquette University.  It has a great backstory--originally built in France in the 15th century,  it was eventually deconstructed and shipped to the US, and later made its way to the Marquette campus in the 1960s.  It's still used daily for Mass and is one of the oldest buildings in continuous use in the US.  It's also really charming inside.  You can read more about it HERE, plus see pictures of the reconstruction process.

This little chapel (and it is pretty small) really means a lot to me in a lot of ways. I have this picture framed and in my office so that I can see it every day. Besides the sentimental attachment, it also looks like a good candidate for a first foray into free-pieced construction--it's simple, with clean lines and few details, but is interesting enough to make a fun quilt. There are also literally hundreds of pictures of it from every angle on the Internet. Maybe I'll try flying buttresses another time, but for now this looks like a good bet.

Here are the fabrics that I pulled for this project:


Most of these did not work at all once I started, though the flowers will be very helpful.  Julie says to start with a detail, and don't start too small, so I started with the doors.  First I put a little tiny black strip in between two brown ones to make two doors:


The doors on the chapel are pretty tall, so I made this longer than necessary.  The next step was to add the batik for the stonework around the doorway.  If you look closely, you'll see that the tops of the doors are slightly rounded, so I added small triangles to the top edges to round them off:

The triangle should go under the strip, not over it.

Yeah, that was a bonehead move.  I ripped it and fixed it, then added the strips to the top and sides, then trimmed the bottom to the correct size for the piece. So far, this measures about 9 by 10.  I left the sides and top wide to give myself room to get the proportions right when I add the top and sides of the chapel.


And this is where my project stalled for a bit.  I realized that the fabric that I chose for the body of the chapel doesn't contrast enough with the stonework fabric.  It looked fine when I bought it and when I put them together, but now that the doors are stitched I just don't like it. The next step is to add the trianglular pieces above the doors, but I can't do that until I figure out the main fabric.


I'll either have to find a lighter color for the main part of the chapel or something weightier for the stonework.  Actually, I'm thinking of using the current stonework fabric for the body and getting something else for the stonework.  I'll take the door piece with me when I go shopping and see if I can work it out.  I happen to have a plan to shop with a friend this weekend, so by next week I should be back to building.

Overall, I'm pretty happy with this, fabric choices aside.  It was not as hard as I thought it would be, though there are some things to still work out.  I have high hopes!  At least until I get to the steeple. . .

Hope everyone is having a great week!

Sharing at Linky Tuesday and Let's Bee Social.

Wednesday, September 13, 2017

Free as a bird

Hi all! I hope your week is going well, and I hope anyone who was in the hurricane zone made it through okay.  My son's mother-in-law lives in Ft. Myers, but luckily she was able to get out and spend the week playing with our grandson.  I understand her house and car are both intact, but there is no power yet, so she's staying away a few more days.  Given the choice, I think I'd take hot showers and a tiny boy to play with, too.

I've been doing something really exciting-- I made some birds!  Okay, I made two birds:


Aren't they darling?  I used Lynne's Liberated Birds Tutorial as a guide for these.  If you haven't checked out her blog lately, Lynne is in the process of making another quilt with a lot of birds.  It's very fun.  And Preeti made a really great bird quilt not too long ago, too.  Who wouldn't want to join in the fun?

The birds are very easy to make, but first you have to relax and just be determined to try a few new things.  This was the hardest part for me.  In her tutorial, Lynne says several times some variation of "decide what you want to do here."  Yikes!  This was hard for someone like me who spends so much time trying to be precise.  But I think I conquered it well enough, and I have some ideas for some other things to try on some other birds.


I wanted to make one bird facing each direction, and I didn't really think about basing the birds on any particular inspiration other than fabric that looks bird-like, but once I finished them I realized that these are pretty much me and the hubs!  At the very least, one is definitely female and the other male.  I'll have to ask my kids for an opinion on this one.

I'm sure there are more birds in my future (with some shorter legs), but I another reason I wanted to make the birds was as a sort of "warm up" for some more free piecing.  I am finally going to build a "barn," based on Julie Sefton's book about free-pieced barns.  I'm not that into barns, but there is at least one other building that I'm very fond of and plan to make a quilt from.  Here are the fabrics I've pulled:


Can't wait to get started on this, which I have put off way too many times.  I think I've been afraid of it, but I'm finally jumping into it.  And something is clearly wrong with me, because I've also got a plan for a free-pieced letters quilt, which I've already started working on.  What is happening?  Perhaps I'm rebelling against too much structure in my life?  Maybe, but if it comes with these cute birds, it can't be all bad, right?

That's the update from here!  I hope you're having a good, productive week.  If not, try making a few birds. They'll cheer you right up!

One last thing--does anyone have any of this fabric that they'd be willing to part with?


It's pretty old, from maybe 2010?, but I only need a fat quarter to finish off a project for my daughter. I would definitely pay you for it, and you would have my undying gratitude!

Sharing at Let's Bee Social.

Friday, September 8, 2017

Fall is on the table

Hi everyone!  I have some bad news for all of us--summer is over.  I know!  I'm not happy about it either.  How did that happen? I still have summer things to do!  Around here, it's like someone has flipped a switch.  All of a sudden the temps have fallen into the 60s and low 70s, and I got stuck behind a school bus this week. I hope fall lasts a long time, because we all know what comes next, right?

This week I finally quilted up a table runner that I made almost two years ago from some scraps left over from another project:


Yep, that's a fall-like picture!  It's a little early for mums, but I think they're very festive.  They certainly dress up the deck now that the geraniums have had it.


This table runner is based on Amanda Nyberg's pattern Bright Birch Trees.  I used the bargello scraps as the trees (obviously) and then just pieced the blocks side by side instead of into a quilt.  I think I managed to get 5 blocks plus a half block out of the scraps and I put them all into this runner.

This made for a pretty long runner!  This finished at about 82 by 13, which is long and skinny but works great for my table:


I quilted this up using the walking foot and just echoing the lines of the "trees."  Some of the lines crossed, but it turned out okay.  There's only one little wrinkle in the quilting, and I think that's because I forgot to reverse directions when quilting the parallel lines.  I didn't fuss over the wrinkle and I think it will disappear once I wash it a few times.  Because it's so long, though, the quilting took a while.  There were no threads to bury because all the lines went all the way across, so that was a nice bonus.


I finished this with a purple and gold batik for the machine binding.  I do love binding it all by machine. Now that I've done it several times I've got the hang of it, and it goes so fast!  You have to love it when binding doesn't take a lot of time.  You still have to piece it together, but there's no hand stitching to eat up the hours.

So that was my big finish for the week!  I'm pretty happy with how it turned out, and it does look good on the table.  Good thing it turned out so long, huh? 


Everyone have a great weekend. Florida friends, stay safe!  We'll all be praying for Irma to make a sharp right turn and pass you by.

Sharing at Finished or Not Friday, Confessions of a Fabric Addict, crazymomquilts, and Oh, Scrap!.

Tuesday, September 5, 2017

Constellations--Orange

Hi everyone, and welcome back again to the Constellations quilt!  We are starting the last part of the quilt today, can you believe it? This month's color is orange.  Orange can be a difficult color to use, but I think we've solved that problem with this month's block.  Here she is:


This block is called Robbing Peter to Pay Paul, which I find highly amusing since I have brothers named Peter and Paul (and several others, too!)  This is a Ladies' Art Company block from 1895.  For my block, I used the orange with a pale yellow green print for an accent.  You could use any color for the accent, or you could use the background in place of the accent, which would give you a very open and airy block.

This block is very easy to piece and goes fairly quickly, so let's get started!

Cutting:


Pieces marked with a * can be oversized if that's something you do.

From the background, cut:

4 2-1/2 inch squares
1 5-1/4 inch square*
1 5-3/4 inch square*

From the orange:

1 4-1/2 inch square
1 5-3/4 inch square*
4 2-7/8 inch squares*
2 2-7/8 inch squares*

From the accent:

2 2-7/8 inch squares*
4 2-1/2 by 4-1/2 inch rectangles

To complete this quilt section, cut from the background:

1 2-1/2 by 12-1/2 inch strip
1 2-1/2 by 14-1/2 inch strip

Construction:

You know how this goes-- first we make a bunch of units, then we put them together into a beautiful block.  Let's start with the flying geese.  Use the 5-1/4 inch square of the background and the orange 2-7/8 inch squares to make fast flying geese:


Your geese should measure 2-1/2 by 4-1/2.


Next, use the 5-3/4 inch squares of the background and the orange to make 8 half square triangles using the Magic 8 method.  These should measure 2-1/2 inches square.


Use the 2-7/8 inch squares of the orange and the accent color to make 4 half square triangles the old fashioned way.  These should also measure 2-1/2 inches square.

That's the end of the units!  Let's put this block together!

Assembly:

First, join the flying geese and the 2-1/2 by 4-1/2 accent rectangles as shown:


Press to the accent rectangle.

Next, make the corners.  Use the orange and background hsts, the orange and accent hsts, and the 2-1/2 inch background squares and lay them out as shown:


Make sure the orange triangles "kiss" in the middle and that the orange/accent hsts are correctly oriented.  Stitch together into a 4-patch, pressing to the orange hsts.

Time to put it all together! Lay out your parts and pieces as shown, including the 4-1/2 inch orange center square:


Join the pieces into rows and the rows into a completed block.  Your block should measure 12-1/2 inches square to finish at 12 inches in the quilt.  Give it a good press, stand back, and admire!

Is that a great-looking block or what?  I think a whole quilt made from this block would look great.  But it's a part of our larger quilt, so let's go finish putting this quilt section together--

Completing this quilt section:

This section is really simple.  Add the 2-1/2 inch by 12-1/2  background strip to the right side of the block.  Press well, then add the 2-1/2 by 14-1/2 inch strip to the bottom of the block.  Press well and admire!


This section is the first part of the final row of the quilt.  If you have come this far, the quilt center is 80% finished!  The big finish to our quilt is in sight.  Come back on October 3 for the next-to-last section of this quilt!


Sharing at Linky Tuesday, Let's Bee Social, and soscrappy for RSC 17.

Sunday, September 3, 2017

Stocking the shelves

Hi everyone!  Wow, it has been a crazy few days here!  There has been too much to do and not nearly enough time to do it.  I just tried compressing everything into the time allotted, but that meant there has been very little time to sew.  It's all calming down now, though, so I'm really crossing my fingers about getting back to the regular routine this coming week.  I need my schedule not to be messed up!

While I had no real time to sew, I did do a little fabric shopping.  It happens that I had to go to the Amish butcher shop to replenish our freezer for the next couple of months, and wouldn't you know--there's a fabric store right around the corner!  Who put that there?  You know I had to go in, and I ended up getting some treasures.  Really, I had to.  Take a look at this:


That is actual room on the fabric shelves!  I had to fill in those gaps, didn't I?  (I knew you would understand.)

The first treasures I have are these two pieces of yardage:


Pretty, right?  It's 61 degrees and absolutely pouring outside, so we are stuck with indoor pictures, but these are really pretty in person.  The blue on the bottom is Town and Country Blue by Pepper Cory for Studio e fabrics.  I got the end of this bolt because I just couldn't leave a little half-yard piece behind.  The top fabric is from Koala Party by Swizzle Stick Studio for Studio e, and it feels really great, like really good sheets.

I also picked up a couple of yards each of these colorful pieces:


Don't those just look happy?  The orange polka dot is from Timeless Treasures and is exactly the color of a perfect cantaloupe.  I wish I had gotten more of it.  The blue on the left is Quartz by P&B Textiles.  It came in several colors but I thought this blue was the prettiest.  The pink at the top is more coral than it shows in the photo, and the selvage has no information at all!  I really don't like that, so you?  I wish there was at least a manufacturer, but no such luck. I had better luck with the green on the right, which is Droplets from Up and Away by Emily Herrick Designs for Michael Miller.  (That's a mouthful!)

After I picked out those beauties, I found a piece called Origami Birds by Sarah Campbell for Michael Miller in the "remnants" bin.  This was a happy accident, because look how great it looks with the other fabrics:


Serendipity!  This piece has a date of 2015 on it, so I feel really lucky.

That was all I found at the fabric store, but I recently got a few other pieces online, including these two pieces of Alison Glass fabric:


The darker yardage on the bottom came from Bernie at Needle and Foot, and the more aqua color on top came from the Old Country Store website.  I had a specific project in mind for these, but neither one turned out to be the right color, so they are going on the shelf.  I'm sure they'll get used for something.

Anyway, that was my interaction with fabric this week!  I promise to get back to our regularly-scheduled programming very soon.  The last week in August always seems to mess me up.  I wonder why?

Have a safe and happy Labor Day!  Squeeze in one more picnic if you can!

Sharing at Molli Sparkles for Sunday Stash.